Initial Data Imports
Import Order
The initial imports must be performed in the following order:
| Step | Content | Description |
|---|---|---|
| 1 | List of values | To import a value dictionary used for "Single choice selection list" or "Multiple choice selection list" type attributes. |
| 2 | Classifications | To create the hierarchy used to organize your content (e.g., ERP categories). |
| 3 | Documents (without variants) | To import documents and their information stored as attributes, as well as their position in the classification. |
| 4 | Documents (with variants) | Import information about documents and variants stored as attributes, as well as the position of the document in the classification. |
| 5 | Assets | To create assets using a URL and add information to them using attributes. |
| 6 | Links | To create a link between objects already created or imported in the database: Link between a document and an asset, Link between a variant and an asset, Link between two different documents. You can also add information to the links as attributes. |
After the initial imports, your content can be imported in any order.
Import Process
For your first import into an empty PIM, select Start an Import from the Data Flow sidebar menu and complete the following sections:
Import Identity
This section allows you to define the import and its settings.

Enter the following information:
| Information | Description | Mandatory |
|---|---|---|
| Select a profile | Select No profile. | Yes |
| Object Type | The type of content the profile will import. Possible values: Assets, Classification, Document (when selected, a mandatory option to specify the type of document appears), Links (when selected, a mandatory option to specify the type of document appears), List of values, Variants | Yes |
| Languages | The data language to import. Note: Only content in the designated language(s) will be imported. | Yes |
| Empty cell action | Defines the action to take if empty cells are encountered during the import operation. Possible values: Ignore (Empty cells in the import file are disregarded and any existing content remains unchanged), Replace (Empty cells in the import file overwrites any existing content. Note: It's recommended to complete the columns with the correct values in order to avoid unintended consequences) | Yes |
| Save as profile | Import settings are not saved by default. Click the slide button to save the settings as a profile. When enabled, an entry area for the profile's name appears. | No |
Import File Format
Files can only be imported one at a time. Large files (100+ columns) may impact performance during the import.
This section is used to specify the format and parameters (if any) of your import file. Two options are available:
| XLSX | 
| 🚧 Note: Mapping is required for .xlsx imports. | ||||||||||||||||||||||||||||||
CSV (default) | 
| 👍 Note: Mapping is optional for .csv imports. |
File Source
This section allows you to specify the source (current location) of your import file.

You can click on the slide button to select between the following two options:
| Local | The import file is on the computer you are using. You can drag and drop the file directly into the drop area or click the Browse button to search your computer's file directory and select a file to import. | |||||||||||||||
| Remote | The import file is on a remote server.  Enter the following information:
|
Once an import file is selected, a check is immediately performed to verify that the file is readable and corresponds to the specified parameters.
 |  |
When the check is completed, you can analyze your file via the Analyze My File link (CSV files only), or immediately start your import. The column headings in the import file are presumed to correspond to the content in your Quable PIM. If they do not, you should enable Mapping (see below).
Mapping
The section allows you to specify which columns of your import file correspond to the content in your Quable PIM.
 | ⚠️ Note: When mapping is enabled, only the mapped columns are taken into account and imported. |
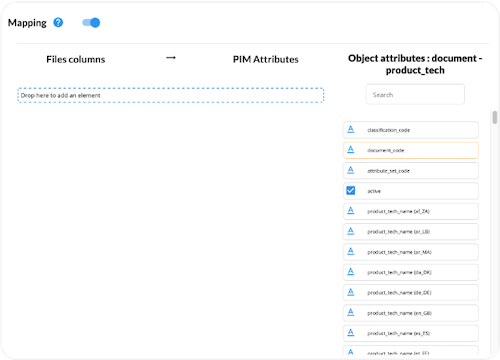
Enabling the mapping option expands the section:

The expanded section is divided into three columns:
- File Columns - This column is used to identify columns in your import file.
- PIM Attributes - This column is used to designate the PIM attribute that corresponds to the file column.
- Object Attributes - The column contains all of the available attributes for the selected object type.
To map your import file to your Quable PIM content, select attributes from the Object Attributes column and drag / drop them into the area below File Columns → PIM Attributes.
 | 🚧 Note: Object Attributes outlined in orange are mandatory. An import can't be started if they're not selected. All of the columns in your import file must be mapped to PIM attributes. |
You can modify the titles of the attributes under File Columns so that they correspond to the titles of the columns of your import file.
Updated 5 months ago
