Assets
Enhance your documents with a built-in DAM!
Documents may be the stars, but assets are what really make them shine! They bring your content to life via visuals, videos, 3D/360° immersive images, etc.

Accessing Assets
There are several ways to access your Quable PIM assets, the most common are:
- Advanced Search,
- the Assets tab of a document, and
- the Assets page (via the Data menu).
Formats
Quable PIM accepts many file formats. The following is a table of the most common formats (non exhaustive).
| Media | Supported formats | Preview image |
|---|---|---|
| Images | .png, .jpg / .jpeg, .webp, .bmp, .gif, .tif / .tiff, .pdf |
|
| Videos | .avi, .mp4 | Online playback, icon displayed instead of thumbnail |
| Other | .pptx, .doc / .docx, .xls / .xlsx, .eps, .psd, .indd, .txt, .csv, .zip, .rar, .xml | Icon displayed instead of thumbnail |
LimitationsMaximum Asset Size: 1 Gb
Maximum Pixel Size (for generating preview images): 75 MPX
Assets Page
The Assets page is where you can create and manage your Quable PIM asset classifications. The page includes:
- your classification hierarchy,
- a button to add classifications or assets,
- options to edit or delete classifications, and
- options to control the asset display.

The page is divided into two panels:

| Left Panel | Right Panel |
|---|---|
The Left panel displays your classification hierarchy in a list that can be expanded and collasped via the arrows ( > ) next to them. The list can be expanded until the lowest classification level is displayed. Expanding a classification level displays the contents of that classification level in the Right panel. When you click on the lowest level, the classification's assets are displayed in the Right panel. You can collapse the Left panel by clicking on the left arrow ( < ) in the upper right corner. The right arrow ( > ) is displayed to allow you to expand the panel again. | Once a classification has been selected in the Left panel, the contents of the selected classification are displayed in the Right panel. You can navigate to lower classification levels by clicking on the classification in either the Left or Right panel. Once the lowest classification level has been selected, the classification's assets are displayed. |
Asset Display
Once you've reached the lowest level of a classification, there are two ways to view your assets:
- Gallery view - Assets are represented in columns with their titles and format. You can activate gallery view by clicking the Gallery icon next to the Add button.

Hovering over an asset reveals buttons to Edit, Download or Delete the asset.
 |
PDF and video assets include a Preview icon. (Use the ESC button to close the preview)
- Table view - (default view) Assets are displayed in table rows. You can activate table view by clicking the crossed out Gallery icon next to the Add button.

| When table view is used, the Columns button allows you to specify which columns to display. By default, the Thumbnail, Name, Size, and Asset Type columns are enabled. You can enable or disable individual columns by clicking the slide switch next to them. To enable or disable all columns, click the Show All or Hide All options. You can search for a specific column by entering its title in the search bar. The list will display fewer and fewer results as you continue to enter text in the search bar until nothing matches. | |||
 | |||
| Table view also allows you to click directly on a column header to change the list sort order and display an arrow to indicate which column and direction the list is sorted on or access a columns submenu to sort and select the columns displayed. | |||
New Classifications
To create a new classification, select the DAM classification level (the highest level) and click the + Classification button. A dialog is displayed to define the new classification:

Enter the following information:
| Information | Description | Mandatory |
|---|---|---|
| Name | The name of the classification. | Yes |
| Code | This is automatically generated by Quable PIM when you click in the Code entry area. This is only editable during creation of the classification. Once the classification has been created, it can no longer be modified. | Yes |
Once you have entered all of the information for the new classification, click the Add button to save your changes or the Close button to return to the Assets page without saving the new classification.
New Sub-Classifications
To create a new sub-classification, select a "parent" classification. A list is displayed of its "children" (sub-classifcations). Continue navigating through the classifications until you're within the desired parent classification. Once you've located the level for the new sub-classification, repeat the process for New Classifications.
Assets can only be added to the lowest classification level.
If a classification:
- already contains assets, sub-classifications can not be added.
- does not contain assets, sub-classifications can be added.
It is not possible to create sub-classifications under the dam_sort classification, as it is used to associate newly added media that do not yet have a classification (for example, when adding a new media file to a document).
Edit Classifications
To modify a classification, navigate through the classifications until you're within the desired parent classification. Once you've located the desired level click the Edit icon (next to the classification title, above the Right panel).
The classification's page is displayed. When you've finished editing the classification, click the Apply button to save your changes or the Back button to return to abort the modification.
Delete Classifications
To delete a classification, navigate through the classifications until you're within the desired parent classification. Once you've located the desired level click the More actions (...) option next to the + Classification button and select Delete classification.
Add New Assets
You can add new assets to your classifications from the Assets page or you can add an asset to a document via its Asset tab. These options are described in the following sections.
Because assets are associated with documents via links, you must have the following cross-reference permissions to manage them: Create - Update - Delete
From Assets Page
The Assets page provides two ways to add assets:
- Drag and Drop - Select a classification, then drag one or more assets into the drop area in the Right panel.

- + Upload button - Select a classification, then click the + Upload button. A window opens where you can select assets from your computer / network.
In both cases, the files are immediately added to the selected classification and a status indicator is displayed. Clicking on the status indicator opens a window showing the status of each uploaded asset.

If the asset addition status is:
- Running - Clicking Reduce closes the window and returns to the status indicator. Clicking Abort All stops the addition of the assets and closes the window and the status indicator.
- Success or Failed - Clicking Reduce closes the window and returns to the status indicator. Clicking Abort All closes the window and the status indicator.
From Product Sheet
To add an asset from a document, open its Asset tab . From here, select a section (link) and:
-
perform a quick search by entering at least three characters of an existing asset's Name or Code in the section's search bar. A scrollable list of assets is automatically displayed from which you can make a selection.
-
click the + Upload a New Asset button. A window is displayed so you can browse your computer / network and select one or more assets to import en masse.

Checking the Overwrite files with the same name option replaces any existing assets that have the same name as a new asset.
Click the Start button to add the asset(s), the Remove All button to clear the list, or the Close button to abort the addition of the new asset(s).
In both case, the asset(s) are automatically associated with the document.
LimitationsThe maximum length of a asset file name cannot exceed 100 characters. The asset file name will be automatically truncated of the excess characters, if any.
From a link : External Assets
External assets allow you to add images, videos, or any other type of asset hosted online into the PIM via a secure public link (HTTPS). External assets can be used to illustrate:
- product sheets or variants,
- classifications,
ImportantThe link to the external asset must be:
- HTTPS only,
- public (no login or password, no VPN),
- directly accessible.
When creating an external asset, fill in the following fields:
- Asset URL (mandatory – must use HTTPS),
- Asset name (mandatory),
- Custom thumbnail URL (optional but recommended – must use HTTPS).
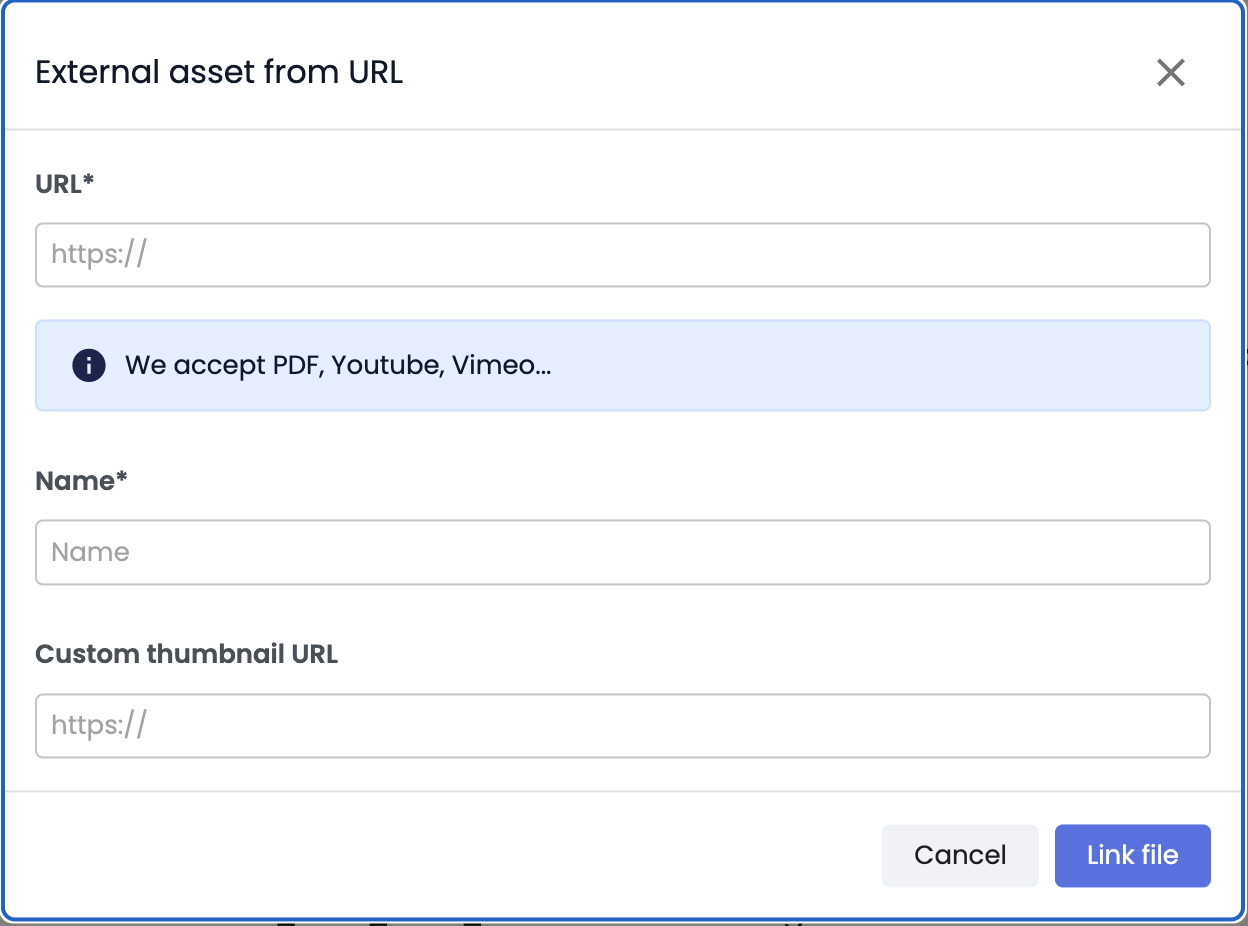
- Click on Link file.
⚠️ A notification is displayed to confirm the asset creation.

Good to know
- Custom thumbnails:
- They help speed up loading, especially for videos or large files, particularly in advanced search results.
- Custom thumbnails take precedence over the original visual.
- For videos, the custom thumbnail is displayed directly.
Limitations
- User permissions for external assets are the same as for assets imported directly into the DAM.
- Bulk download of external assets is not possible since they are not stored in the DAM.
Importing external assets
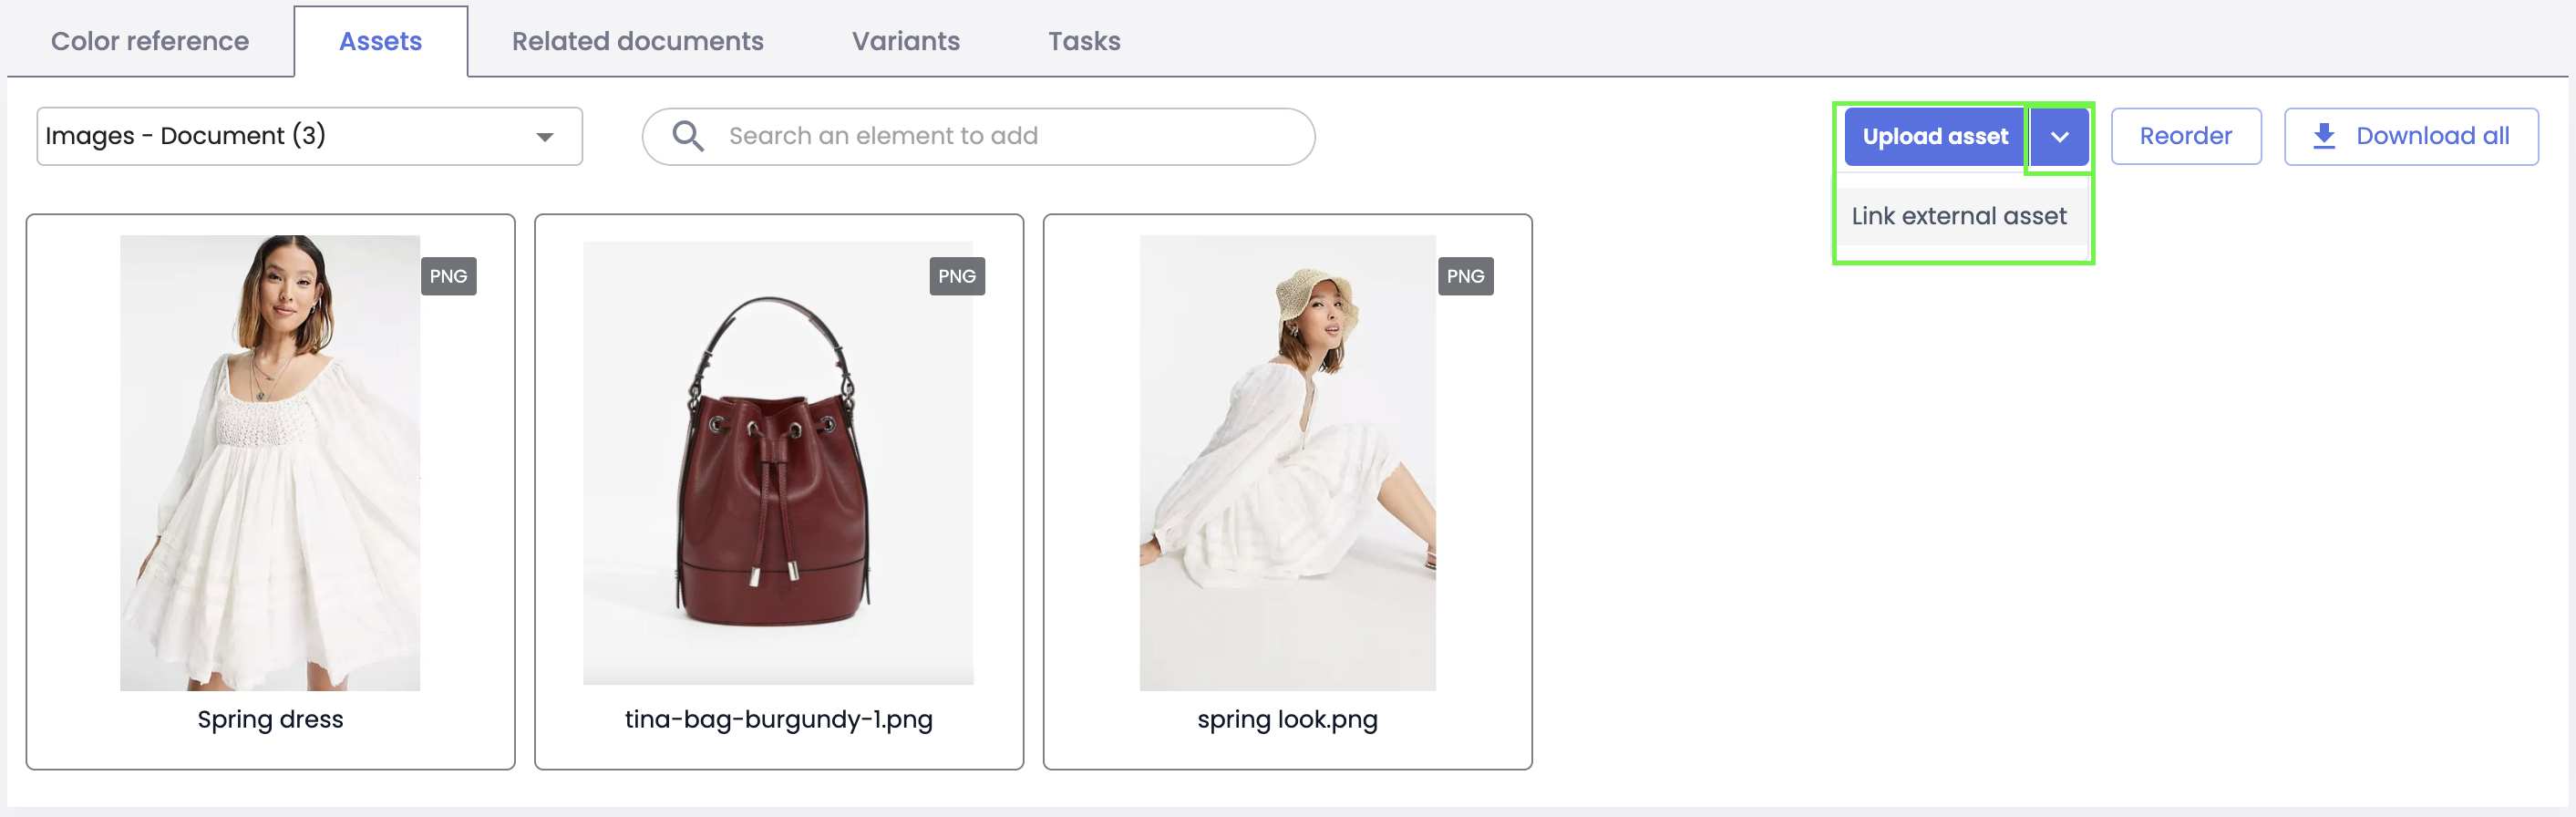
From a product or variant sheet
Go to the Assets tab, then click the arrow next to the Upload asset button. Select Link external asset.
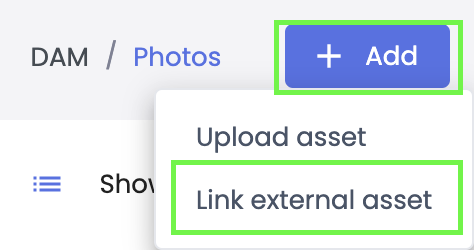
From the DAM
Go to the DAM page where you want to add the external asset. Click on +Add and select Link external asset.
Bulk import of external assets
From the data flows:
External assets can be bulk imported via an import file from data flows, by uploading a file containing the URLs (HTTPS only).
From the API:
Good to knowWhen creating an external asset, the system checks file accessibility via an HTTP GET request with the header
User-Agent: "Quable PIM". A200 OKresponse is required. If the server returns an error (e.g.,403due to SSL certificate restrictions), the media will be considered invalid.
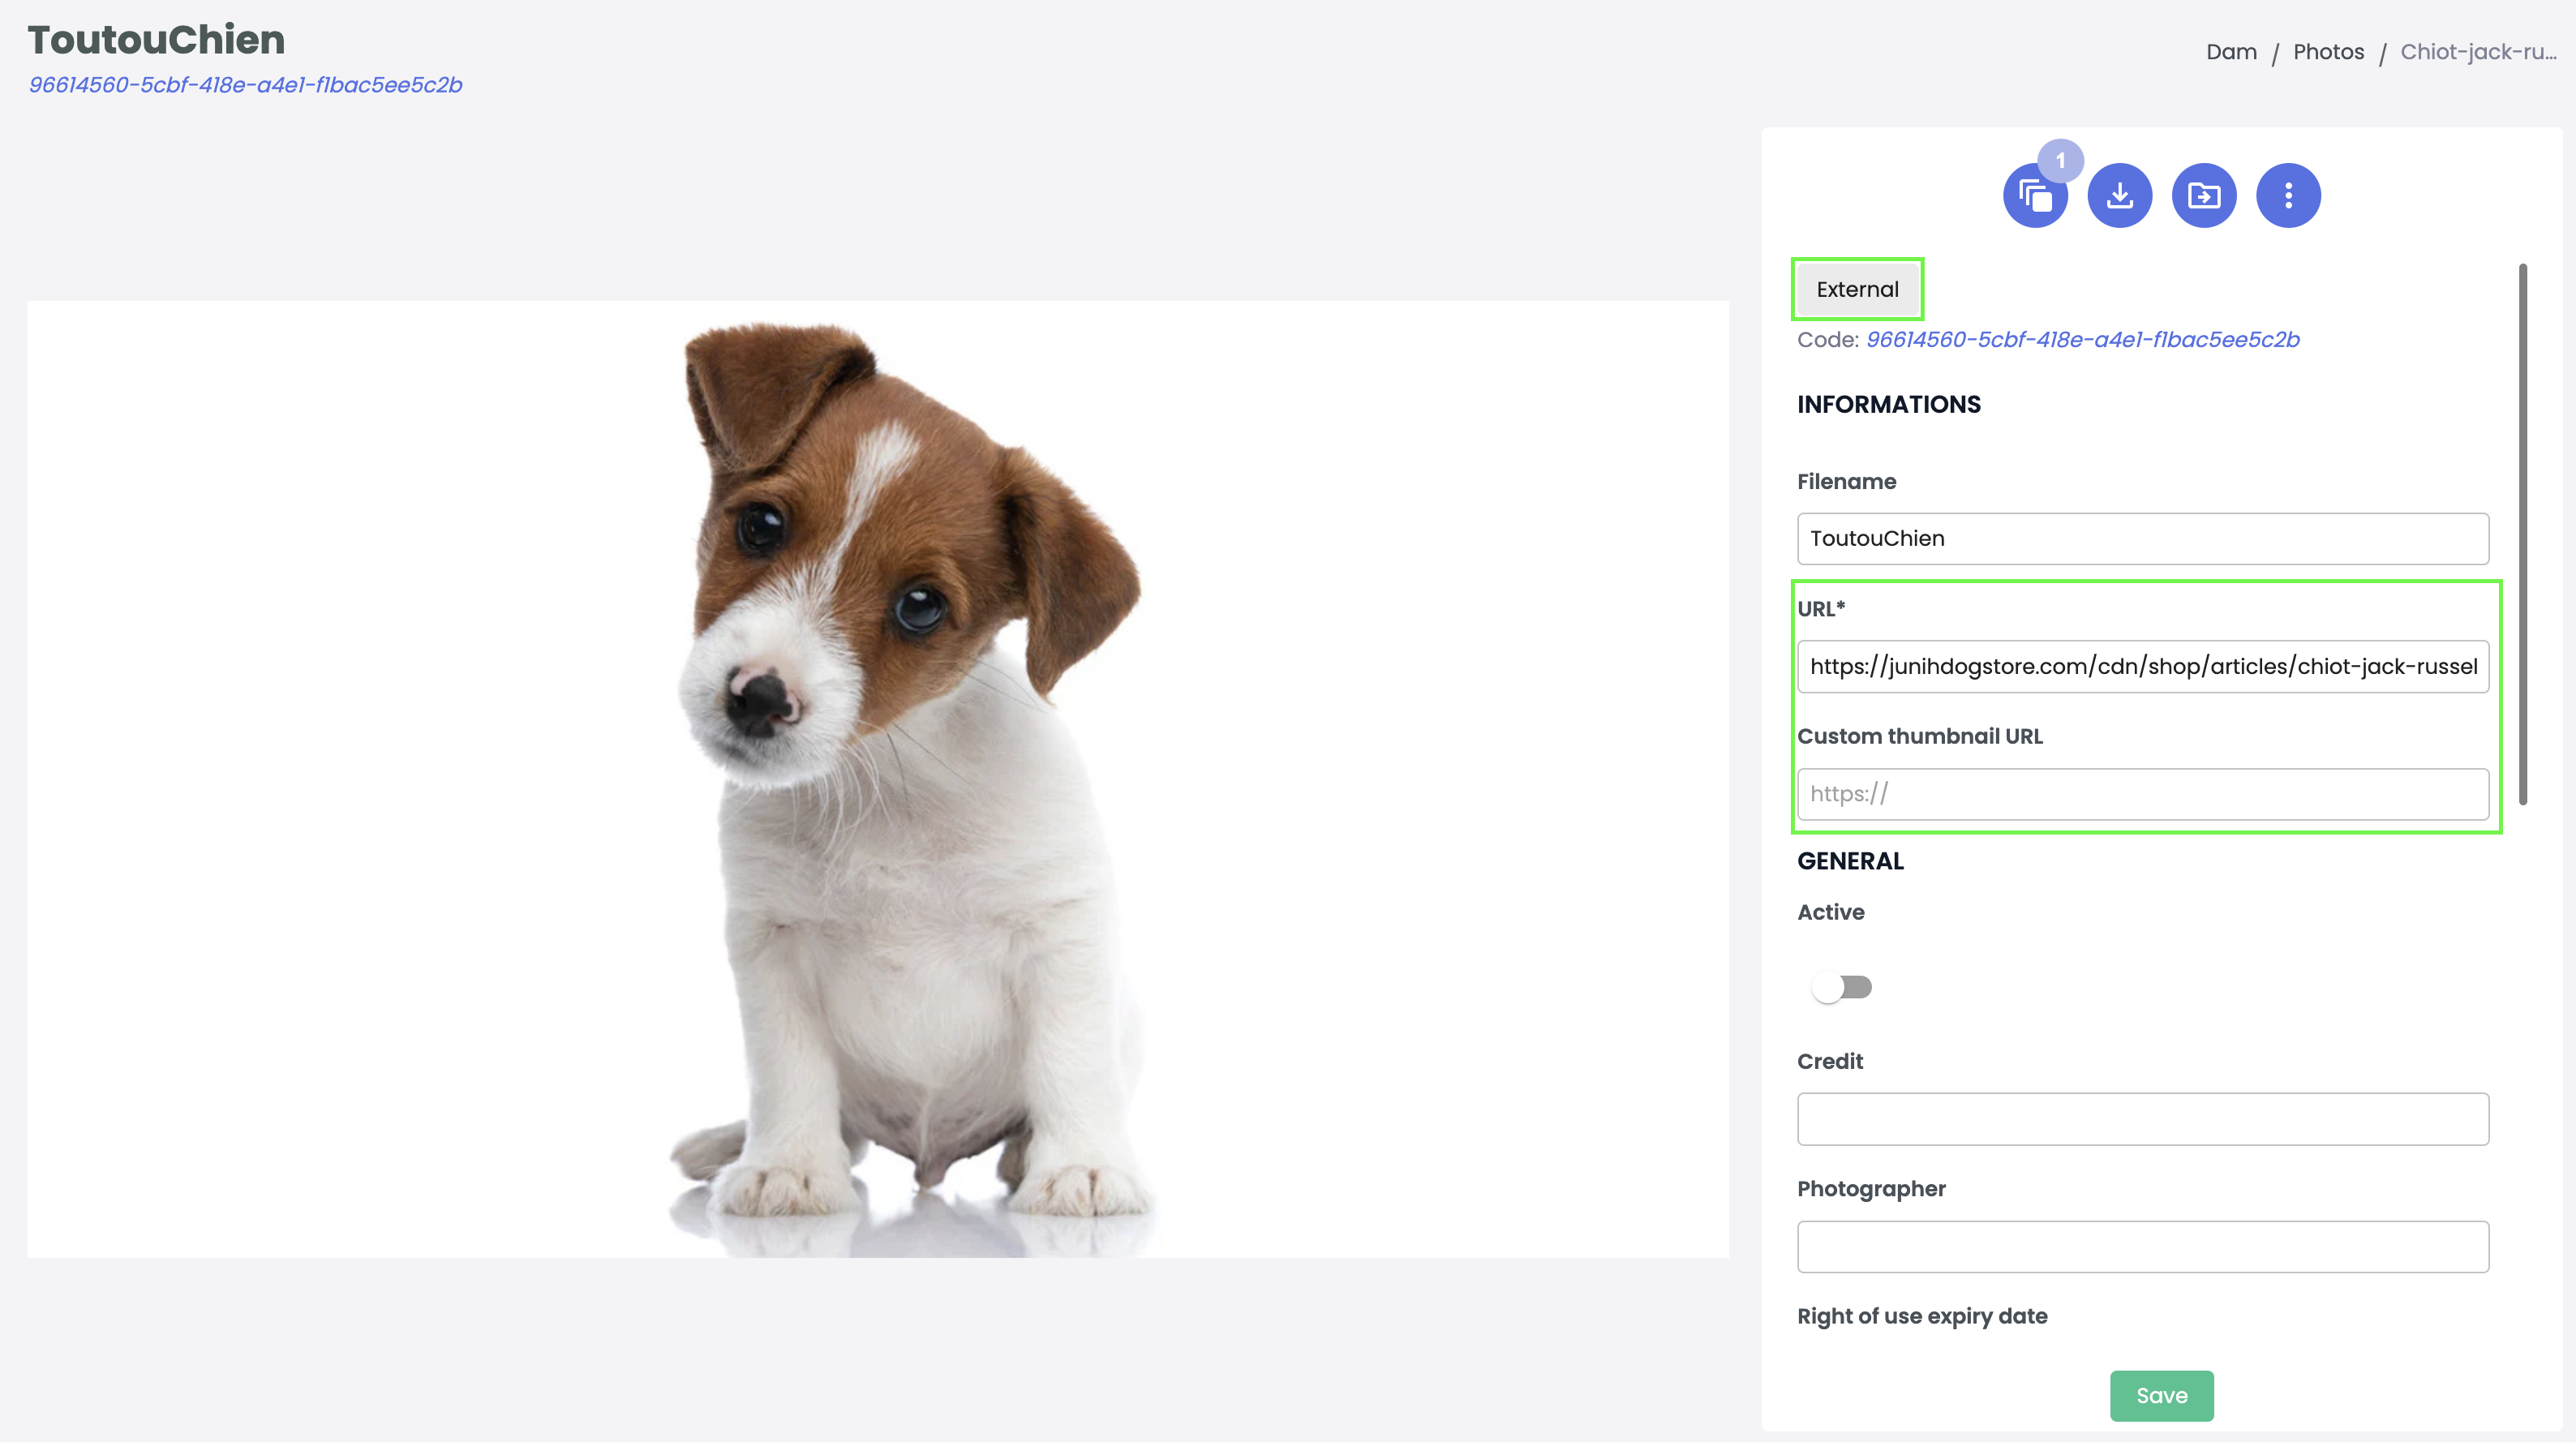
External asset sheet
-
An "External" label is displayed at the top left of the attribute list,
-
The following information is visible:
- URL,
- Custom thumbnail URL,
- All other attributes of assets sheets are available.
⚠️ Warning! Technical metadata (XMP, color space, size…) is not available.
Asset Sheet
Asset sheets contain everything necessary to identify and describe an asset. While there is no "standard" asset sheet structure, every asset sheet includes the following segments:

| Segment | Description |
|---|---|
| Classification breadcrumbs | Enables viewing and navigating your classification hierarchy via the breadcrumb links at the top of each asset sheet. |
| Asset | The asset. |
| Asset Attributes | All of the attributes for the asset. By default, the following attributes are available:
|
| Action buttons | Enables performing specific actions on a document:
|
| Save | Save modifications to an asset's attributes. |
AI-generated image auto-tagging
The DAM includes an AI-generated media auto-tagging feature designed to facilitate image search, filtering, and identification within the DAM, without requiring any prior manual enrichment.
When an eligible media asset is imported, the AI automatically analyzes the image and generates descriptive labels (tags) that characterize its visual content.
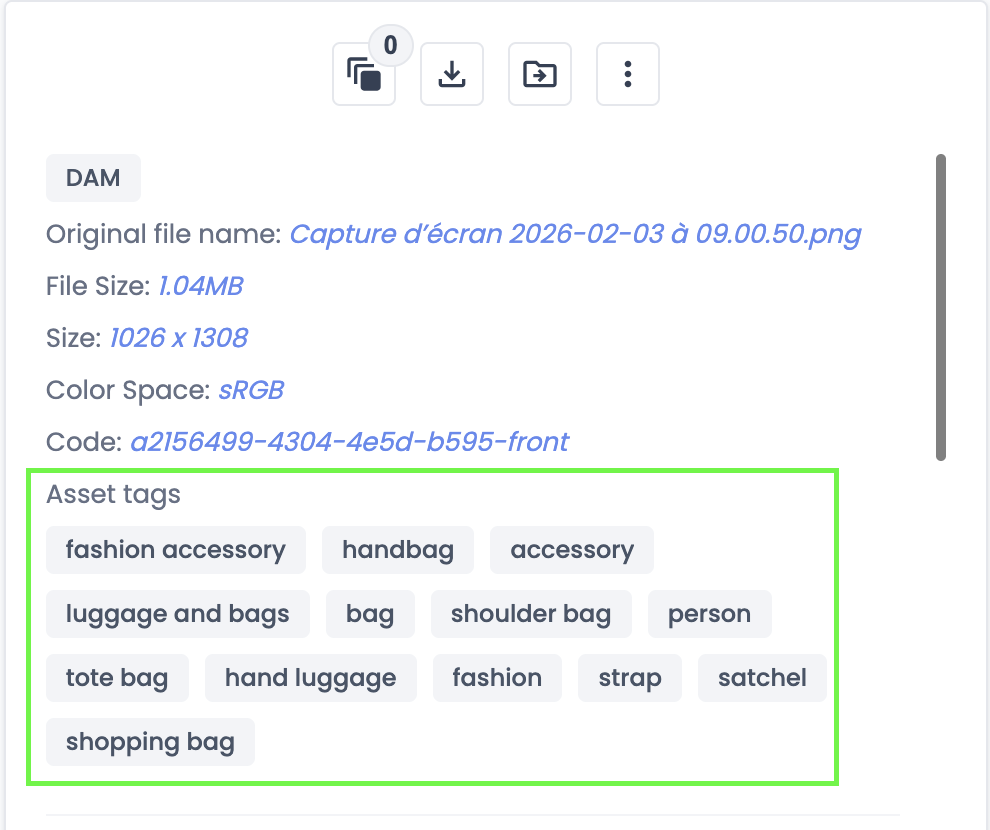
- Generated tags can be used as filters in the DAM advanced search.
- Tags are not exportable, either via flat file or API.
- Labels are generated in English only, with a maximum of 20 tags per image.
- The feature supports the following image formats:
.png,.webp,.jpg,.bmp,.gif,.tiff. - AI-generated tags are read-only: they cannot be edited, modified, or deleted.
- Auto-tagging applies only to media assets imported into the DAM. External media are out of scope.
Use case:
Thanks to auto-tagging, you can perform advanced media searches without manually enriching media descriptions beforehand. For example, you can identify all images containing a green shirt by directly filtering on the AI-generated media tags.
LimitationsAutomatic label generation is available only for images that meet the following criteria:
- File size: up to 20.9 MB
- Dimensions: between 50 px and 16,000 px
Images outside these limits are not supported.
Save
At any time, you can save modifications to an asset's attributes by clicking the Save button.
Action Buttons
On the right of the page is a group of buttons to perform actions on the asset. Their actions are described in the following sections.
Related Documents
Documents related to the asset are displayed in this section along with the document's Name, Code, and Slug. Double-clicking on a document opens the document's page.

You can relate new documents by searching for them in the search bar and selecting one from the results.
Order Assets
Once assets are related to documents, you can specify the order in which they're displayed via the assets tab.
Variant Associated
Variants associated to the asset are displayed in this section along with the variant's Name, Code, and Slug. Double-clicking on a variant opens the Variants tab of a document.

You can associate new variants by searching for them in the search bar and selecting one from the results.
Download
Clicking on the Download button opens a dialog to download the original asset file or to select a specific image size (according to profiles defined by the Quable PIM administrator):

Move
You can move an asset to a different classification by clicking the Move button. A dialog is displayed where you can select a new classification from a dropdown list. Once you've made your selection, click the Move button to move the document or click the Cancel button to abort the move.

This does not remove the asset from the document. It only changes the classification of the asset.
Replace
To replace an asset file, click on the Replace button. A window will appear, allowing you to browse your computer/network to select a new asset file to replace the existing one.
Delete
You can permanently delete an asset by clicking the Delete button. A dialog is displayed to confirm the deletion. Click the Yes button to delete the asset or click the No button to abort the deletion.
Asset: Instructions and Restrictions
Important: Do not use asset URLs directly outside of Quable solutions ⛔
It is strictly prohibited to use asset URLs outside of Quable tools and solutions, typically beyond the PIM and DAM. URLs provided by Quable PIM are download links, not for direct usage.
On this subject, please refer to the documentation of API & Assets.
Bonus Information
Tab Save Chrome extension
You can download assets from a list of URLs via the Chrome extension: Tab Save.
To launch a download of assets with Chrome, follow this procedure:
| 1. | Install the Tab Save extension. |  |
| 2. | Click on the extension in the toolbar to open the extension. |  |
| 3. | Click on the Edit icon. |  |
| 4. | Enter a list of URLs into the Tab Save window. (By default, the URLs of all open browser windows are listed.) |  |
| 5. | Click the Download icon to start the download. |  |
If the total file size is too large (>2GB), an email is sent to you with a file listing all the URLs of the requested assets.
Updated 26 days ago