Start an import
Ready, set, go!
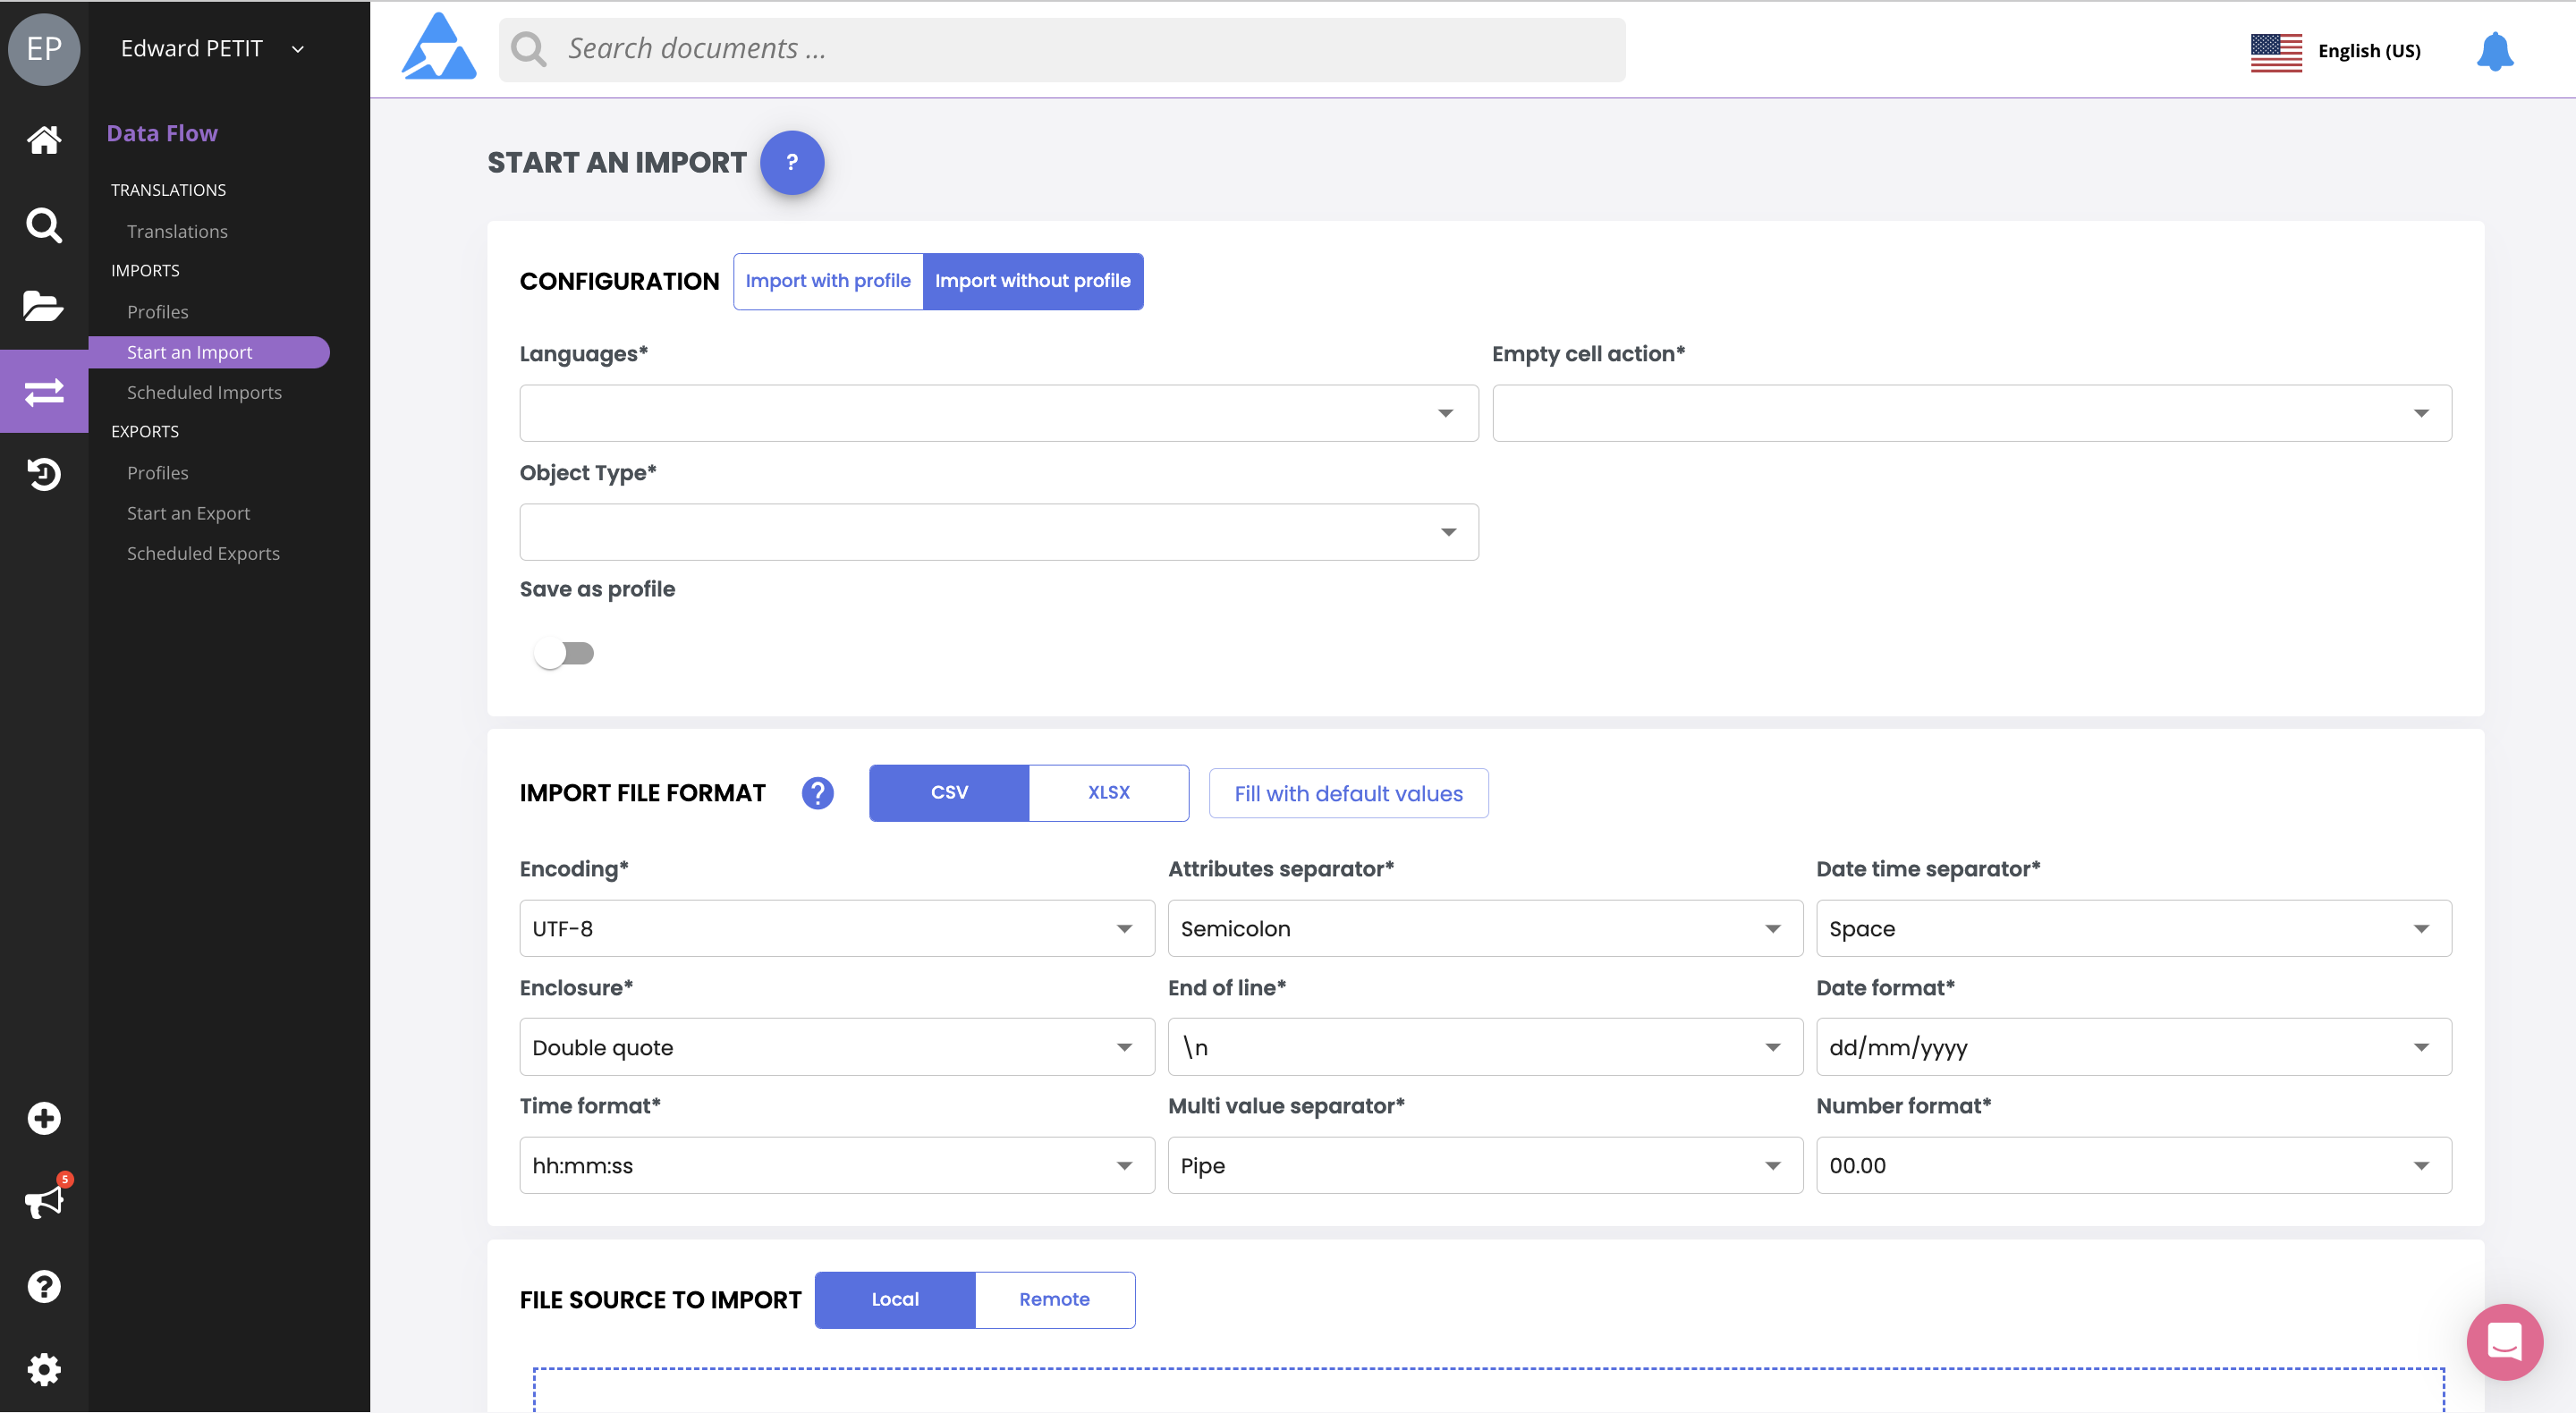
The Start an Import page allows you to define and manage the settings for importing your Quable PIM content.

The page is divided into four sections::
- Profile - Use with or without an import profile
- Import File Format - The format of the import file
- File Source - Location of the import file
- Mapping - Instructions to match your import file content to your Quable PIM content
When you've completed the sections, click the Import Data button to start the import.
Quable's powerful import functionality allows you to start imports from:
- the Import Profiles page (via More actions), and
- from the Start an import page (with or without an import profile)
There are two main scenarios for importing content into Quable PIM:
| No Profile | With Profile |
|---|---|
| Typically used for one-time imports. | For recurring imports. |
These scenarios are described in detail in the following sections.
No Profile
To start an import without an import profile, select Start an Import from the Data Flow sidebar menu and complete the following sections:
Import Identity
This section allows you to define the import and its settings.

Enter the following information:
Information | Description | Mandatory |
|---|---|---|
Select a profile | Select No profile. | Yes |
Object Type | The type of content the profile will import. Possible values:
| Yes |
Languages | The data language to import. Example | Yes |
Empty cell action | Defines the action to take if empty cells are encountered during the import operation. By default, empty cells are considered = 0. Possible values:
| Yes |
Save as profile | Import settings are not saved by default. Click the slide button to save the settings as a profile. When enabled, an entry area for the profile's name appears. | No |
File Import Formats
Important Note
- Files can only be imported one at a time.
- Large files (more than 100 columns) may impact performance during import.
This section is used to specify the format and settings (if applicable) of your import file. Two options are available:
XLSX

- Maximum File Size: 10MB
- Maximum Number of Rows: None
Important NoteMapping is required for .xlsx imports.
For .xlsx file imports, standard settings are used. You do not need to specify additional parameters.
CSV (Default)

- Maximum File Size: None
- Maximum Number of Rows: 200,000
Good to KnowMapping is optional for .csv imports.
For .csv file imports, you have two parameter options:
- Standard: Standard settings are used. You do not need to specify parameters.
- Custom: You must specify the following parameters (you can click on the link Fill with default values to automatically select default settings):
- Character Encoding (UTF-8)
- Column Separator (Comma, Semicolon (default), Tab)
- Date Separator (Space (default))
- String Identifier (Quotes (default), Apostrophe)
- Line Break Identifier (\n (default))
- Date Format (yyyy/mm/dd, dd/mm/yyyy (default))
- Time Format (hh:mm.ss (default))
- Multiple Values Separator (Vertical bar (default))
- Number Format (00.00 (default), 00,00)
File Import Source
This section allows you to specify the source (current location) of your import file.

You can click on the drag button to choose between the following options:
- Local: The import file is on the computer you are using. You can drag and drop the file directly into the drop zone or click the Browse button to locate the file directory on your computer and select a file for import.
- Remote: The import file is on a remote server.

Enter the following information for remote sources:
Information | Description | Mandatory |
|---|---|---|
Protocol | The protocol to use for the import. Possible values:
| Yes |
Folder Path | The full address of the directory containing the import file. | Yes |
Login ID | Username for connecting to the source containing the import file. | Yes |
Password | Password for connecting to the source containing the import file. | Yes |
Once an import file is selected, immediate validation is performed to ensure the file is readable and matches the specified parameters.
 |  |
Once validation is complete, you can:
- Analyze your file via the Analyze My File link (CSV files only), or
- Immediately start your import. Column headers in the import file are assumed to correspond to the content in your Quable PIM. If not, you need to enable Mapping (see below).
Mapping
The section allows you to specify which columns of your import file correspond to the content in your Quable PIM.

When mapping is enabled, only the mapped columns are taken into account and imported.
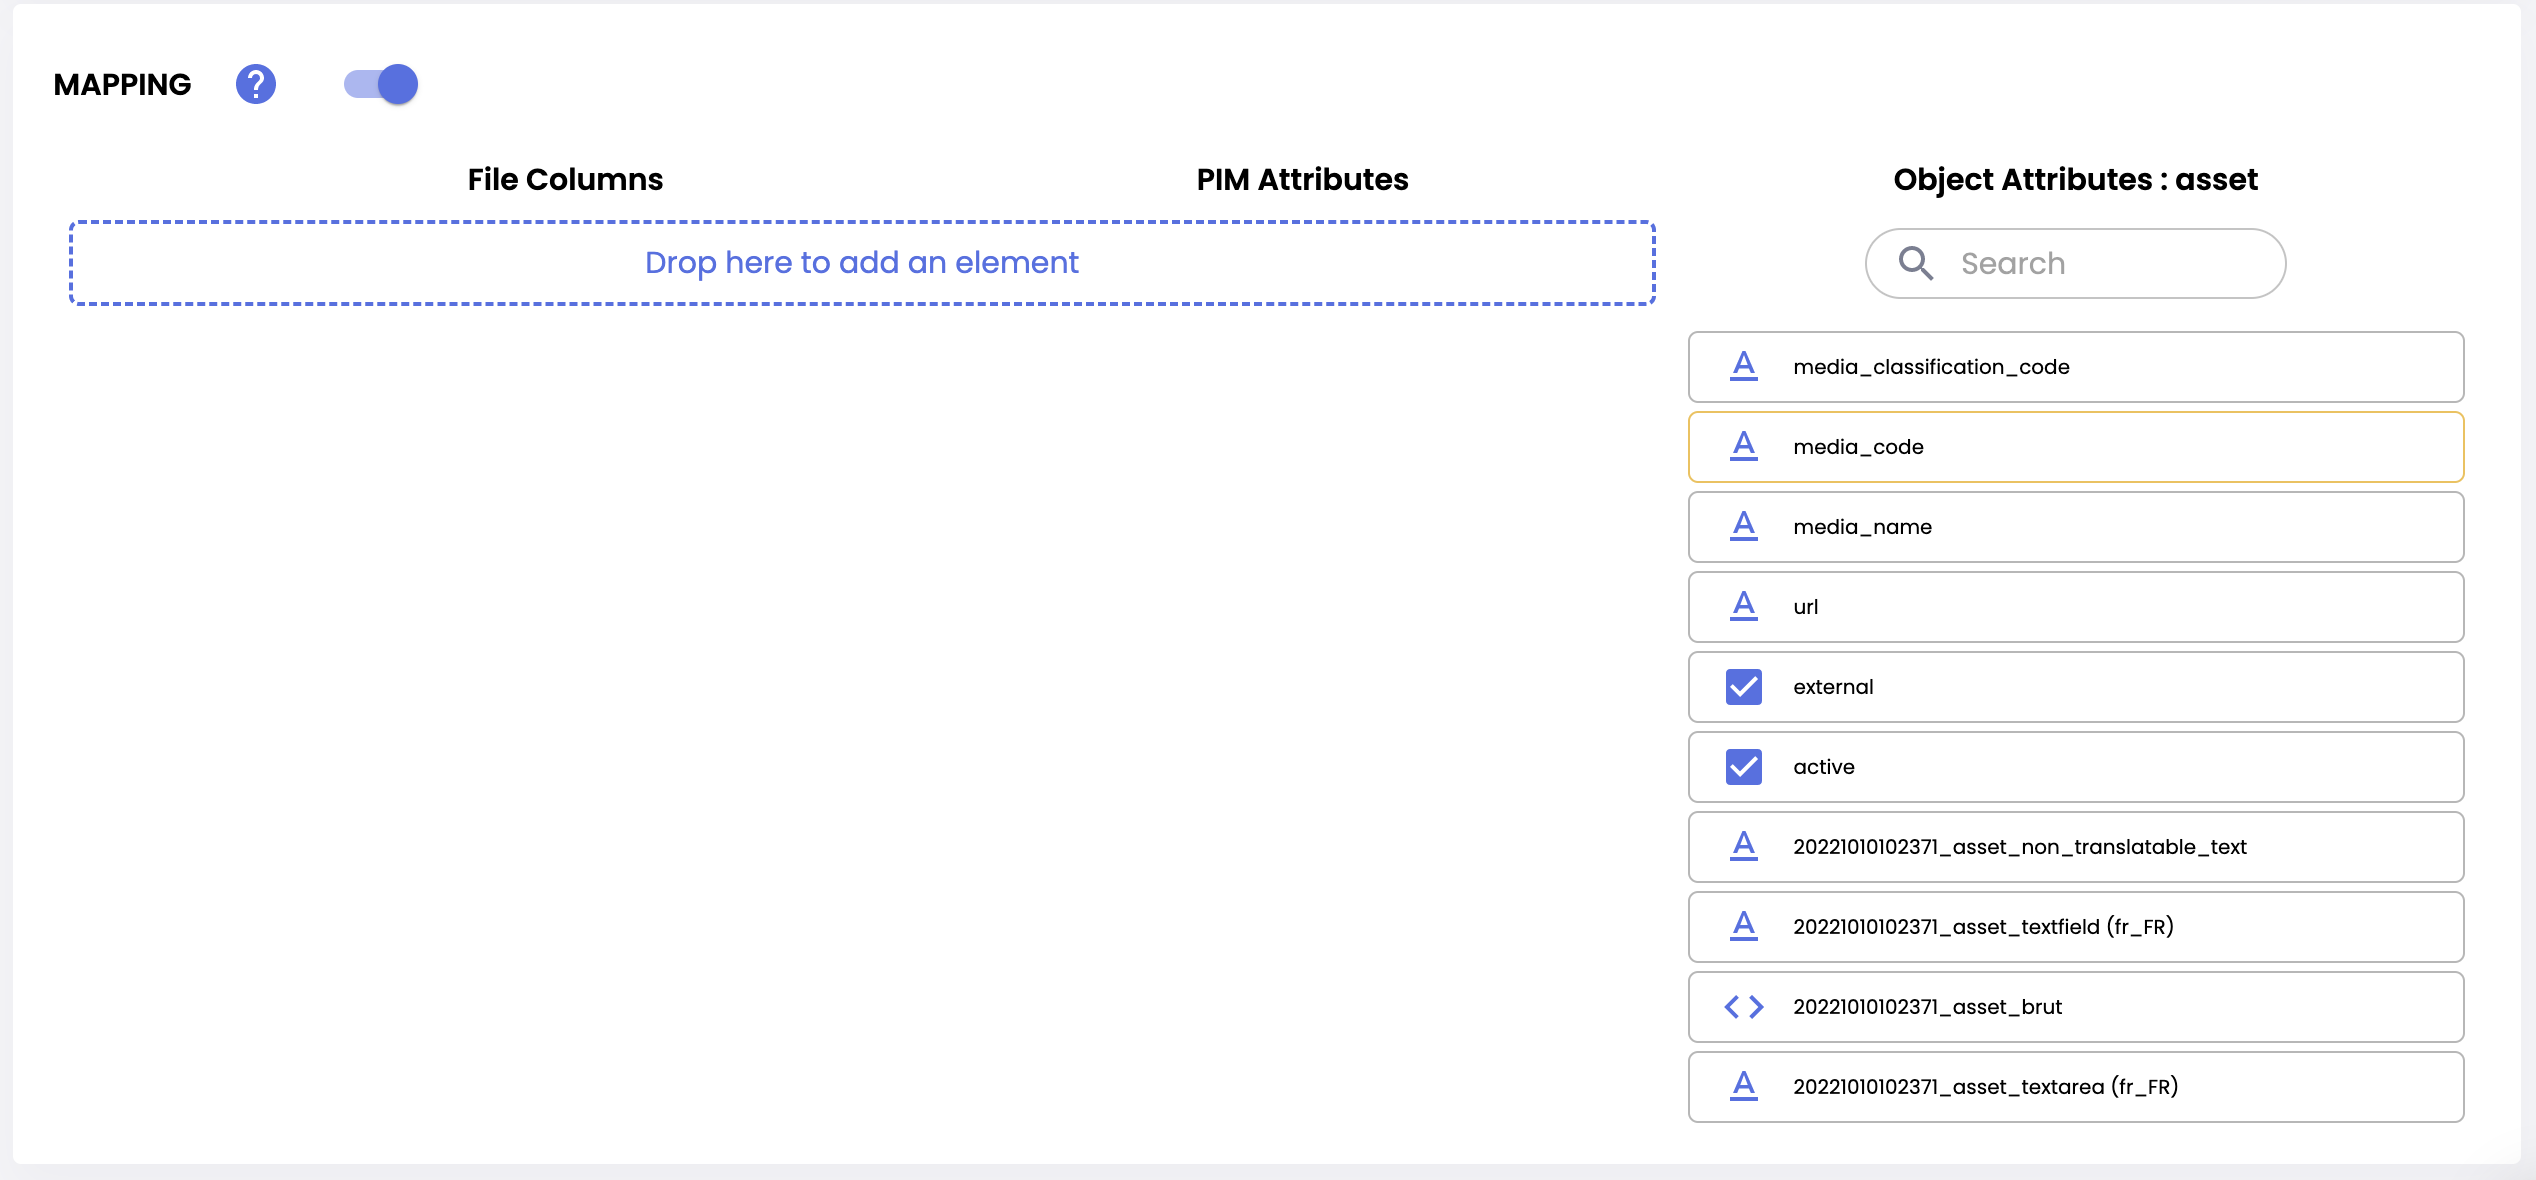
Enabling the mapping option expands the section:

The expanded section is divided into three columns:
- File Columns - This column is used to identify columns in your import file.
- PIM Attributes - This column is used to designate the PIM attribute that corresponds to the file column.
Please note that only 500 attributes are displayed in this list. You can perform a search to find an attribute from this list or another attribute that is not displayed. - Object Attributes - The column contains all of the available properties for the selected object type.
To map your import file to your Quable PIM content, select attributes from the Object Attributes column and drag / drop them into the area below File Columns -> PIM Attributes.

- Object Attributes outlined in orange are mandatory. An import can't be started if they're not selected.
- All of the columns in your import file must be mapped to PIM attributes.
- The columns of your import file should include correct values to avoid unintended consequences (e.g., set "Active" to "1", so it isn't replaced by "0" and setting your content inactive.)
You can modify the titles of the attributes under File Columns so that they correspond to the titles of the columns of your import file.
With Profile
To start an import with an import profile, select Start an Import from the Data Flow sidebar menu and complete the following sections:
Import Identity
In the Select a profile dropdown list, select an import profile to use.

You can expand the section by clicking on the arrow on the right side of the section. The expanded section displays the details of the selected profile.

File Source
This section allows you to specify the source (current location) of your import file.

Two options are available:
-
Local - The import file is on the computer you are using. You can drag and drop the file directly into the drop area or click the Browse button to search your computer's file directory and select a file to import.
-
Remote - The import file is on a remote server . Enter the Protocol (i.e. FTP, SFTP, HTTP, or HTTPS), URL of the remote file, and the Login and Password to connect to your remote server. Note: Assets can only be from HTTP or HTTPS sources.

Once an import file is selected, a check is immediately performed to verify that the file is readable and corresponds to the specified parameters.
When the check is completed, you can:
- analyze your file via the Analyze My File link (CSV files only), or
- immediately start your import. The column headings in the import file are presumed to correspond to the content in your Quable PIM. If they do not, you should enable Mapping.
Asset import & NotFound errorError 404 or 405 code happens when your asset doesn’t exist at the following url or when the asset cannot be reach through HTTP HEAD method.
In case of redirection, we recommend to set the “final” url in the import file
Updated 4 months ago
