Start an Export
Ready, set, go!
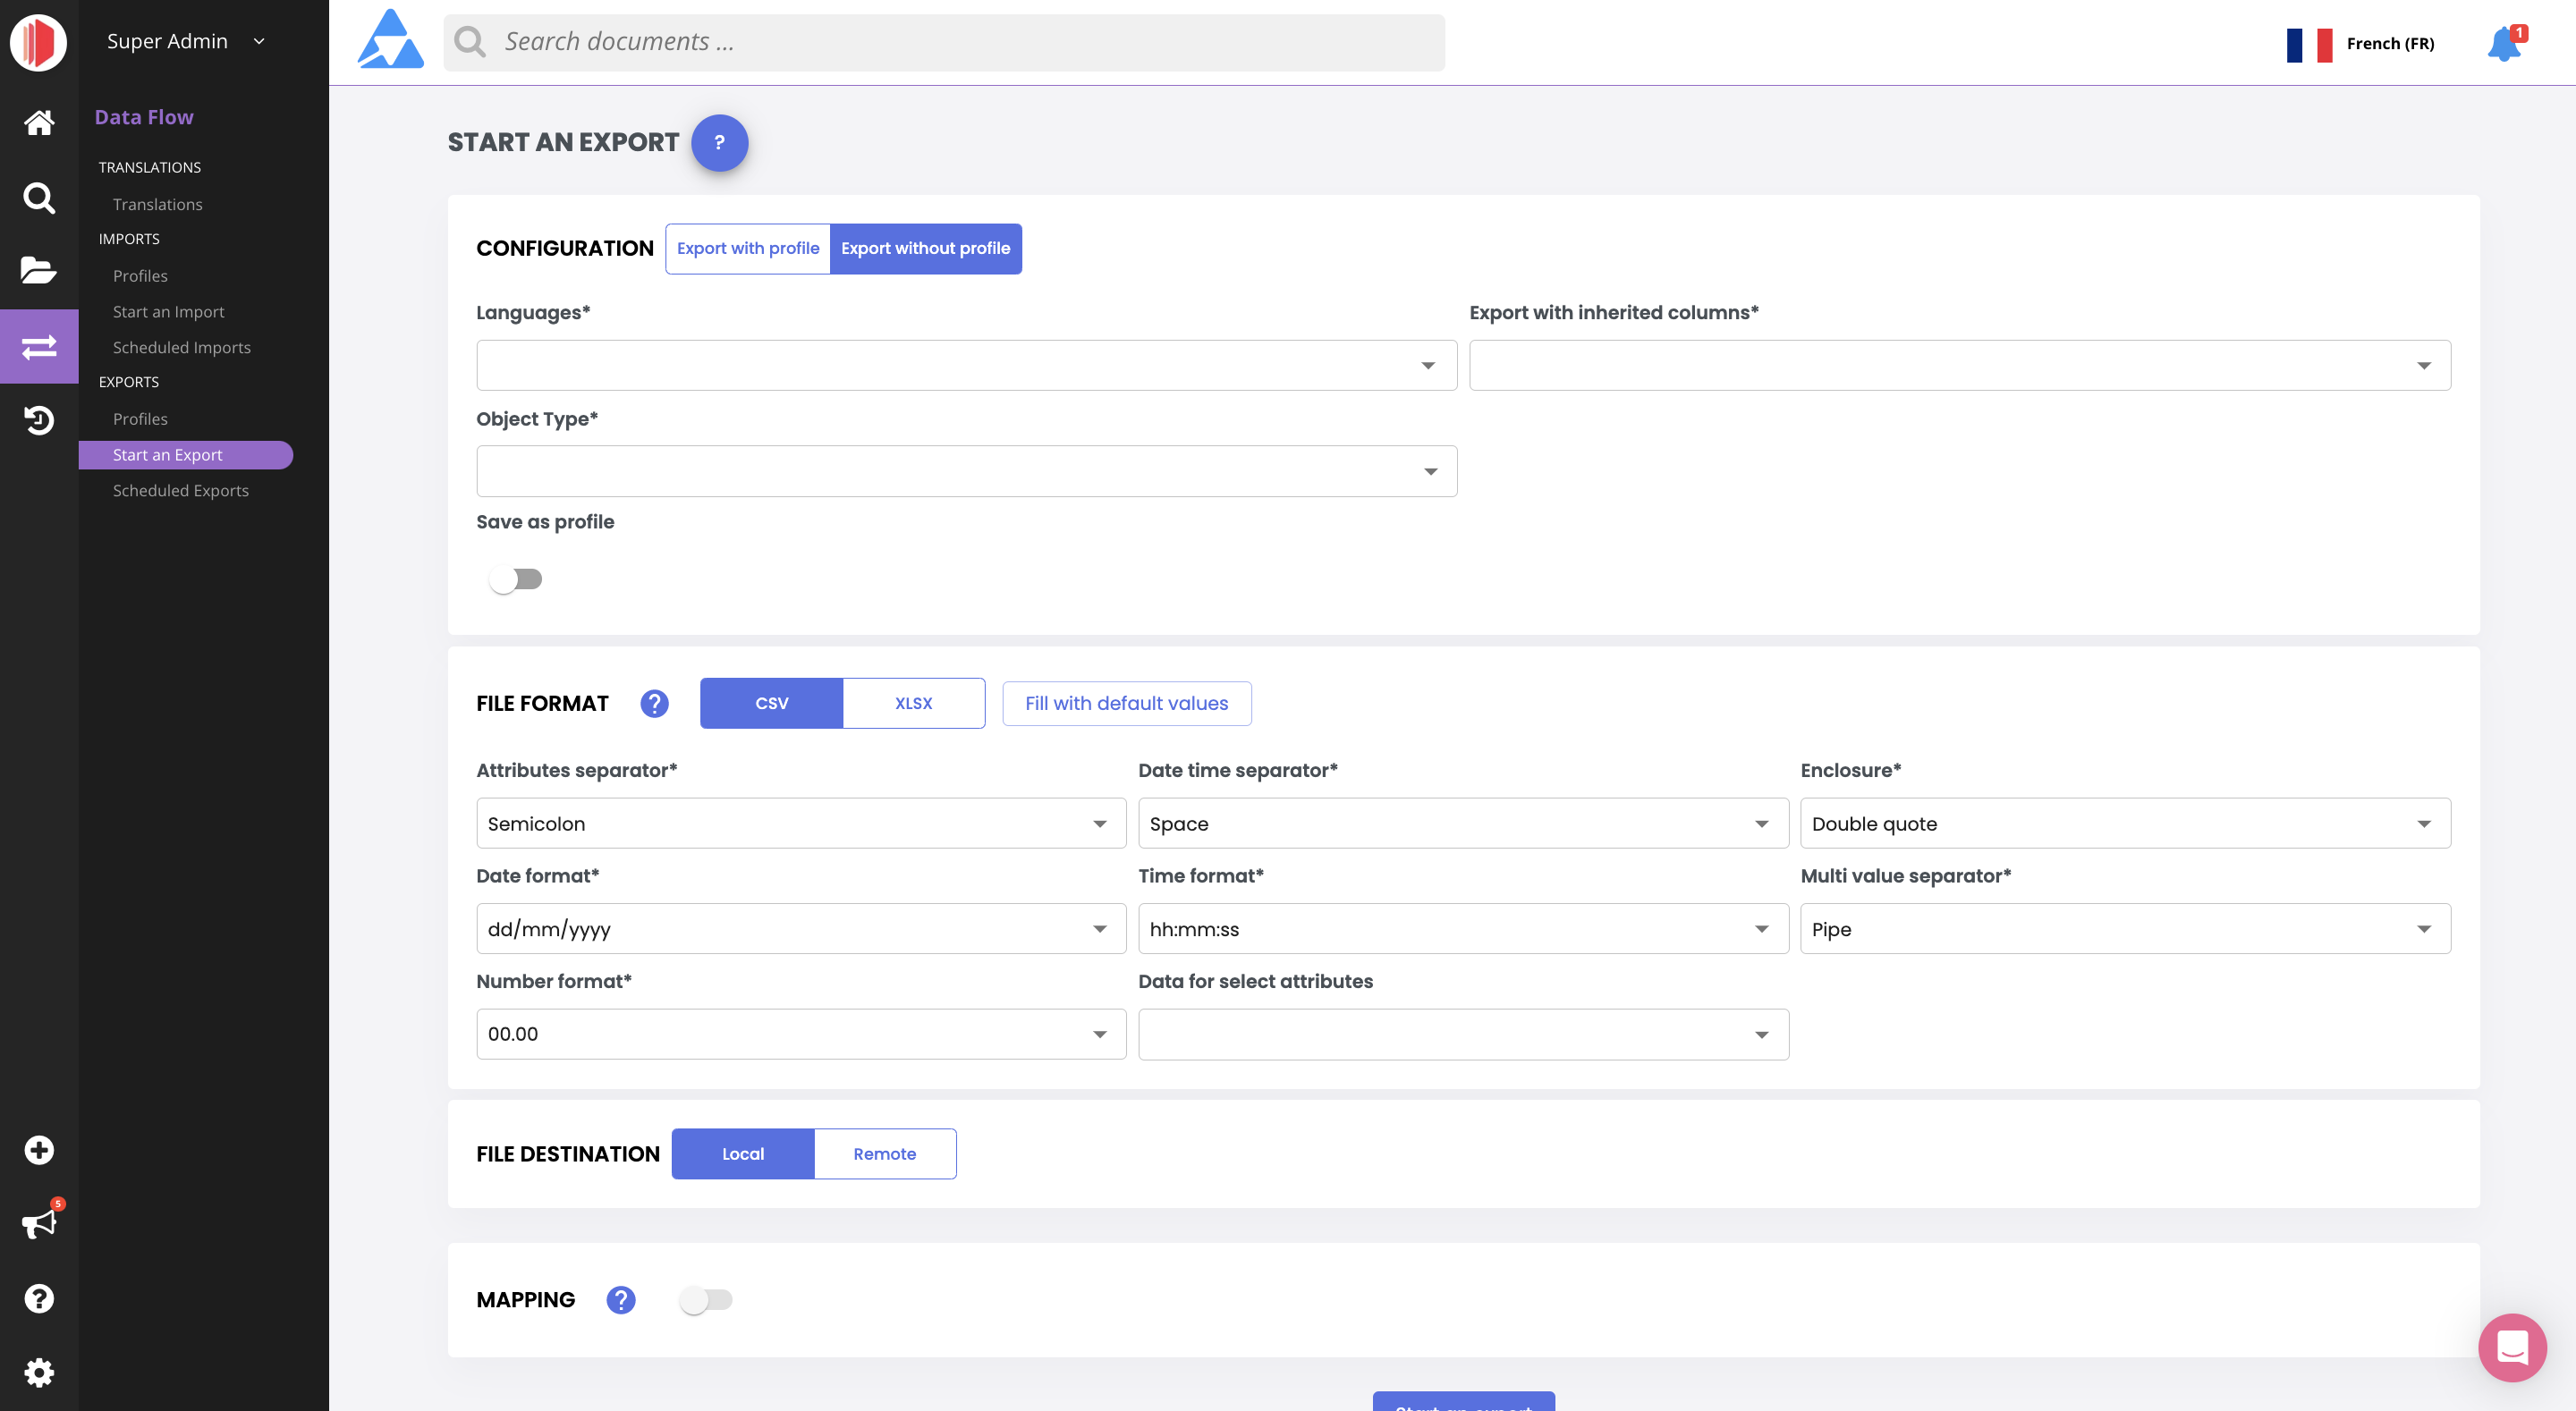
The Start an Export page allows you to define and manage the settings for exporting your Quable PIM content.

The page is divided into four sections::
- Profile - Use with or without an export profile
- Export File Format - The format of the export file
- File Destination - Location of the exported file
- Mapping - Instructions to define your Quable PIM content to export
When you've completed the sections, click the Start the Export button to start the export.
Quable's powerful export functionality allows you to start exports from:
- the Export Profiles page (via More actions), and
- from the Start an export page (with or without an export profile)
There are two main scenarios for exporting content from Quable PIM:
| No Profile | With Profile |
|---|---|
| Typically used for one-time exports. | For recurring exports. |
These scenarios are described in detail in the following sections.
No Profile
To start an export without an export profile, select Start an Export from the Data Flow sidebar menu and complete the following sections:
Export Identity
This section allows you to define the export and its settings.

Enter the following information:
Information | Description | Mandatory |
|---|---|---|
Select a profile | Select No profile. | Yes |
Object Type | The type of content the profile will export. Possible values:
| Yes |
Languages | The data language to export. Example | Yes |
Export with inherited columns | Defines the action to take for data defined with a language inheritance. When language inheritances are defined, incomplete content in the exported language is automatically replaced by the corresponding content in the data language. Possible values:
| Yes |
Save as profile | Export settings are not saved by default. Click the slide button to save the settings as a profile. When enabled, an entry area for the profile's name appears. | No |
Export File Format
Important Note
- Files can only be exported one at a time.
- Large files (100+ columns) may impact performance during the export.
This section is used to specify the format and parameters (if any) of your export file. Two options are available:
|  Maximum number of lines: 200,000 To export .xlsx files, standard settings are used. You don't need to specify any parameters. | |||||||||||||||||||||||||||
|  Maximum number of lines: 200,000 To export .csv files, you have two options for parameters:
|
A new feature is available for CSV exports!In the custom CSV exports, you find a new option "Data for list attributes" that allows you to add to the export file: one to two columns per selected language, for each "List" attribute of the selected object type, displaying labels and/or descriptions.
Orphaned documents and export - Some documents may be missingThere is a case where a document might not be exported. If a document is orphaned (not classified in the PIM) and it is manually assigned to a classification of a channel, it will not be included in the export. A document that is not classified in the PIM is considered a bad practice, so simply classify it to recover it.
File Destination
This section allows you to specify the destination of your export file.

You can click on the slide button to select between the following two options:
| The file is exported to the computer you are using. | |||||||||||||||
| The file is exported to a remote server. Enter the following information:
|
Filters
Available only for document objects, once a document type is selected.
This section is used to specify filters for the data to be exported. Two options are available:
- No filters (default) : All data of the selected object type are exported without any filtering
- Advanced filters
This feature is experimental and is only recommended for advanced users with JSON skills.
Quable does not provide support for its use at this time.

In the field accepting Json, enter your filters.
- Filters can be for attributes, completeness, tags and workflows.
- The JSON syntax is checked, but the filters are not checked for veracity.
- Filters work in combination to create an AND statement.
- Conditional OR statements are not supported.
- If a mapping is used, the keys of your filter must match the names of the mapped attributes.
[
	{
		"column": "document_code",
		"operator": "!=",
		"value": "DOCUMENT_1234"
	},
	{
		"column": "attribute_set_code",
		"operator": "==",
		"value": null
	},
	{
		"column": "completeness_website (en_GB)",
		"operator": ">",
		"value": "0.80"
	}
]
You can find information on filter operators [here] (doc:filter-operator-reference).
Joins

This option allows you to create a file resulting from the concatenation of several files that can be exported by your PIM. Also, by using this option, you will export all the information from the previously selected Document type, as well as all the information from the files of its related objects (Assets, Variants and the child Document types).
To do this, set the switch to ON :
- A box opens showing the types of links available for each type of object (Documents, Assets, Variants) that you can attach.
-- Select up to 3 types of objects to attach and start your export.
--- Once the generation and download is finished, you will find all the columns of the selected objects as well as the columns of the links between these objects.
N.B.: To avoid columns with the same name in the case of linked documents, the columns of the attached files are prefixed by "{linkTypeCode}_".
Example :Let's say I export the document type "Product" which has only one document with the code "red-skirt", linked by the link type "Photo" to 2 media "pictJR1.jpg" and "pictJR2.jpg" and having 3 variants "S", "M" and "L":
By doing a simple export without join, I will have all the usual columns for this type of document and I will have 1 line: [skirt-red]
By doing a join with "Photo", I will have all the columns of this type of document + all the columns of the Assets and I will have 2 lines: n with "Photo", I will h and ll the columns of this t.
This avoids me to make 3 exports: a DOC export + an Asset export + a LinkType export 'Doc->Photo'.By doing a join with "Photo" and "Variants", I will have all the columns of this type of document + all the columns of the Assets + those of the Variants and I will have 6 lines: f document + all the columns ; the Assets + those of the ariants and I will have 6 l nes: [red-skirt; pictJR1; S jpg] ; [red-skirt; pictJR2
Feature limits :
- You can only attach files of child object types to the selected document type.
- You can select up to 3 object types to attach.
- Multi-level joins are currently not available
- By selecting this option, the mapping option is no longer available.
- By selecting this option, your file will be limited to 500,000 lines.
Mapping
This section allows you to specify your Quable PIM content to export.

AttentionWhen mapping is enabled, only the mapped columns are taken into account and exported.
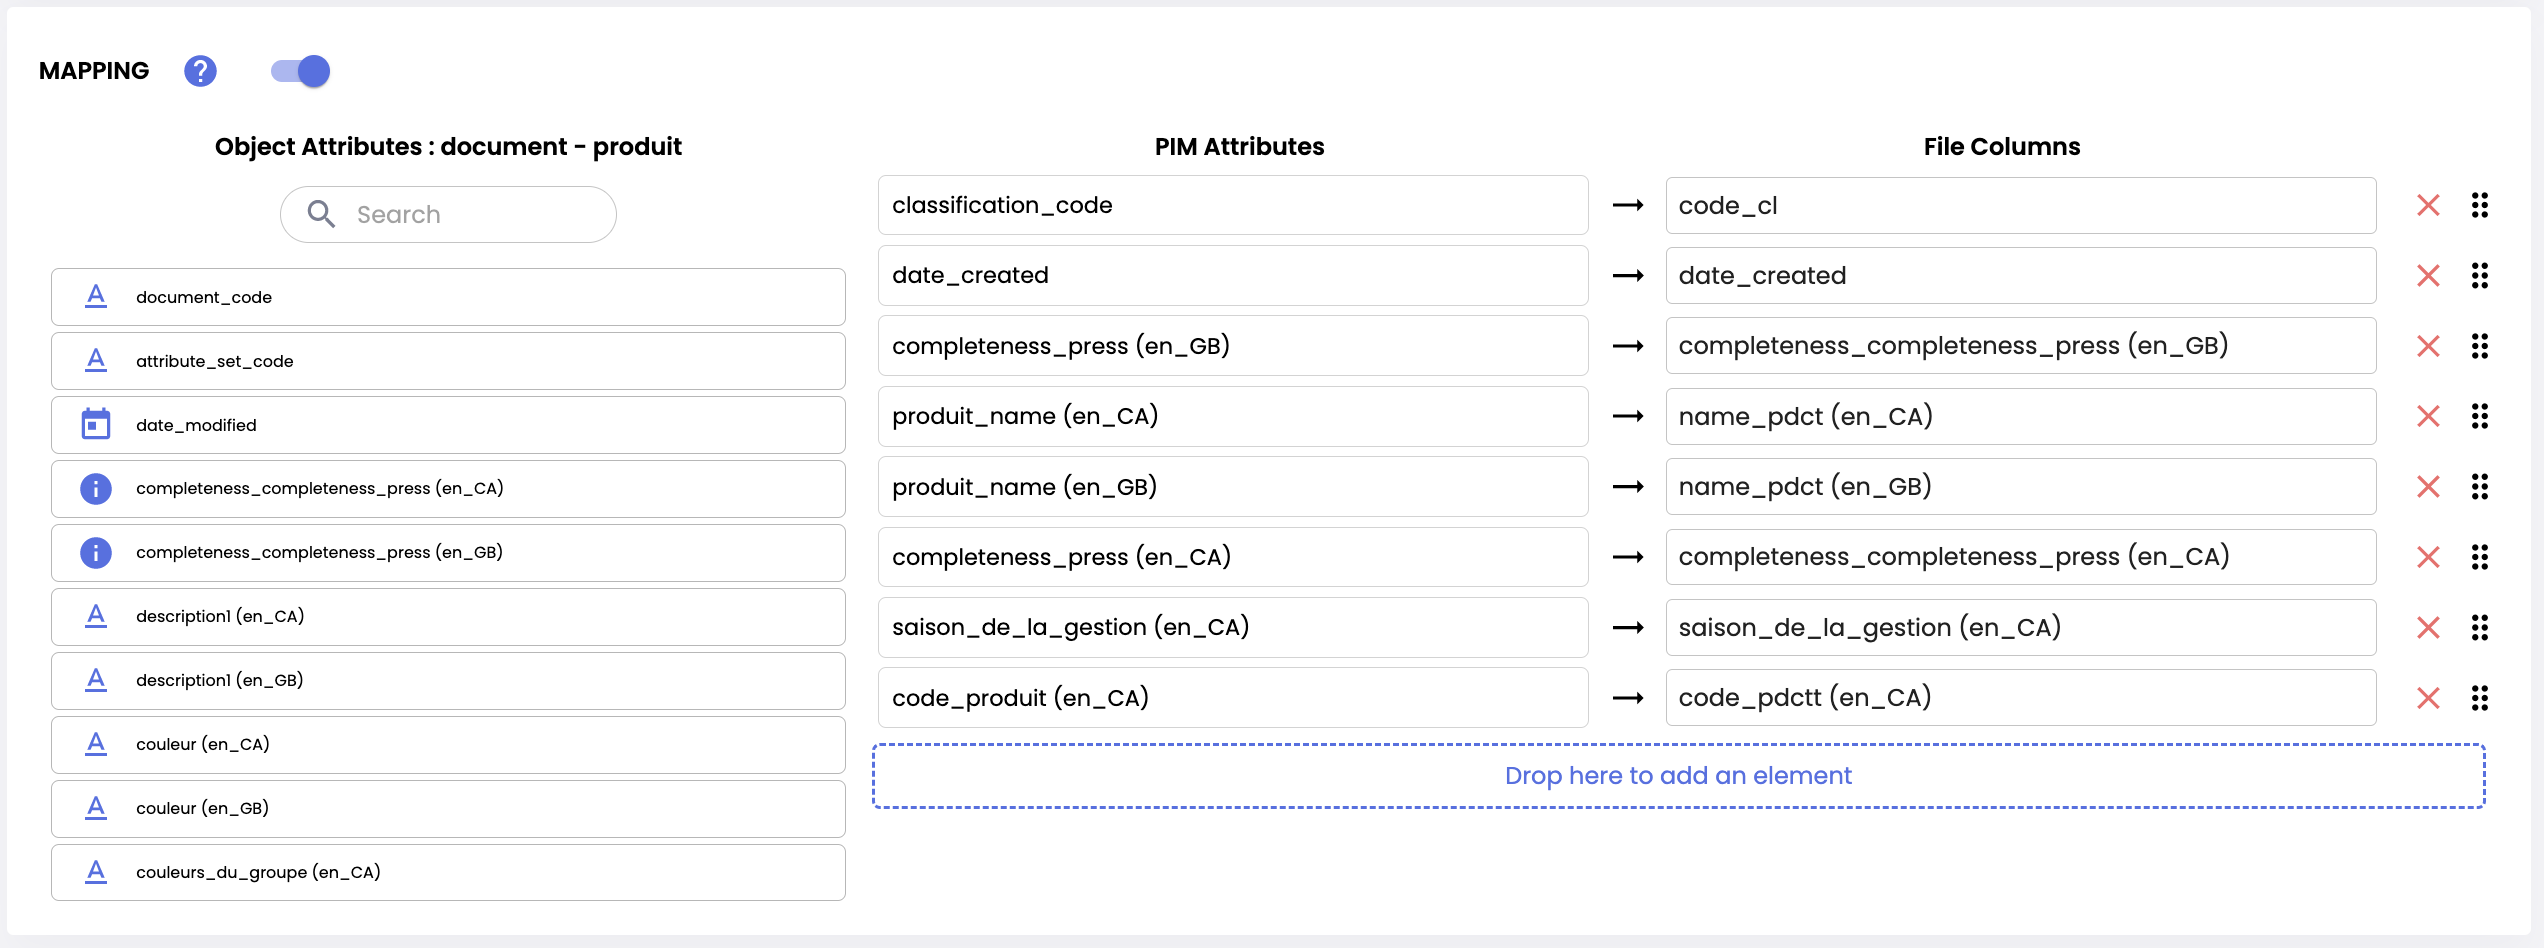
Enabling the mapping option expands the section:

The expanded section is divided into three columns:
- Object Attributes - The column contains all of the available properties for the selected object type.
- PIM Attributes - This column is used to designate the PIM attribute that corresponds to the file column. Please note that only 500 attributes are displayed in this list. You can perform a search to find an attribute from this list or another attribute that is not displayed.
- File Columns - This column is used to identify columns in your export file.
To map your Quable PIM content to your export file, select attributes from the Object Attributes column and drag / drop them into the area below PIM Attributes -> File Columns.

Object Attributes outlined in orange are mandatory. An export can't be started if they're not selected.
At this point, you can:
- modify the titles of the attributes under File Columns so that they correspond to the desired titles of the columns of your export file.
- change the position of the attributes into the desired order of your columns in the exported file.
With Profile
To start an export with an export profile, select Start an Export from the Data Flow sidebar menu and complete the following sections:
Export Identity
In the Select a profile dropdown list, select an export profile to use.

You can expand the section by clicking on the arrow on the right side of the section. The expanded section displays the details of the selected profile.

After clicking the Start the Export button, the Activity Reports page is displayed indicating that an export of the selected profile's data type has been launched. You can click on File to download the export file or More Information to view how may items were exported.
Updated 4 months ago
