Product page
The stars of the show!
New Version of the Product PageThis page presents the new version of the product page, available following the visual rework of our platform.
You can still access the old version of the product page by clicking on "Switch to the old document page" located at the top right of the screen. This will allow you to continue using the suggestion mode which is not carried over to the new version of the product page.
Product pages are amazing. Their versatility allows them to be used in many different ways. Not only do they display all the information describing your products, but they do much more! Product pages are based on document objects and are sometimes referred to as document pages or simply documents.
VocabularyProduct pages, based on document objects, can sometimes be called document pages or simply documents.
Accessing Product Pages
There are several ways to access your Quable PIM product pages, the most common are:
- Quick Search,
- Advanced Search, and
- The Documents page (via the Data menu).
Product Page Structure
Product pages contain everything necessary for presenting an item: editorial content, asset, variants, links to other documents, etc.
Although there is no "standard" product page structure, each includes the following segments:
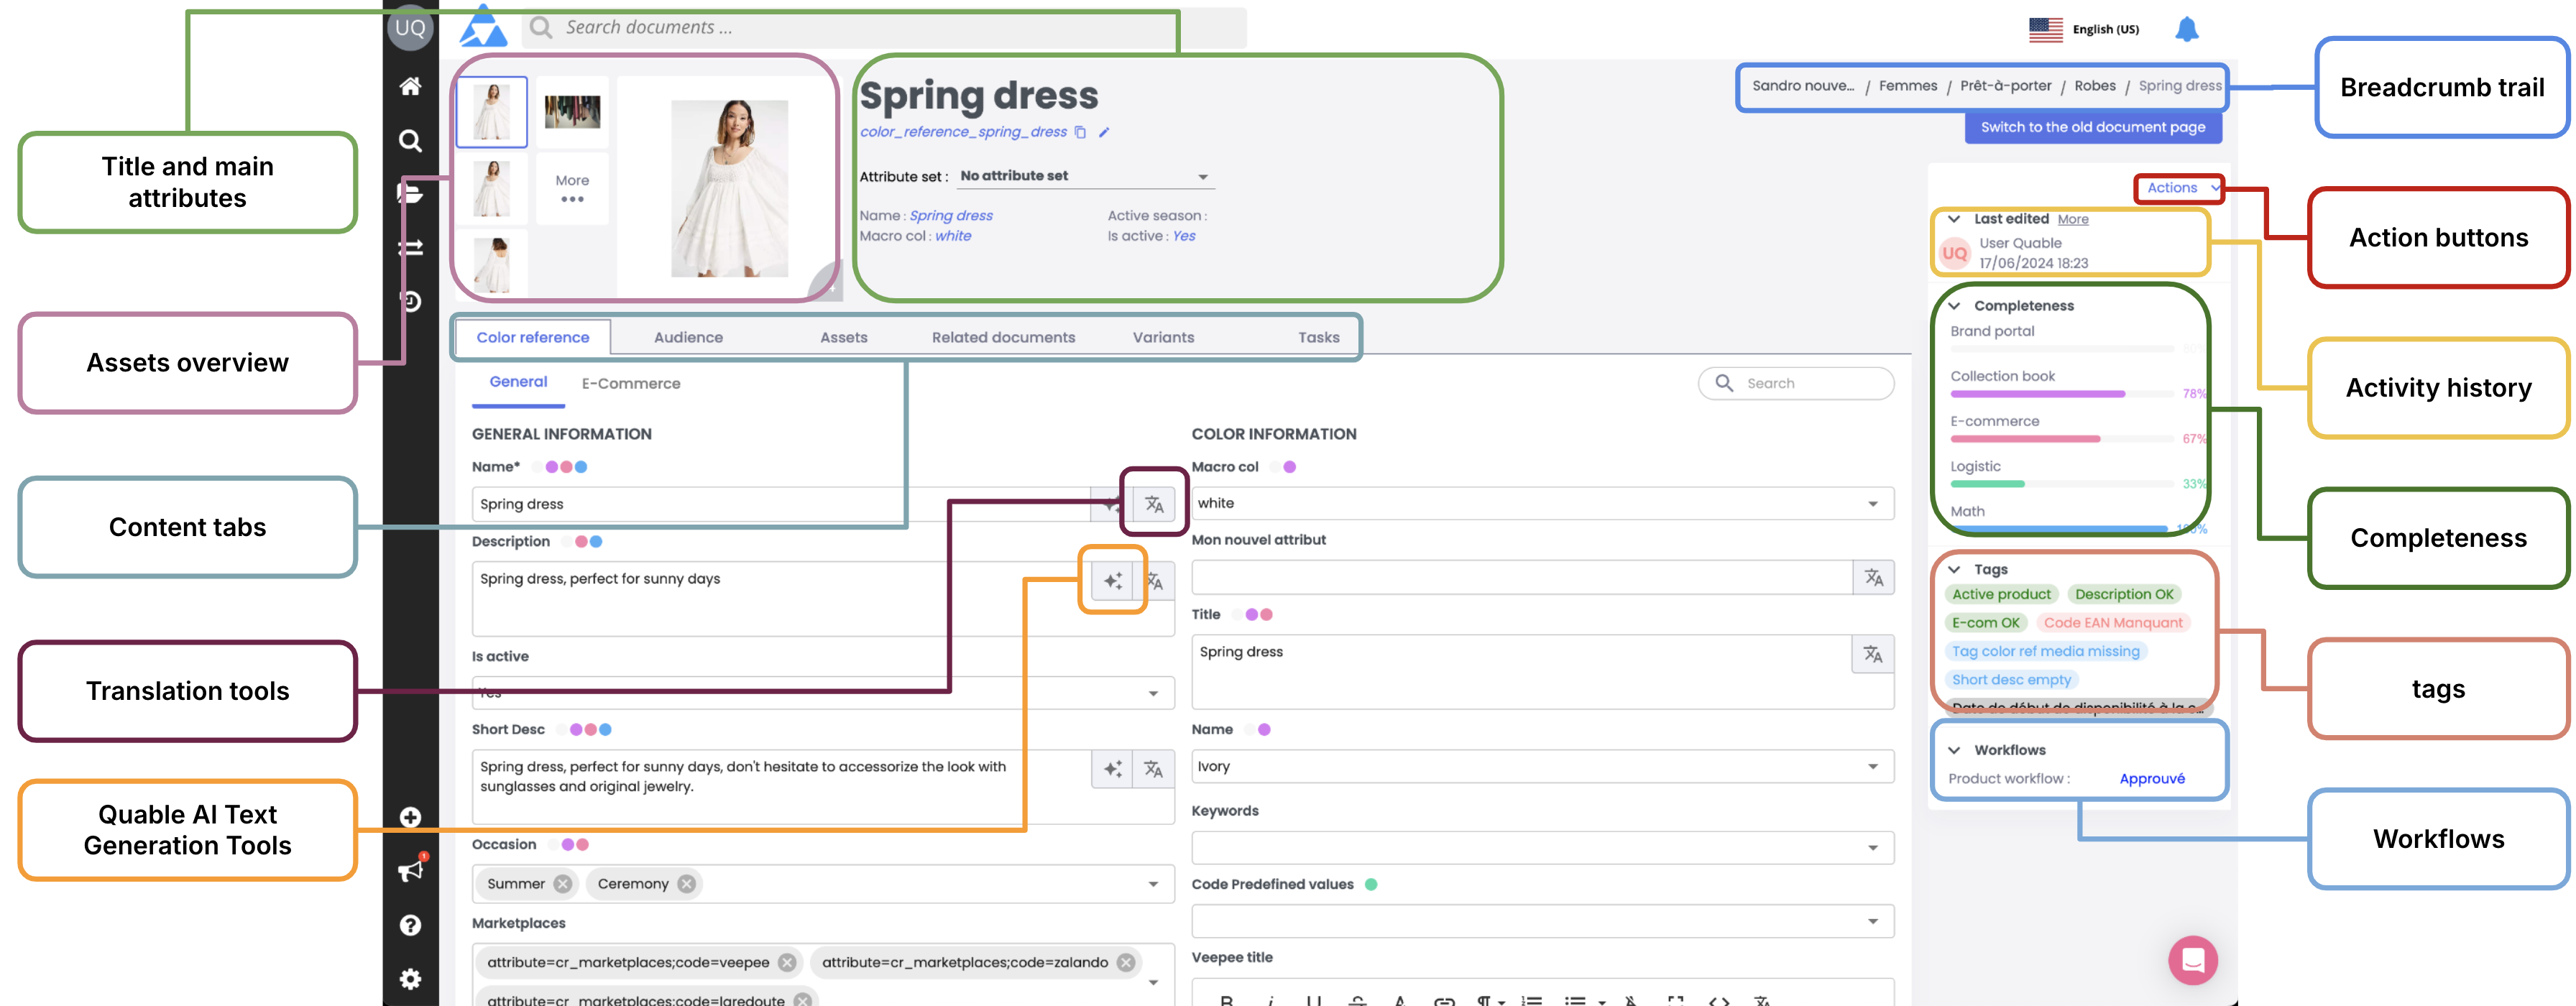
| Segment | Description |
|---|---|
| Title and main attributes | Provides an overview of the product page:
|
| Assets overview | Provides an overview of the assets linked to the product page: |
| Content tabs | Product pages generally include the following tabs:
|
| Translation tools |
|
| Quable AI Text Generation Tools | Click on the icon to automatically generate content using the Quable AI text generation feature. Note that:
|
| Breadcrumb | Allows you to visualize and navigate through your classification hierarchy using the breadcrumb links located at the top of each product page. |
| Action buttons | Allow you to perform specific actions on a product page: |
| Activity history | Allows you to view previous actions performed on a product page. Displays the date, author, and language. |
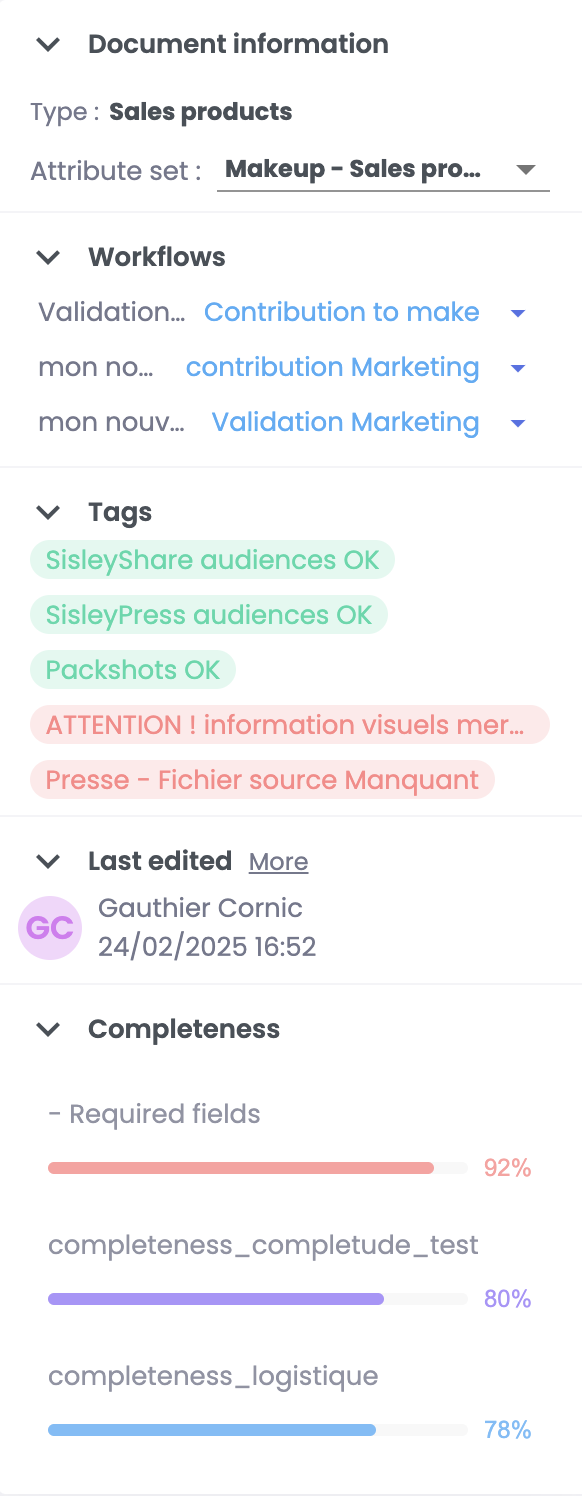
| Completeness | Indicator of the completeness level of product pages, according to the sets defined by the Quable PIM administrator. By clicking on a completeness indicator, the color-coded point corresponding to completeness is highlighted next to the required attributes, and attributes not concerned by completeness are hidden. |
| Tags | Located in the upper right corner, tags indicate the stages or states of product pages, highlighting relevant information and making it easy to see the actions to be taken. Tags are defined by the Quable PIM administrator. |
| Workflow | Indicator of the status of a product page or a workflow stage (e.g., publication status, completeness rate, etc.). There are two types of status:
|
Product Page Header
The upper part of the product page gathers the main information, accessible at a glance.
Collapsible Header BehaviorWhen you scroll down the page, the header shrinks and only the large thumbnail, the name, and the product page code remain visible.
Asset Preview
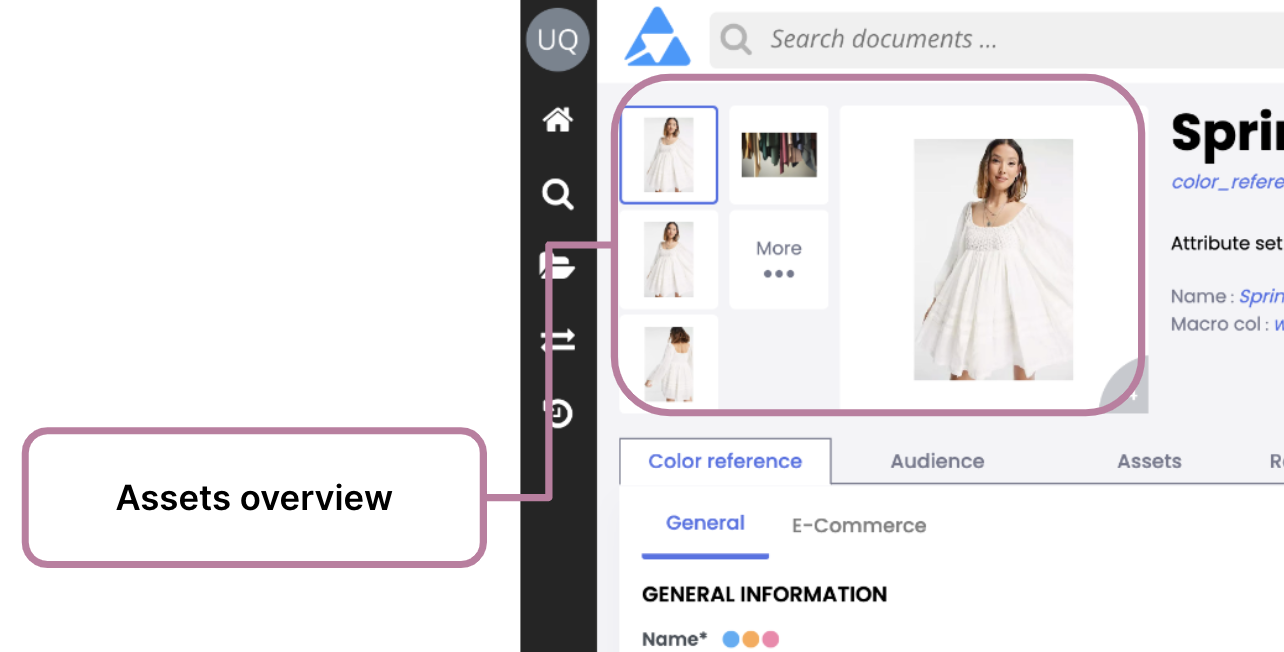
At the top left of the product page header, you will find:
- A large thumbnail representing the first image associated with the product page, with the total number of asset displayed at the bottom right.
- Small thumbnails for other asset linked to the product page. By clicking on these small thumbnails, you can change the image displayed in the large thumbnail.
- A "more..." button. By clicking on it, you directly access the asset tab of the product page.
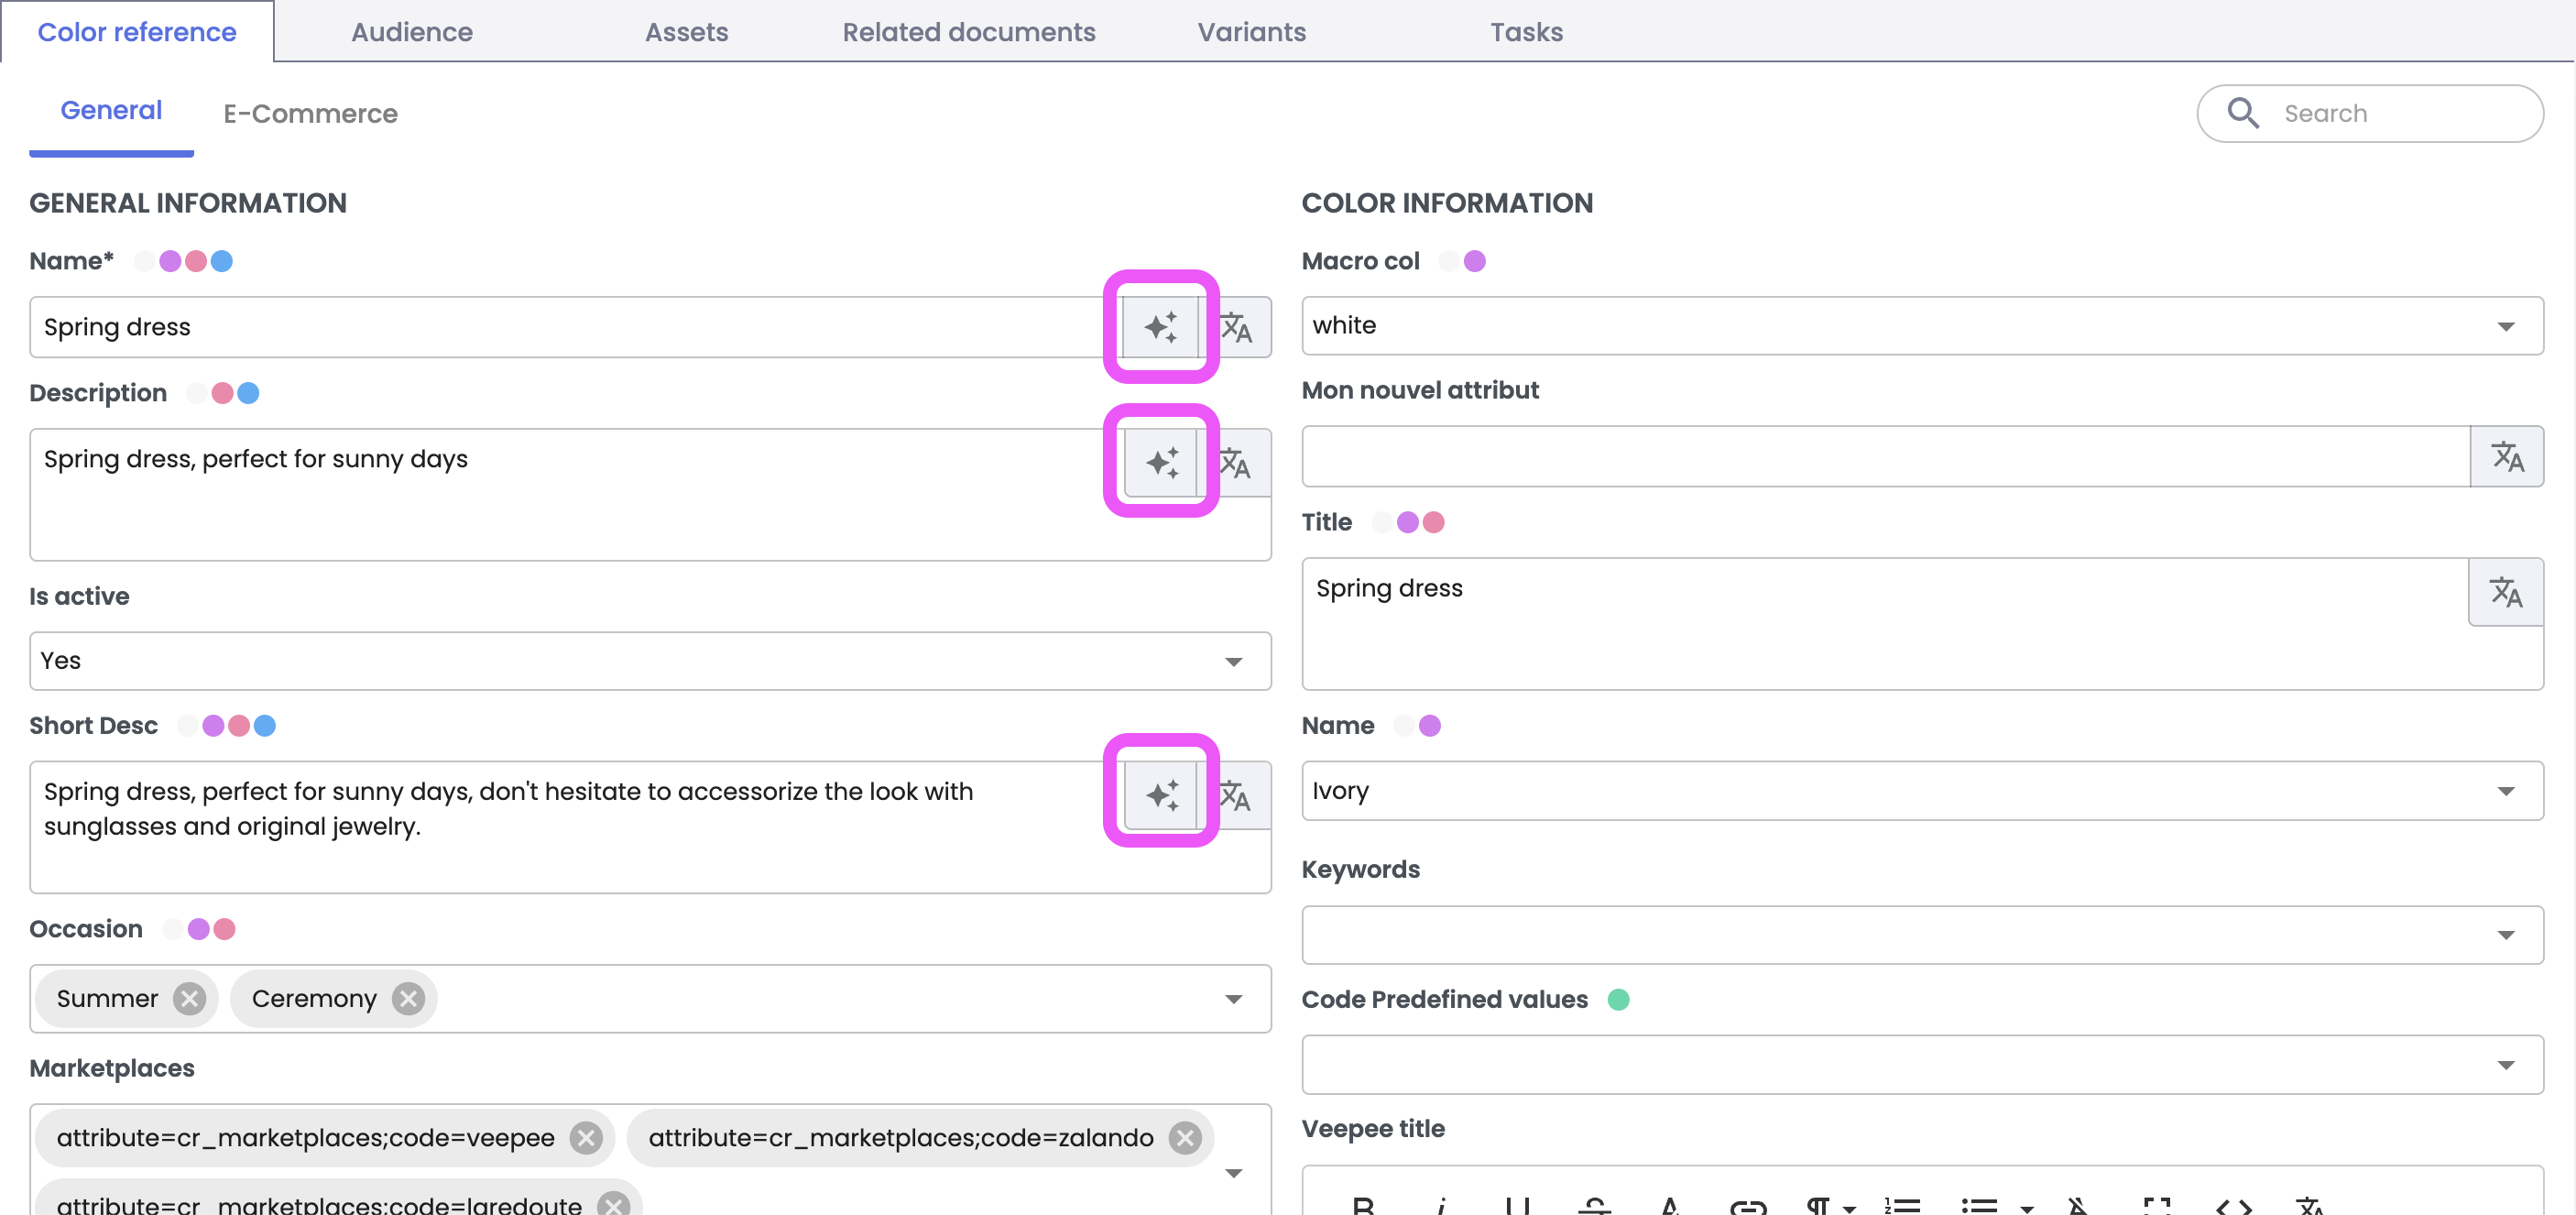
Name, Code, and Main Attributes
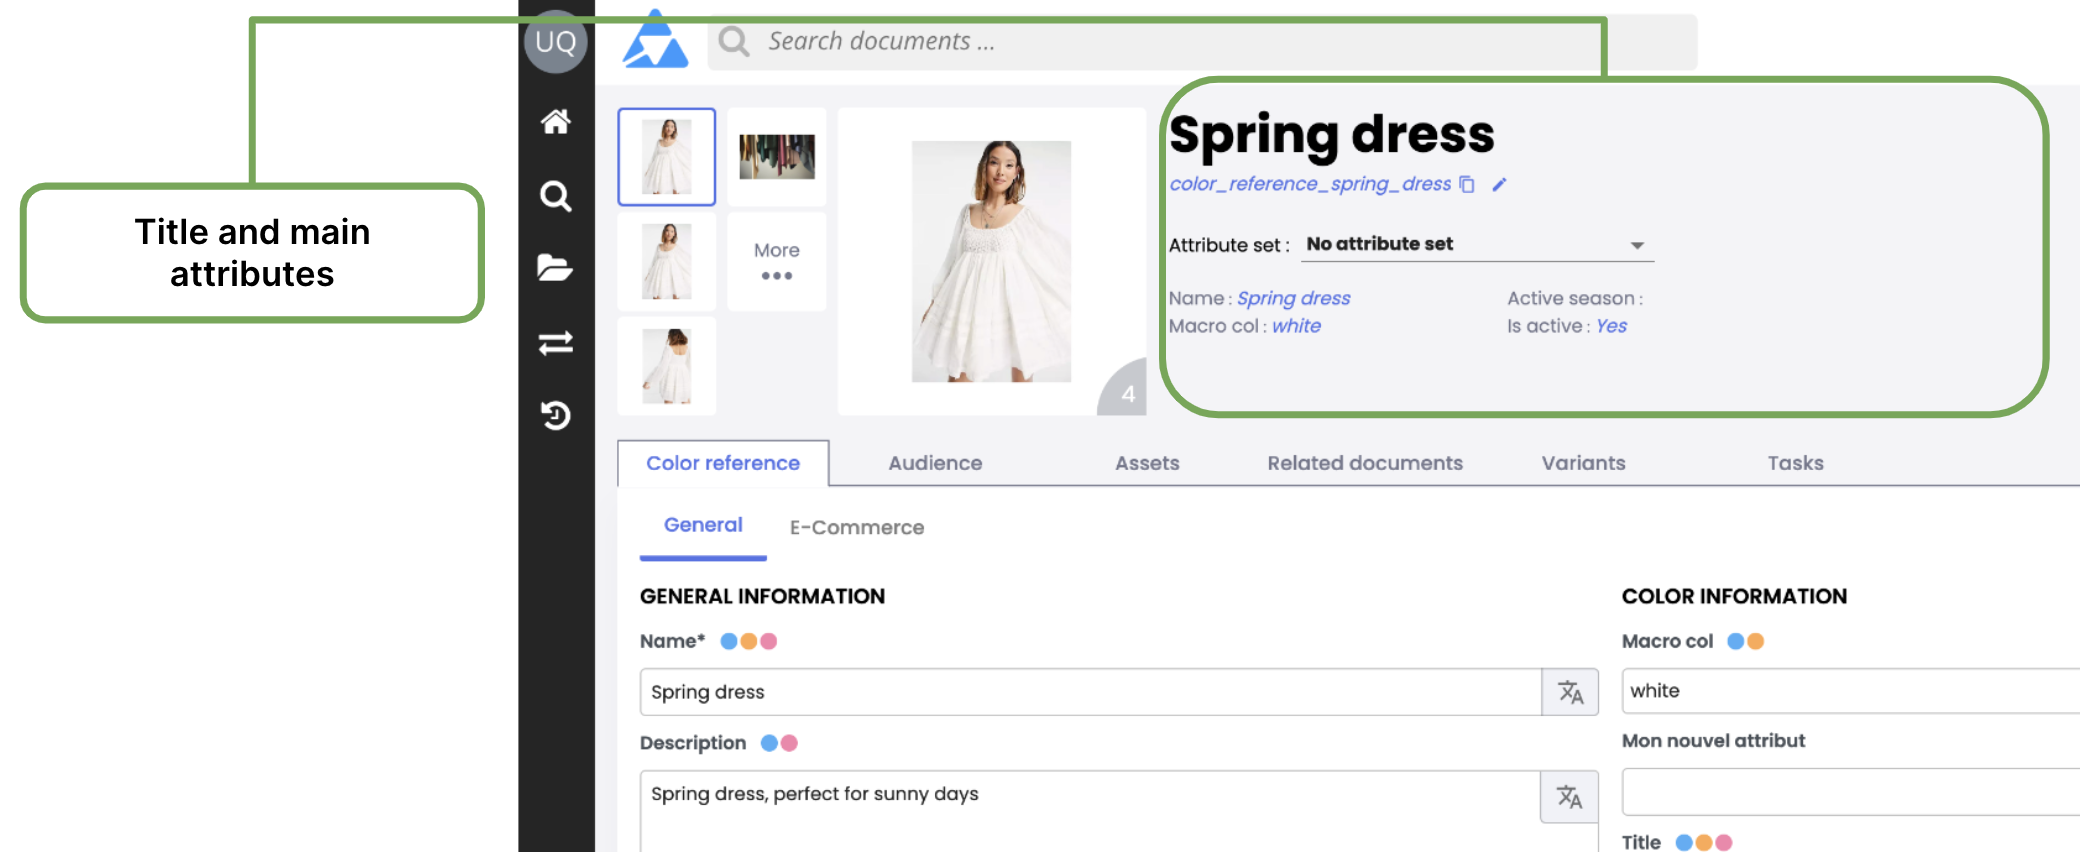
The central block of the header contains:
- The product page title, corresponding to the document's "name" attribute.
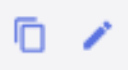
- The document code, with two nearby buttons to copy and edit this code.
- A dropdown menu to select and modify the attribute set of the product page.

- The main attributes configured by the administrator in the PIM instance's data model.
LimitationsIt is possible to display up to 8 main attributes in the product page header.
Breadcrumb
The breadcrumb at the top right of the product page shows the position of the product page within the classification hierarchy. The classification is interactive and allows navigation to higher levels.

Content Tabs
General
This tab is where you enter and edit most of the text descriptions for a product page. It generally contains several sections with distinct groups of attributes to be completed. The exact layout of the document type is configured by your Quable PIM administrator.

NoteThe tab named "General" is a generic editing tab. The Quable PIM administrator can rename it or create other tabs of this nature.
Quable AI Text Generation Tools
PrerequisitesTo use the generative AI feature on the product page, your Quable PIM instance administrator must have configured the feature in advance.
With Quable AI, users can easily generate relevant and accurate content with just a few clicks, enhancing their productivity. This feature enables users to fully leverage artificial intelligence for enriched and consistent product descriptions.
Identifying the Quable AI Text Generation Button
A button is available next to text input fields, allowing users to generate relevant prompts to automatically complete their text entries.
Generating Content
Click the AI prompt button to automatically generate content.

Monitoring Prompt Usage
If you are using an instance with a free subscription, Quable PIM displays the number of remaining prompts when using AI on the document page. Notifications inform you of the remaining prompts based on current usage.

Calculated Attributes
PrerequisitesTo use the calculated attributes feature on the product page, the administrator of your Quable PIM instance must have enabled and set-up the feature beforehand.
Overview
Calculated attributes automatically generate attribute values based on other attributes already filled in the product sheet. They appear like standard attributes, but their content is dynamically computed using a formula.
A calculated attribute:
- Appears greyed out on the product sheet,
- Is marked with a sigma symbol Σ on the product sheet,
- Is a non-localized and non-editable attribute,
- Displays a result in text format.
A calculated attribute is based on a formula defined in the administration menu. This formula combines one or more attributes using mathematical operators (+, -, *, /) and functions such as text concatenation, average calculation, and others.
Good to know
- Formulas can only include attributes from the same product sheet.
- Only non-localized attributes can be used in a calculated attribute formula.
- Formulas cannot be based on other calculated attributes or on attributes from other product sheets, variants, or asset sheets.
Enrichment process
The values of calculated attributes populate automatically based on other attributes in the product sheet. In order for the calculated field to display a result, all attributes used in the formula must be filled.
If one or more attributes in the formula are empty, an exclamation mark (!) will appear next to the calculated attribute. Hovering over the icon will display a list of missing attributes. If there’s an error in the formula (e.g., division by zero), an explicit error message will be displayed instead of the result.
Calculated attributes are updated automatically:
- when a value of an attribute used in the formula is modified,
- during a bulk edit,
- or when the formula is modified by the administrator.
LimitationThe usual restrictions related to attributes and bulk actions also apply to calculated attributes.
Save your changes
When you enrich attributes in the General tab, the changes are not saved automatically. A box at the bottom of the product page appears to inform you of the number of fields modified and invites you to save or cancel your changes.
At any time, you can save the changes made to a product page by clicking the Save button at the bottom of the page or Cancel to discard the changes.

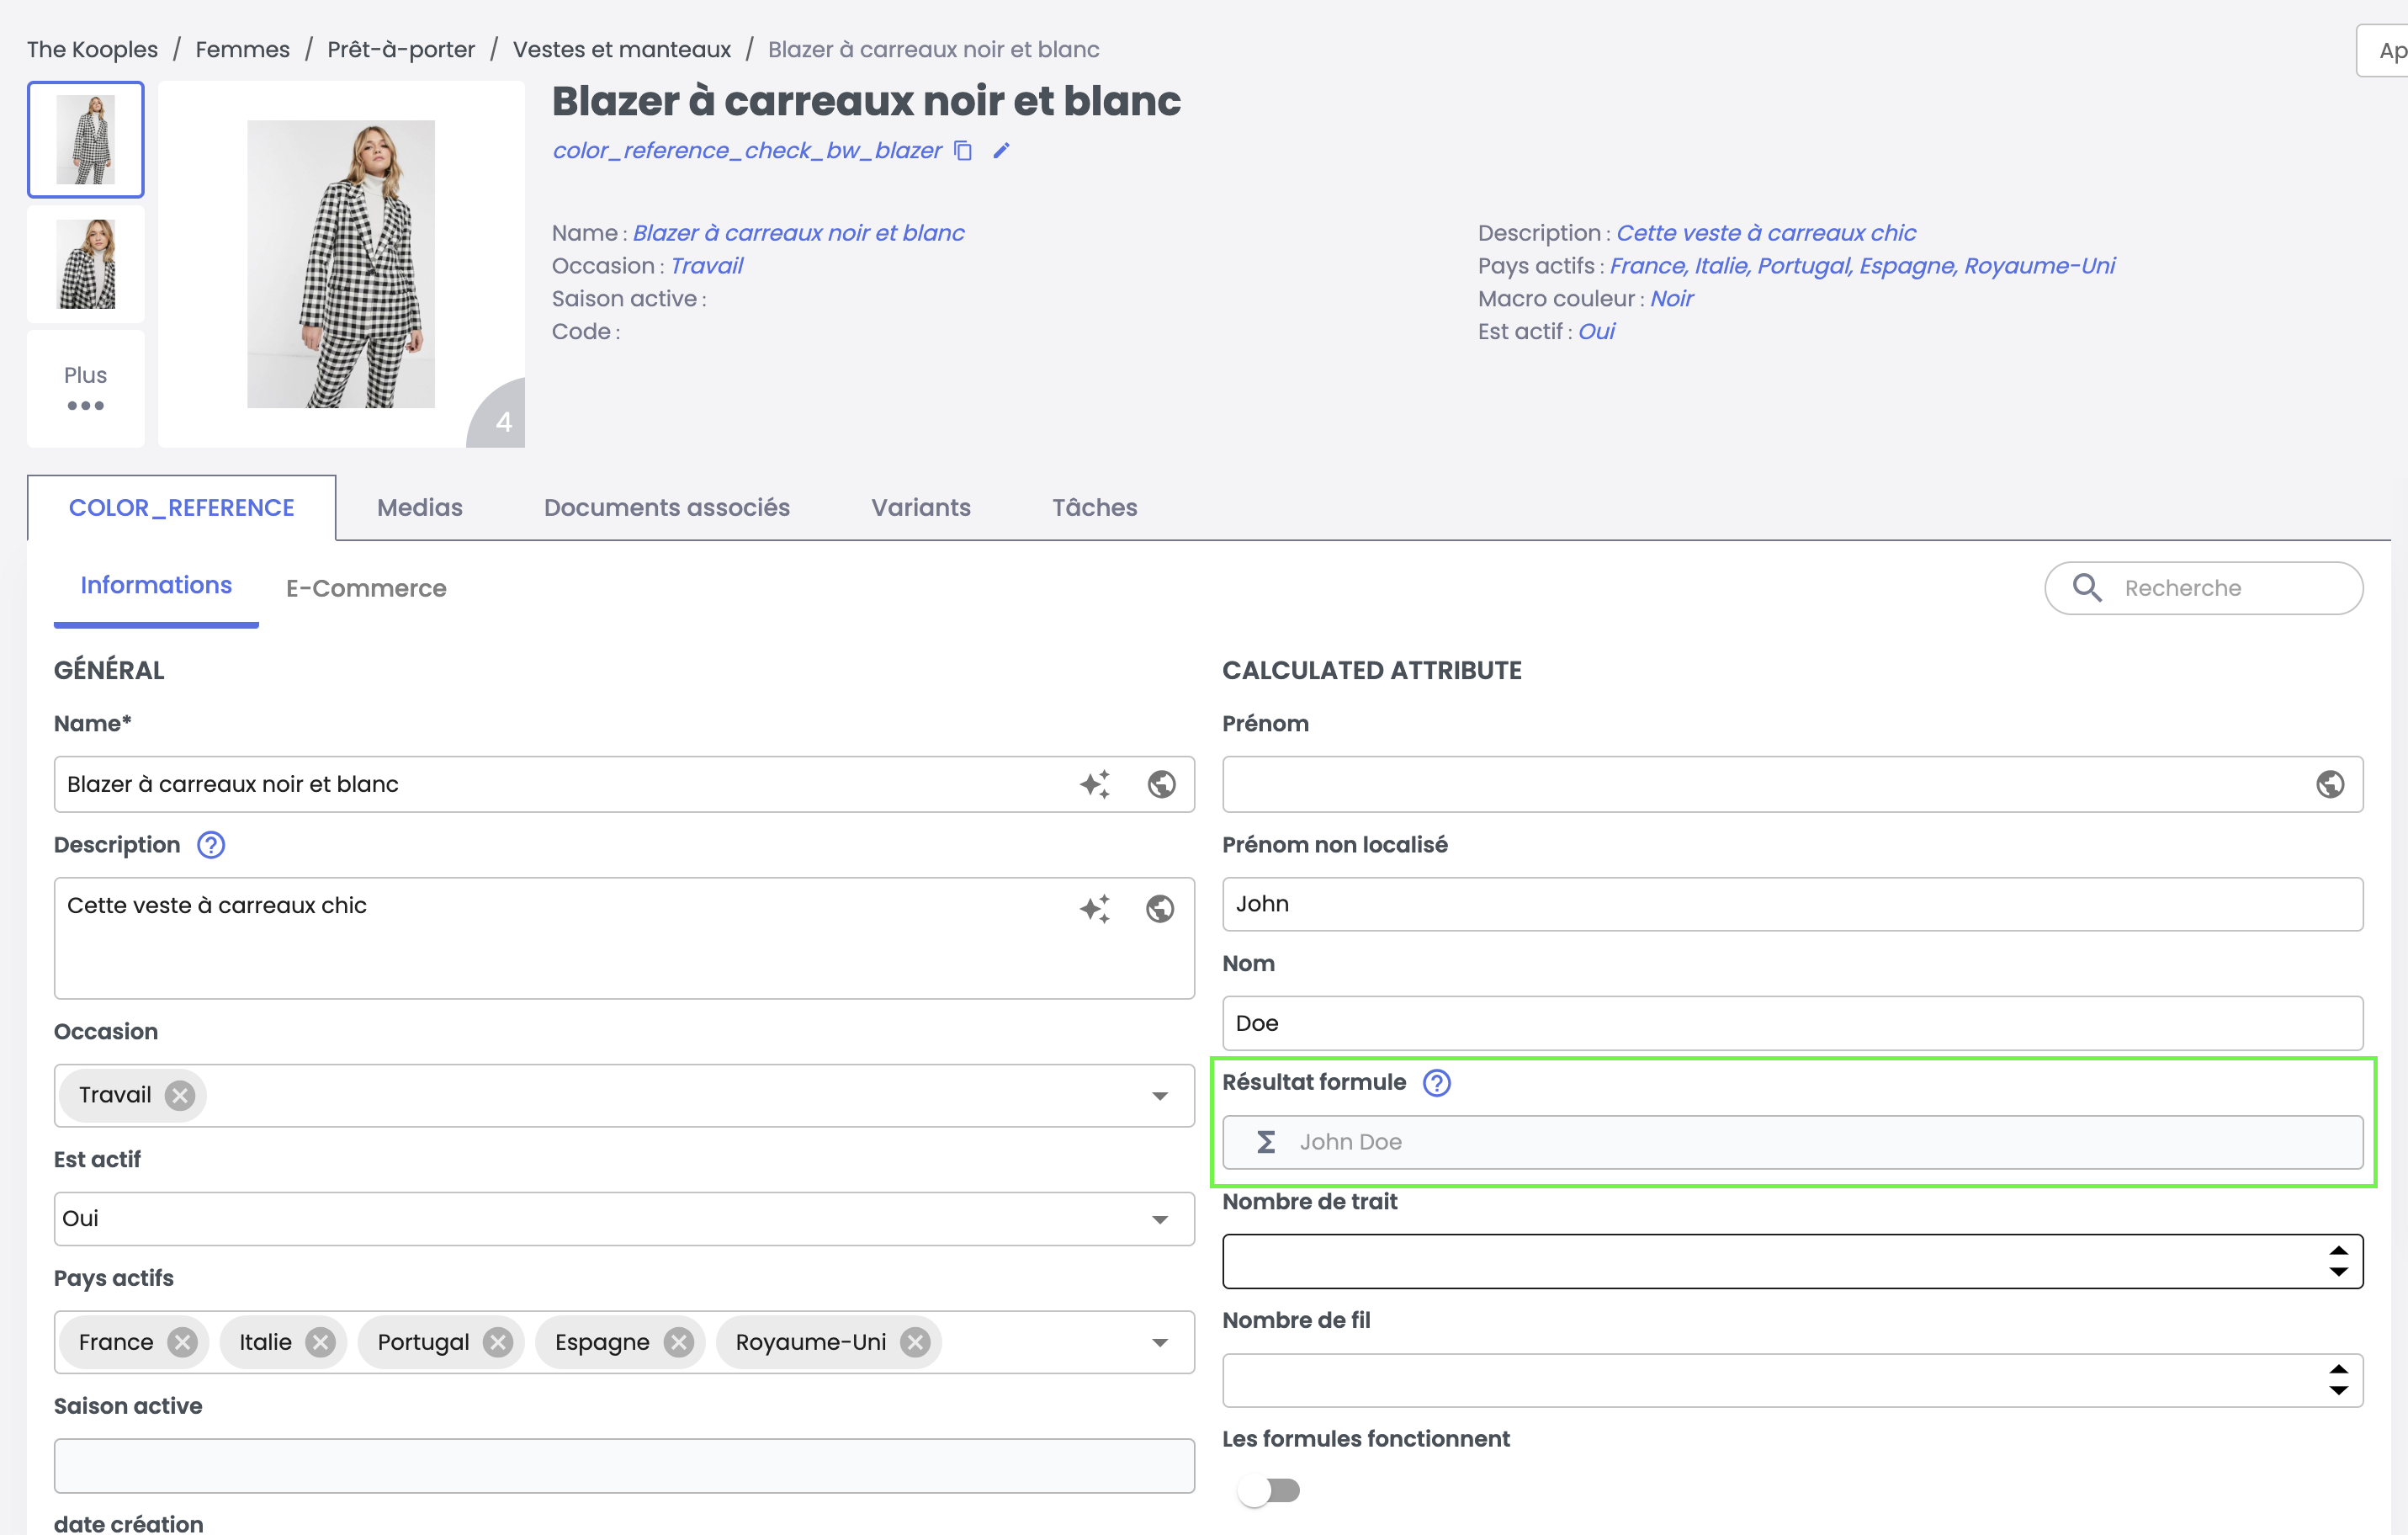
Assets
This tab lets you manage the digital multimedia files (assets) associated with a product page.

Assets are displayed one after another in the sections that correspond to the link type used to associate them with the product page.
Just after the link name, the number of associated assets for that link is displayed. This helps quickly identify how many assets are used for specific purposes (e.g., collections, print, web, etc.).
Important noteSince assets are associated with documents through links, you must have the following cross-reference permissions to manage them: Create – Update – Delete.
Add assets
At the level of each section corresponding to the link used, click + Add an asset. There are three ways to add assets to a product sheet:
-
Searching in the DAM. Enter at least three characters of the Name or Code of an existing asset in the search bar: a dropdown list of assets will automatically appear. Click the checkboxes to add or remove assets from the section.
-
Upload a local file. Drag and drop files into the window, or click "Choose files". The new asset will automatically be associated with the document and imported into the DAM’s default classification.
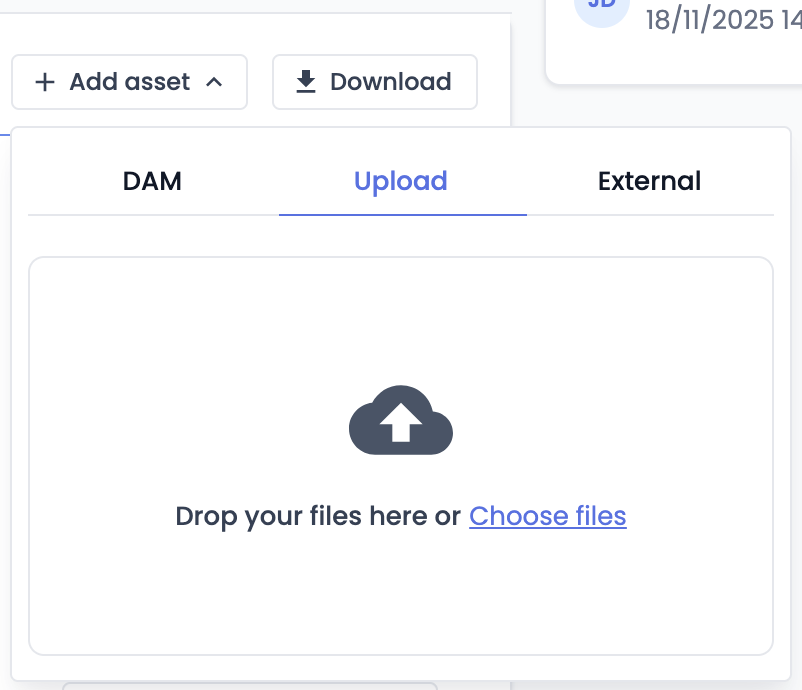
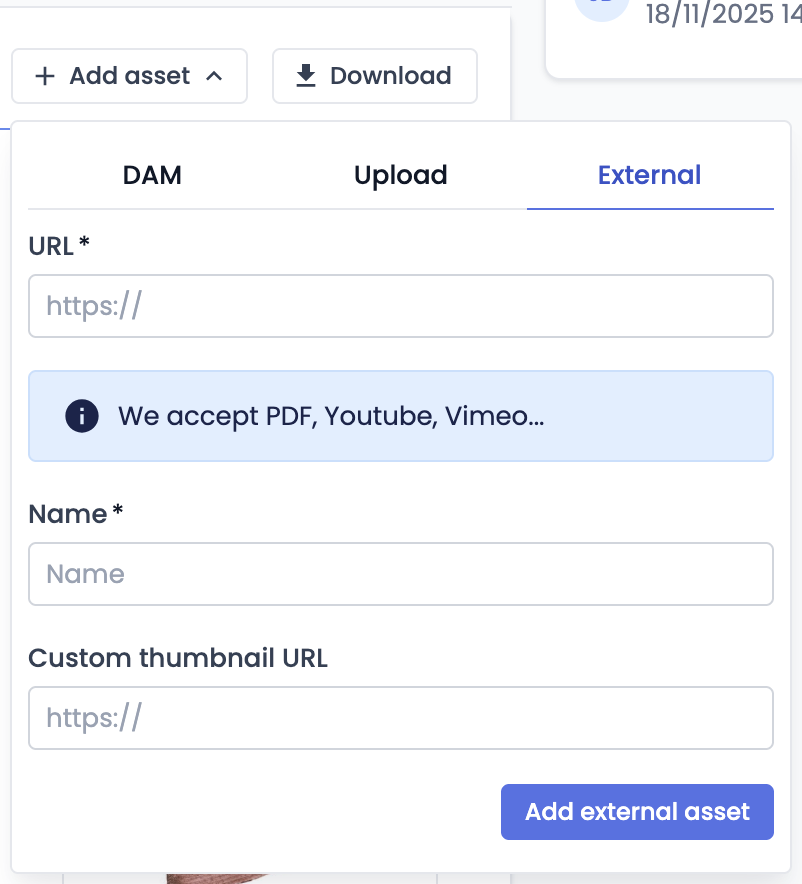
- Import from an external link, see the Assets documentation).
Reorder assets
You can change the order of assets within a section by clicking the ⋮⋮ on the asset thumbnail, then dragging and dropping.
The main asset of the product page is the first asset in the first section. To select an asset from another section as the main asset, the administrator must change the position of the link type of the selected section.
Compressed download
You can download a compressed file containing all assets available in the asset tab of the product page by clicking the Download button. Assets are downloaded in their native format (no resizing).
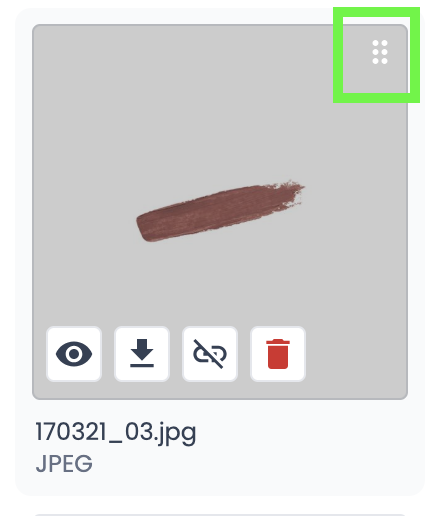
Additional actions
When hovering over an asset, additional buttons appear, allowing you to perform actions on the selected asset:

More details
Clicking the More details button takes you directly to the asset page.
Download the asset
Clicking the Download the asset button opens a dialog box to specify the size to download:

- Original file – The file is downloaded in its original size. Note that depending on the format, it may be quite large.
- Image Resizer Profile – You can specify the Image Resizer Profile to apply. This option is used for image files.
Make your selections and click the Download button to download the asset, or Cancel to abort.
Unlink
Clicking the Unlink button removes the link between the document and the asset.
NoteUnlinking an asset from a document does not delete it. If the asset is:
- associated with one or more other documents ➡️ the asset is simply detached from the document.
- not associated with any other document ➡️ it becomes orphaned.
Delete
Clicking the Delete button permanently deletes the asset from the document and from Quable PIM.
WarningThis action is irreversible. Once an asset is deleted, it cannot be recovered.
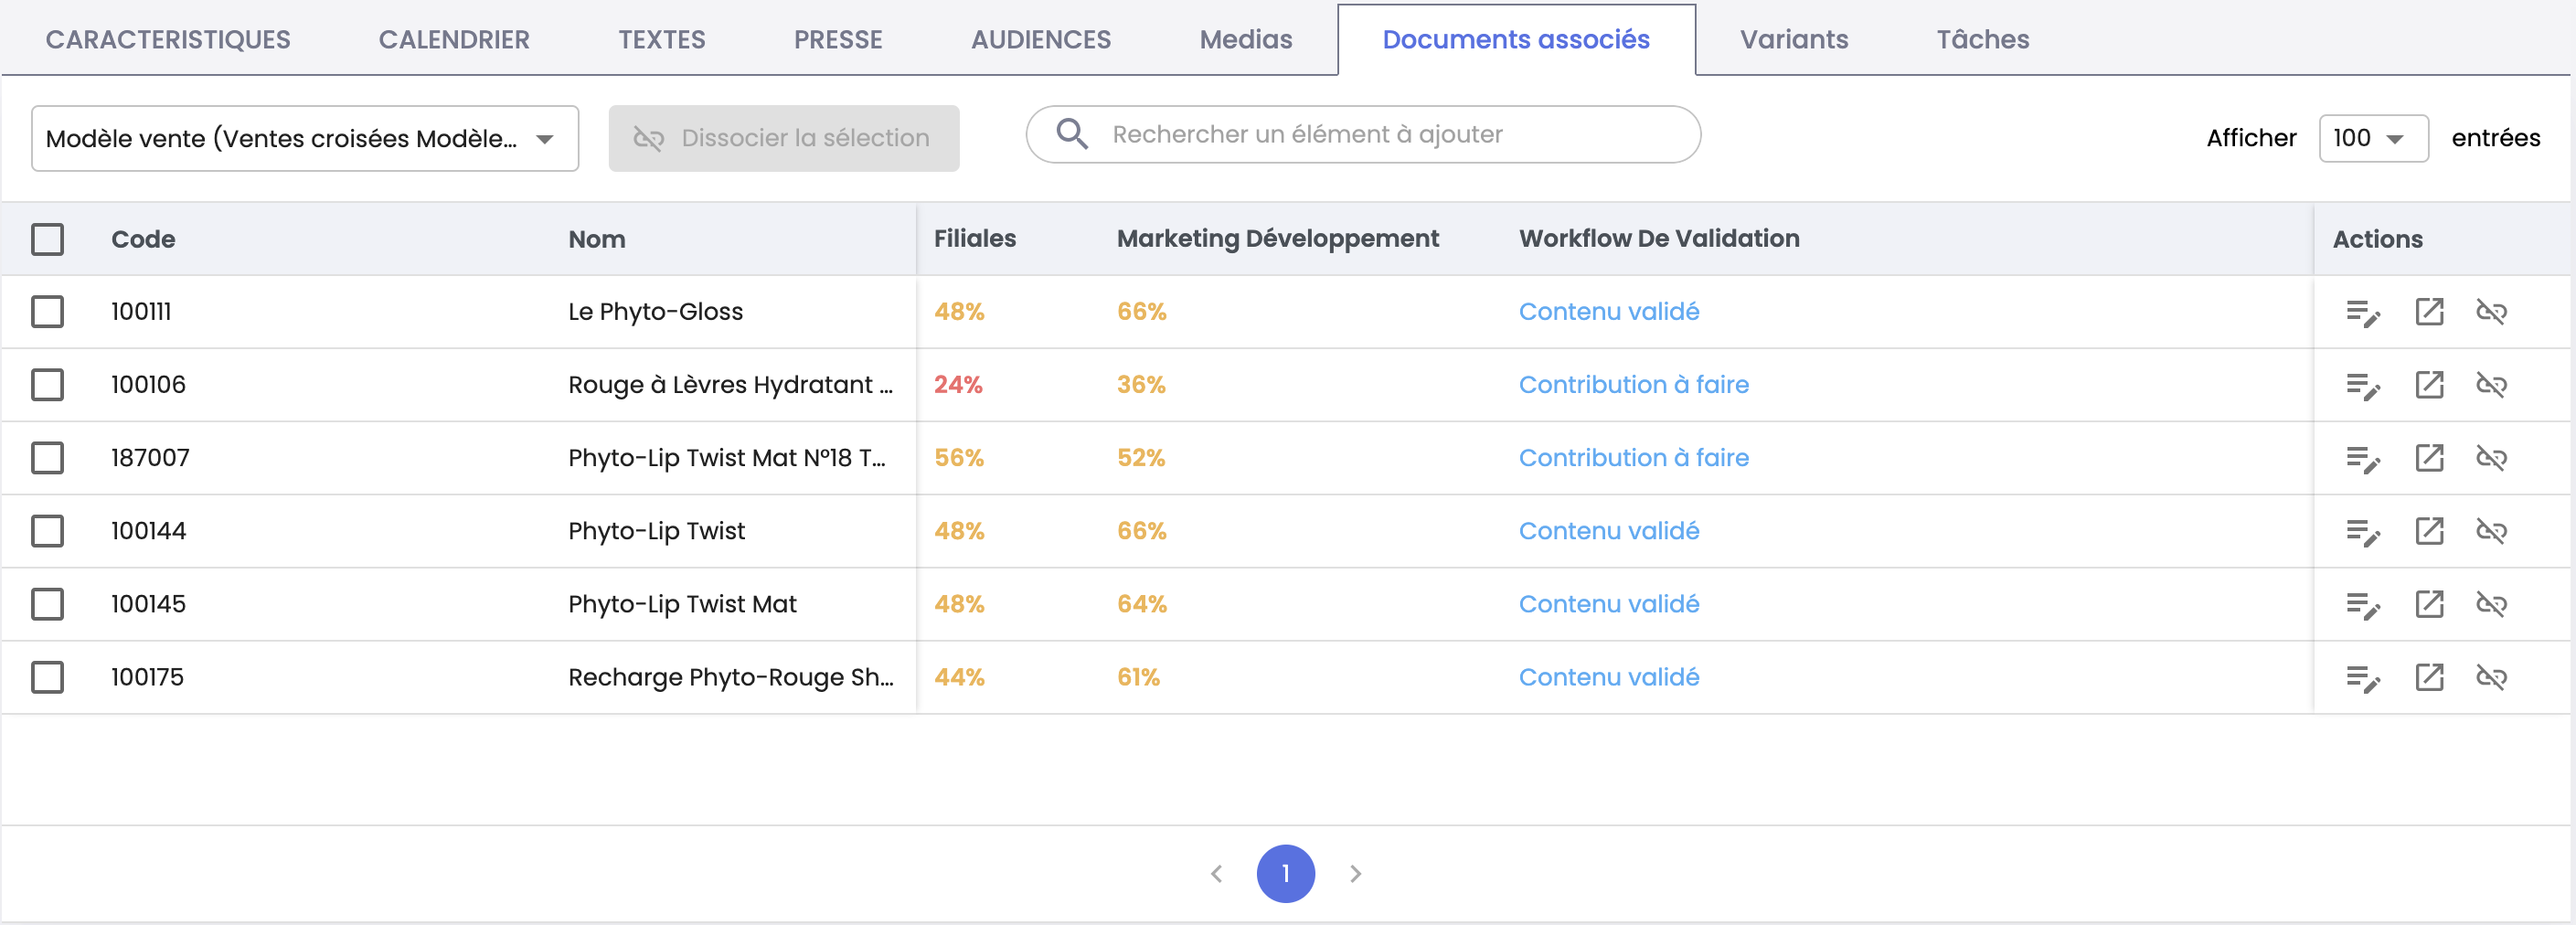
Related Documents
This tab allows managing other documents related with the product page.
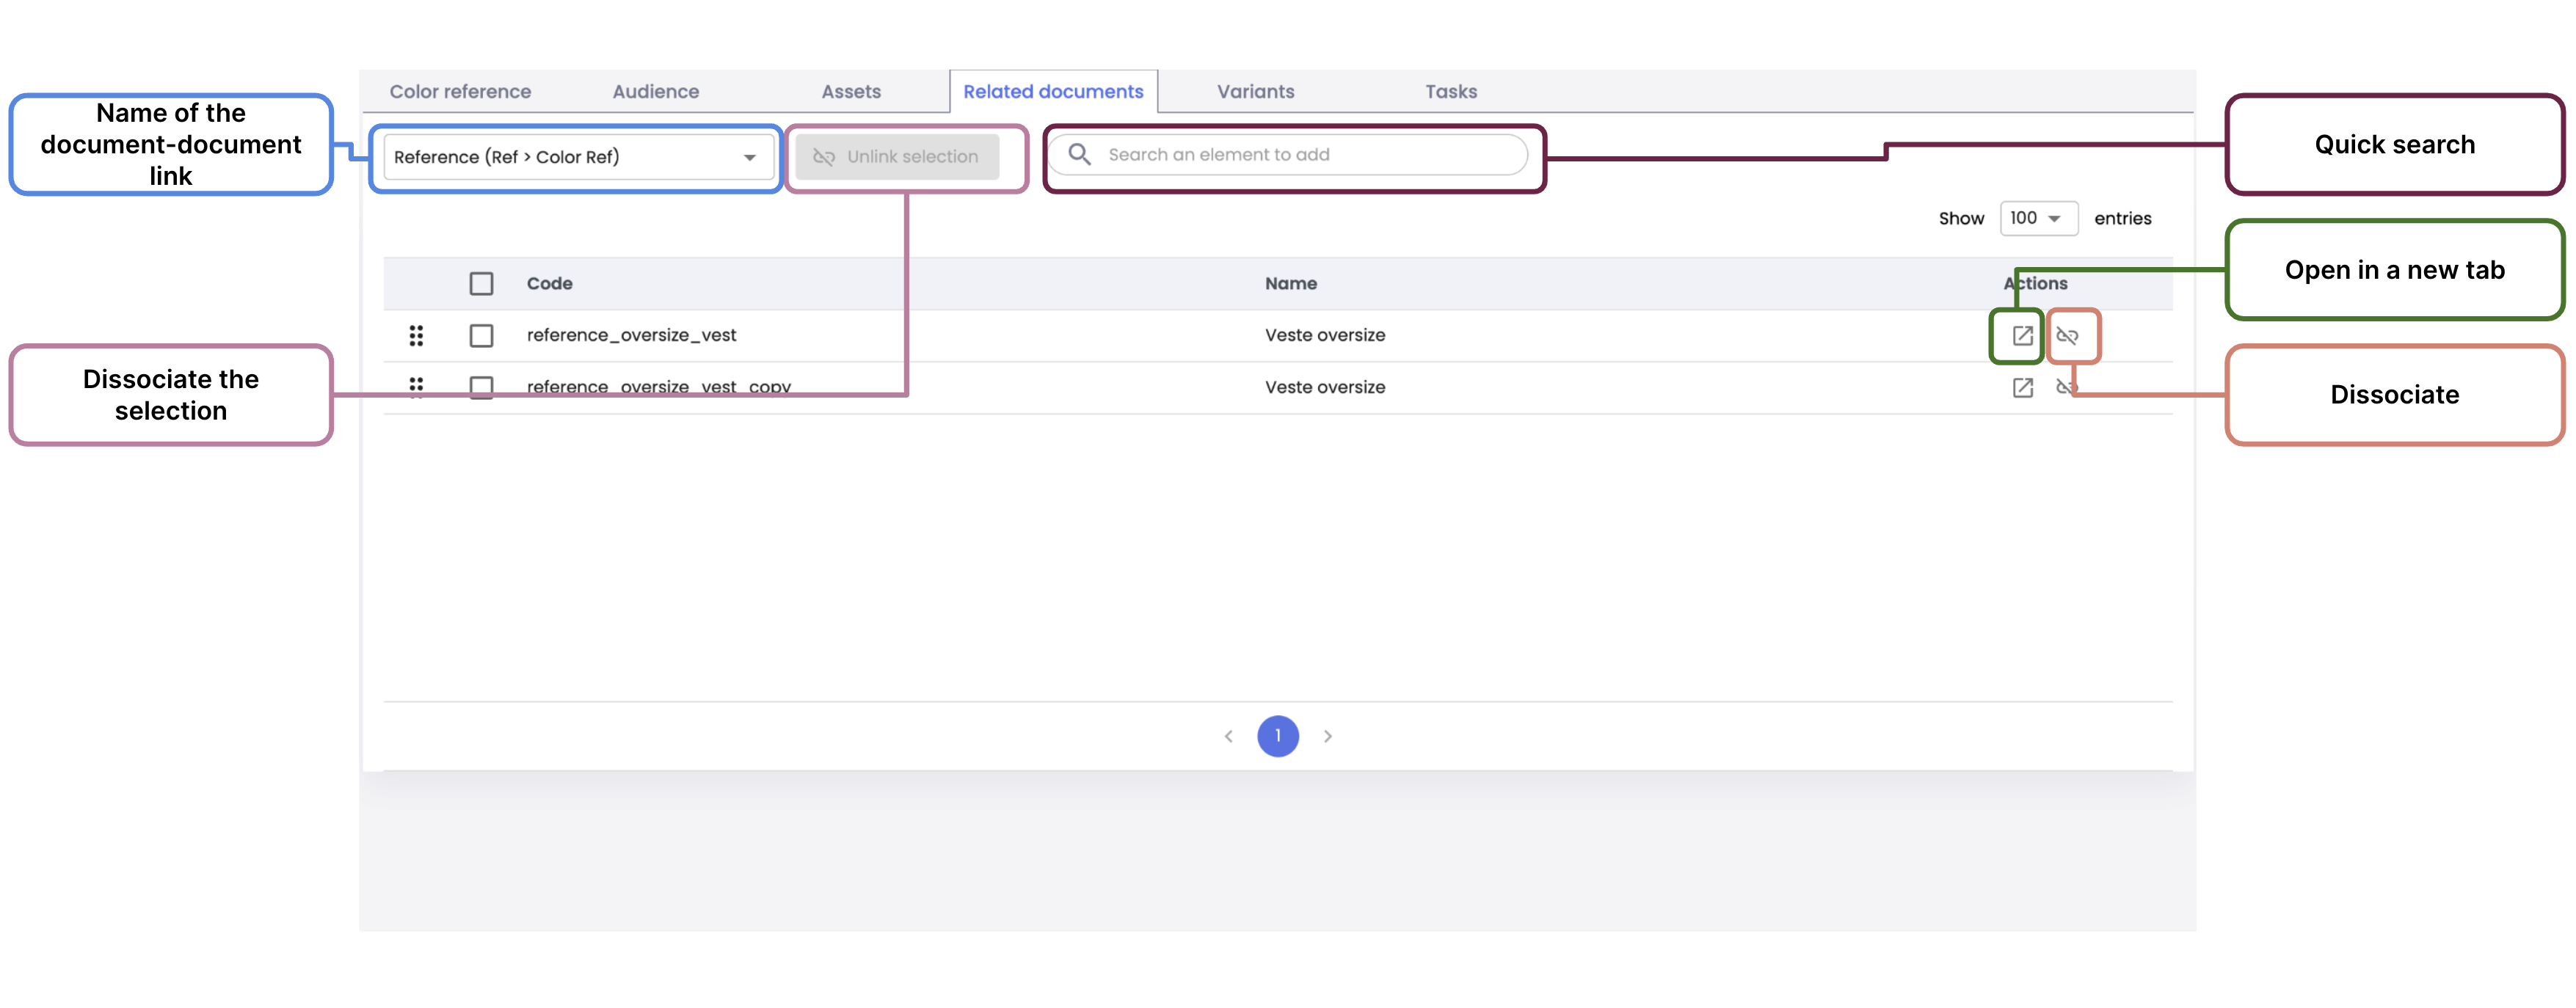
The links between documents are displayed in the left dropdown menu, and the number of related documents for each link is shown immediately after the link name. This allows quickly identifying the number of related documents used for specific purposes (e.g., cross-selling, upselling, etc.).
Rights and PermissionsSince related documents are connected to documents through links, you need the following cross-reference permissions to manage them: Create - Update - Delete.
| Action | Description |
|---|---|
| Associate Documents | You can add related documents by performing a quick search. Enter at least three characters of the Name or Code of an existing document in the search bar. |
| Disassociate Documents | You can remove an related document by clicking the Dissociate button, or by selecting a group of documents and clicking the Unlink Selection button. |
| Open Documents | You can open a related document in a new browser tab by clicking the Open in New Tab icon. |
Display Options
You can modify the display of related documents in the table. Click on the three dots ⋮ next to the column header to access display options:
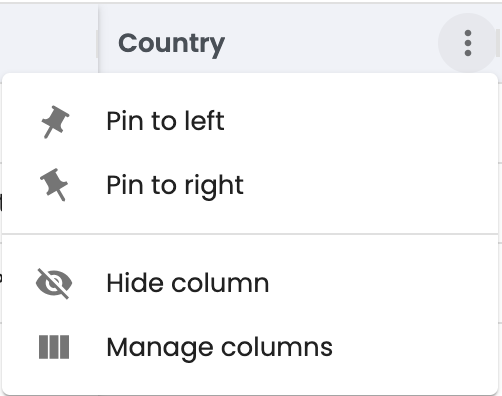
* Pin to left, Pin to right
- Hide Column
- Manage columns. This option allows you to customise information :
- Data languages, by locale and by country
- Document completeness rate
- Document workflow status
Variants
This tab allows managing variants associated with a product page.

Quick search: The quick search filters the existing variants in the table as soon as the first 3 characters entered. It searches both the variant codes and names, displaying the results directly in the table.
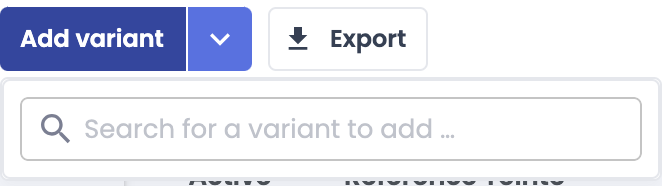
Add a Variant
ImportantA variant can only be associated with a single product page.
- Click the Add variant button. A text field will appear, allowing you to associate an existing variant with the product page. If the variant is already linked to another product, it will be detached from the previous one and associated with the current product.
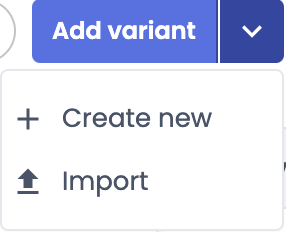
- Click the downward arrow to access a menu that allows you to:
- Create a new variant
- Import a file (for bulk import of new variants)
- Click Create new: A window will open to define the attribute values for the new variant.
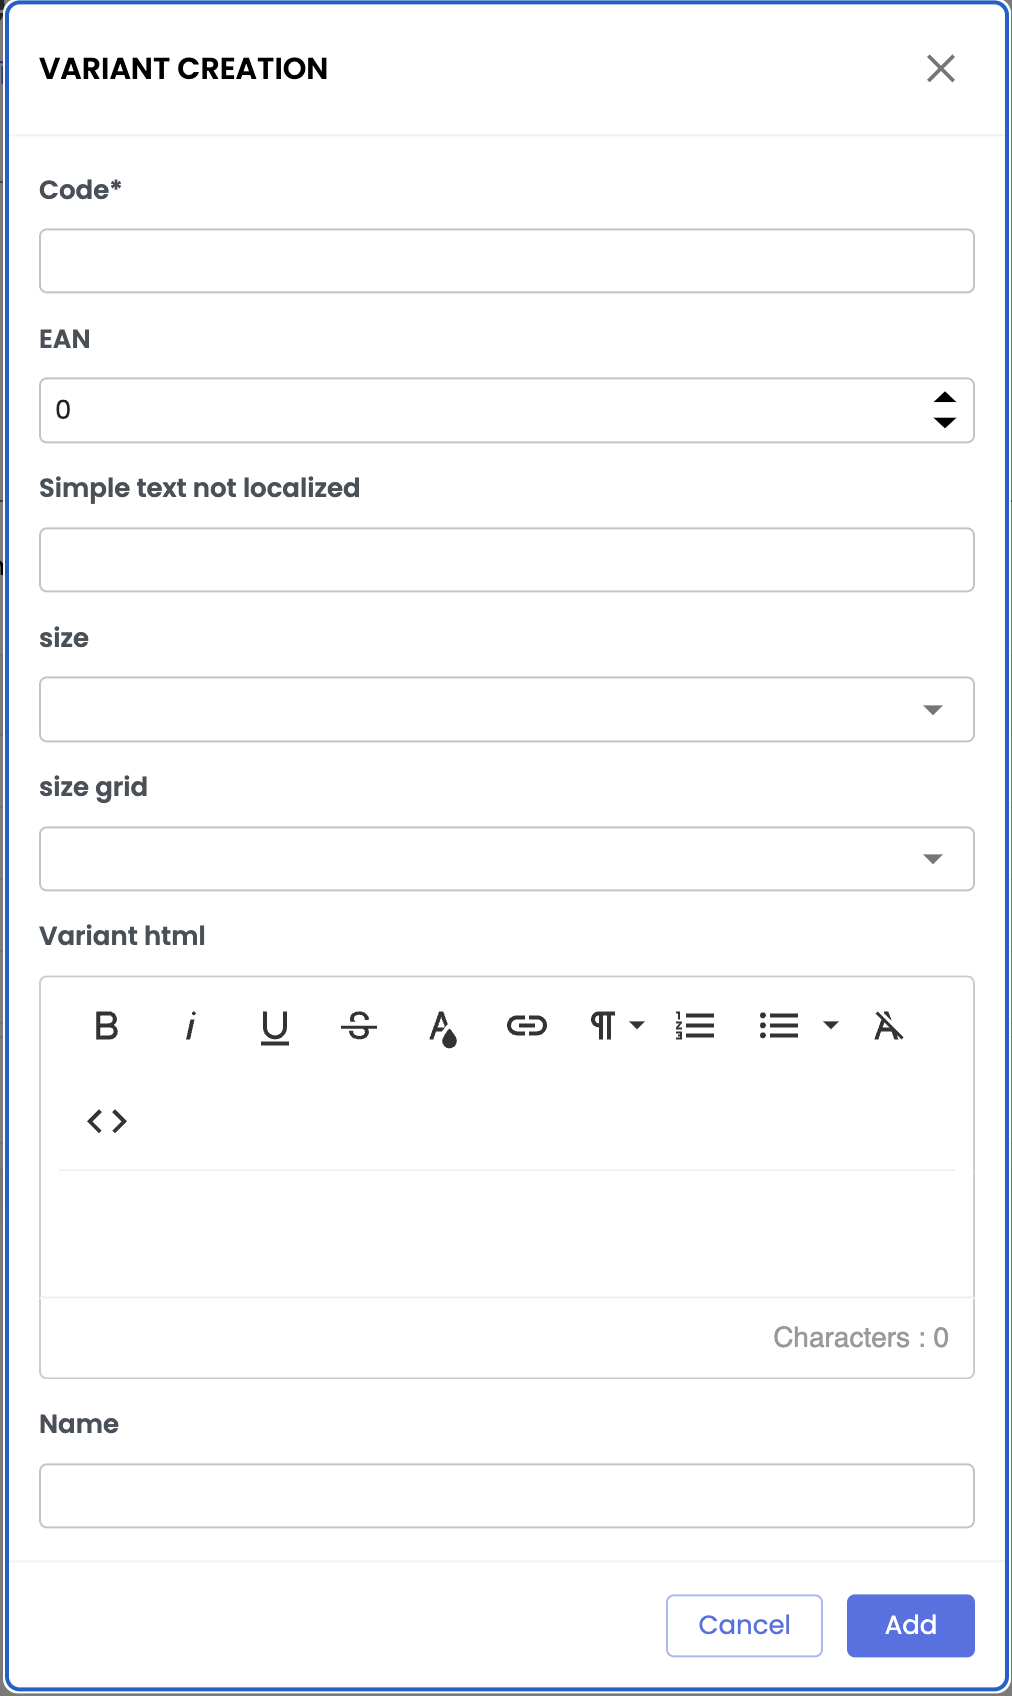
Enter the information related to the variant attributes. By default, the following attributes are available:
| Information | Description | Required |
|---|---|---|
| Code | The unique code of the variant | Yes |
| Name | The name of the variant | No |
Once you have entered all the information for the new variant, click on the Add button to save the variant or on the Cancel button to abandon creation.
NoteThe attributes available for variants are defined by the administrator of your Quable PIM instance.
Main Info
At a glance, this section displays the position (priority) of the variant and its code.

Reorder VariantsTo rearrange variants:
- Drag and drop a variant by clicking on the ⋮⋮ icon at the beginning of the row.
- Double-click the position field and enter a new value manually.
The other variants will automatically adjust based on the new position.
Enhance or Modify Variant Attributes
Variant attributes are displayed directly in the right part of the table. To enter or modify an attribute value, double-click on one of the cells. Use the Tab key to automatically move to the next attribute.
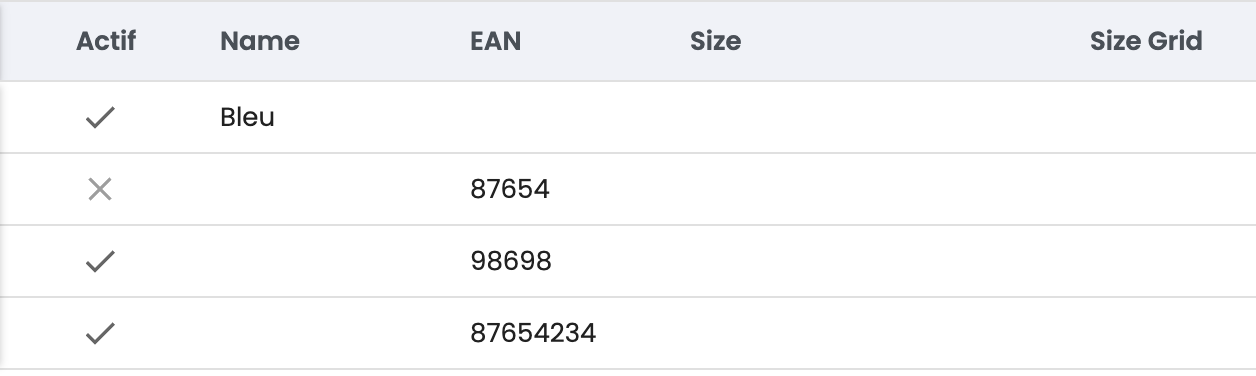
Double-click on the Active column cell of a variant to change its active or inactive state.
Display Options
You can modify the display of variant attributes in the table. Click on the three dots ⋮ next to the attribute name in the column header to display the display options:
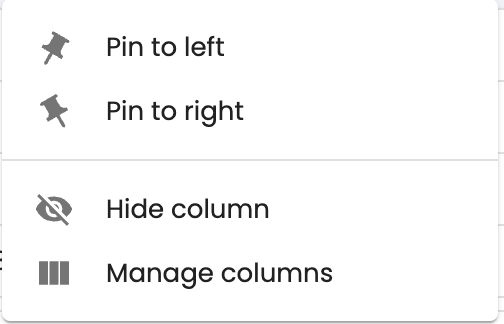
* Pin left
- Pin right
- Hide
- Manage columns. This option allows you to customize attributes to hide or display for variants.
Assets associated with variants
Click on a row in the table to select a variant. Assets association functionalities for the selected variant appear below the page.
You can then add asset for the selected variant by following the steps in the Assets section. The process is identical to managing asset for the product page.
NoteOnly the image-variant link is available for associating asset with a variant.
Tasks
This tab allows you to manage tasks associated with the product page.

At the top of the tab, you will find Filters. Use the dropdown menus to filter tasks displayed by status, category, created by, and/or assigned to.
Tasks are displayed in the center of the tab with their status indicated by a color code representing the level of completion. Click on a task to open its dialogue box and add a comment for its creator.
To create a new task, click on the Create task button. This will open the New task window where you can enter the necessary information and assign the task to the appropriate person or role.
For more information on task management, refer to the Tasks page.
Action Buttons
The Actions menu (on the right side of the product page) provides access to a set of buttons for performing actions on the product page. These buttons are available from each tab of the page.

Move
You can move a document to another classification by clicking the Move button. A window will appear where you can select a new classification from a dropdown list. Once you have made your choice, click the Move button to move the document, or click the Close button to cancel the move.

Duplicate
You can create a copy of a product page by clicking the Duplicate button. A window will appear to confirm duplication. A "-copy" suffix is added to the Code of the document. You can modify it or leave it as-is.

NoteOnly the product page, its attributes, its links, and its assets (if applicable) are copied. Variants are not copied because they can only belong to one product page.
Print
PrerequisiteThe Quable PIM administrator must configure a print channel for this feature to be available.
You can generate a product sheet in PDF format by clicking the Print button. A new browser window will open to display the generated PDF.
The PDF product sheet contains the following information:
| Information | Description |
|---|---|
| Classification Hierarchy | The classification hierarchy from which the product page originates. |
| PDF Creation Date | The date when the PDF was created. |
| Page Name | The name of the product page. (Automatically included) |
| Data Model Information | The product page settings within the data model:
|
| Main Media | The main media of the product page (images only). |
| Attributes | The attributes selected for the print channel. |
| Variants | The variants of the product page (Code and Label only). |
NotePDF product sheets are only available for product pages, their attributes, and their variants. Other related objects are not available for PDF printing.
Archive
You can exclude a document from displaying in your Quable PIM by clicking the Archive button. A window will appear to confirm archiving. Click Yes to archive the document, or click No to cancel archiving.

Archive RetrievalYou have 2 ways to retrieve archived product pages:
- Or via the following API: https://{your-company}.quable.com/api/documents?active=0
Remove
You can permanently delete a product page by clicking the Delete button. A window will appear to confirm deletion.
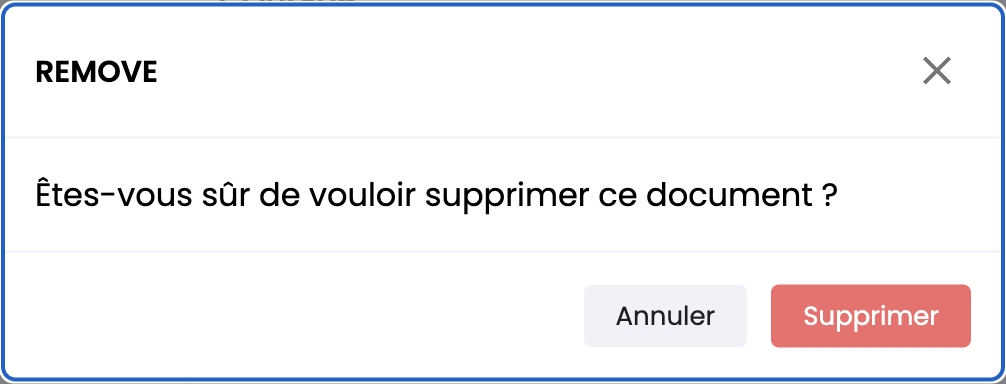
AttentionThis action is irreversible. Once a document is deleted, it cannot be recovered.
Collaboration Widgets
On the right side of the product page, you will find collaboration widgets. By default, all widgets are visible, but you can collapse them for better readability by clicking the arrow at the beginning of the section. These widgets can also be rearranged using drag-and-drop by clicking the ⋮⋮ icon at the beginning of the row.
Activity History
In the Last Edited section, you can view the most recent actions performed on the product page. The feed displays the name of the person who performed the action and the date it was carried out.
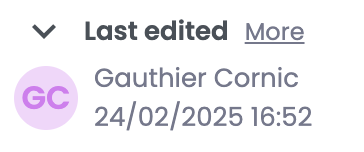
Click More to get additional details about the action, including the data language used for the modification if applicable. You will then be able to view the full history on a dedicated page displaying all modifications:

Each individual modification is listed in a table displaying:
- Start Date - the date the modification was made
- Author - the person who made the modification (profile picture is also displayed)
- Actions - the type of modification performed
- Languages - the data language used for the modification
Click the i icon at the end of the row to open a dialog box with additional details about the modification:
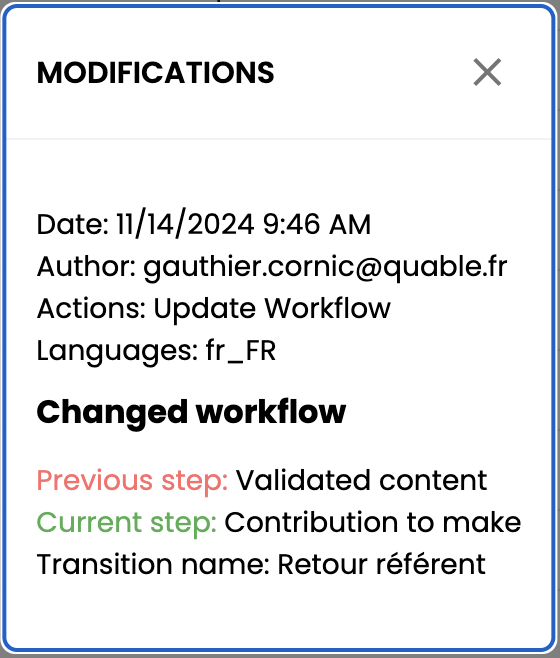
The details are color-coded to indicate the type of change:
- GREEN = new values, information has been added.
- RED = old values, information has been modified or deleted.
NoteTo close the history page and return to the product page, use the breadcrumb navigation at the top right and click Document Page.
Updated 8 months ago