Advanced Search
Find your content quickly!
New VersionThis page introduces the new version of the advanced search, now available following the visual redesign of our platform.
You can still access the old version of the advanced search by clicking on "Switch to old search page" located at the top right of the screen. This will allow you to manage the channels until the deployment of the new version of the channels page, as the current version still uses the saved searches from the legacy version of advanced search.

Advanced Search is a central feature of Quable PIM. It allows you not only to locate and quickly access all objects contained on the Quable platform using a selection of criteria but also to:
- control the columns to display as well as the sorting order,
- make quick modifications to your classifications, documents, assets, and variants,
- create dynamic widgets for your dashboard, and/or
- export your search results or translations.
Accessing Advanced Search
You can access it from:
- a search using the Quick Search bar.
- the Search icon in the form of a magnifying glass in the left navigation menu.

Foy your Information
- The initial view is a list of your existing documents linked to a selected doctype
Presentation of Advanced Search
The page is divided into two sections. The upper section contains:

The central section displays the results of your search.

Accessing ObjectsTo access the page of an object in the search results section, you can either:
- double-click on the row, and you will be immediately redirected to the object's page
- click on the icon at the end of the row, opening a new tab to the object's page

Search Options
To launch a search, you must specify at least one search option in the upper section. Search options are applied instantly when selected. The more options you use, the more refined your results will be.
Object Type
The Object Type parameter allows you to specify on which type of object Quable PIM performs the search.

| Option | Description |
|---|---|
| Documents | (by default) The search is performed only on documents. When Document is selected, the Document Type option is displayed to specify the type of documents to search for. |
| Assets | The search is performed only on assets. |
| Variants | The search is performed only on variants. |
| Classifications | The search is performed only on classifications. |
Contains text
This input field allows you to directly enter text related to the name and code of documents to refine your search.

Add a Filter
For your Information
- You can combine multiple filters to refine your search.
- Filters apply to only one object type and doctype at a time.
To further refine your searches, you can filter by attributes of your items. These attributes can be general, such as name or code, or specific to your items, depending on your data model.

For example, if you're conducting a search on a document, you can filter the search on:
- one of the attributes associated with the document type,
- one of the attribute sets, tags, completeness, classification, or workflow associated with the document type,
- one of the attributes associated with any of its linked documents.
When you add a filter, a dialog box opens to define the filter rules. You can filter by:
- Values: all available values in the added filter are offered for selection,
- Conditions: a list of operations on the values is available in a dropdown menu. The menu options vary depending on the type of filter added.

Good to know:
- The "Status/Workflow" filter is divided into "Tags" filters and Workflow filters (one for each existing workflow, designated by their names in the current interface language).
- "Status/Workflow" is still usable, but we recommend using the new filters.
Limitation on "Text Area" AttributesYou cannot search for attributes of “text area” and “HTML field” types that contain more than 255 characters.
Asset tag filters
When the Asset object type is selected, you can refine your searches using the Asset tags filter in the advanced search.
Add screenshot
Images benefit from an AI-based auto-tagging feature, designed to facilitate image search, filtering, and identification within the DAM, without requiring any prior manual enrichment.
How to filter on media tags
- Select the Asset_Auto_Tag filter.
- Choose the “contains” condition.
- Enter one or more label values to use as filtering criteria.
Add screenshot
This allows you to quickly identify all images associated with specific labels by directly filtering on the AI-generated tags.
Limitations: media tag filters
- Only images in the following formats can be searched via the tag filter:
.png,.webp,.jpg,.bmp,.gif,.tiff.- Labels are available in English only, regardless of the selected data language.
- Search applies only to media imported into the DAM. External media are excluded.
Active Filters
When filters have been applied, they are displayed in the header of the search. To remove a filter, click on X.

Display Options
In the right-hand part, the upper section presents the display options. They allow you to define the columns to display, the sorting to apply, and the number of results per page.

Modify Columns
By clicking on the Columns button, a dialog box opens where you can select the columns to display in the search results.

To select columns, check individual items in the Available Columns list (on the left) and move them to the Selected Columns list (on the right). You can also search for a specific column by typing its name in the search bar.
Once you have selected all the columns you want to display, click the Apply button to save the changes or the Cancel button to exit the dialog without modifying the displayed columns.
For your informationYou can select or deselect all columns by clicking on the first checkbox at the top of the list.
Modify Sorting
By clicking on the Sort button, a dialog box opens where you can select the direction in which individual columns are sorted in the search results.

To select columns, choose individual items from the Available Columns list (on the left) and move them to the Selected Columns list (on the right). You can also search for a specific column by typing at least three characters of its name in the search bar.
Once you have selected the sorting to apply to the columns, click the Save button to save the changes or the Cancel button to exit the dialog without modifying the sorting order.
Number
You can define the number of results displayed per page (10, 25, 50, 100) in the dropdown menu. 100 is selected by default.

Search Results
Once you have applied your search parameters in the upper section, the corresponding results are displayed in the central section, allowing you to perform the actions described below.
LimitationsIt is impossible to display and navigate beyond 100,000 results in the advanced search.
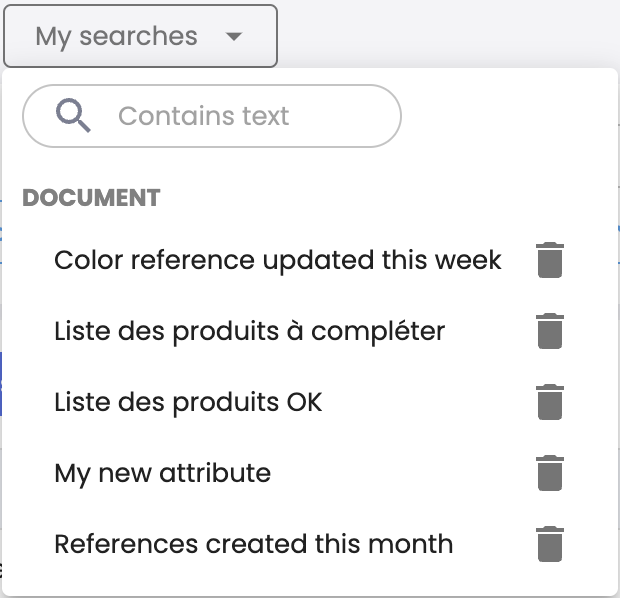
Save Search
Best PracticeSaving your searches enables:
- Consistency of results when performing the same search in the future,
- Dynamic distribution of product sheets across channels,
- widgets creation.
You can save your search options for future reuse. To save a search, click on the Save button.

A Create a new saved search form opens.

Enter a name to define the label for your saved search, and click Save.
Saved searches appear in the My Searches dropdown menu. Select a saved search to display the search result in the main section. You have the option to delete them by clicking on the trash can icon.
Feature undergoing redesignCreating dynamic product lists for sharing across channels is currently only available in the legacy advanced search
An update is underway.
Create a Widget
Quable PIM's graphical widgets present your data in the form of charts to help you see and understand them easily, enhancing time management, collaboration, and efficiency.

To create a new graphical widget from your search results, click the Create a Widget button.

A new dialog box opens, allowing you to Create a Widget.
For detailed information on creating graphical widgets, see Graphs.
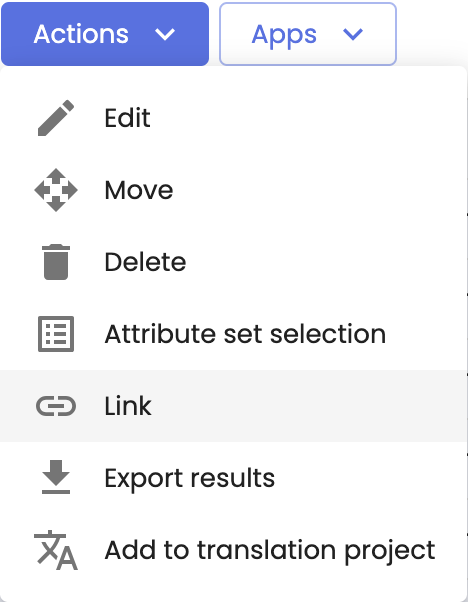
Actions on Results
Selections and Required PermissionsThe following actions are only active when:
- The user has the required permissions (update, delete, move, etc.)
AND
- The objects have been selected (via checkboxes or by using "select all results").
Good to KnowOnce validated, action processes run in the background, and the update time for your modifications will depend on the number of selected objects.
Processes are visible and can be tracked from the activity log page.
Limitations on bulk actionsIt possible to perform a bulk action :
- On a maximum of 100 items selected via checkboxes,
- On a maximum of 250,000 items using "select all results".
Bulk Edit
Bulk Edit allows you to update values for a selection of multiple attributes simultaneously on product sheets, assets, or variants. For bulk editing of product sheets, you must also select a document type in the Document Type option.
- First, perform a search on a selection of objects.
- Second, select the objects you wish to modify by clicking their checkboxes, or by clicking "select all results".
- Finally, click on the Action button, then choose Edit from the dropdown menu.
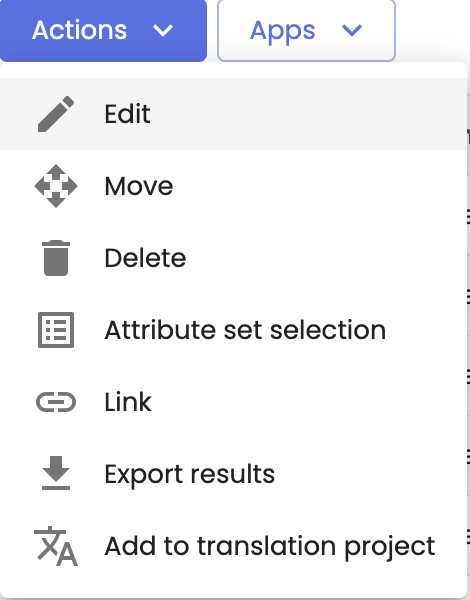
- A dialog box allows you to set up bulk editing for the selected objects.

The number of selected objects is indicated in the header of the window. Enter and/or select the following information:
| Options | Description |
|---|---|
| Attribute to Modify | Select an attribute to modify from the dropdown list. |
| Value | Select or enter a new value for the attribute. |
| Removes the value of the attribute in all locales.
|
For your information
- You can add attributes to modify by clicking the Add an Attribute button or remove them by clicking the trash can icon.
- If you modify or clear the value of a text attribute, it will be modified only in the current data language.
Once you are done, click the Save button to update the attributes or the Cancel button to exit the dialog without modifying the attributes.
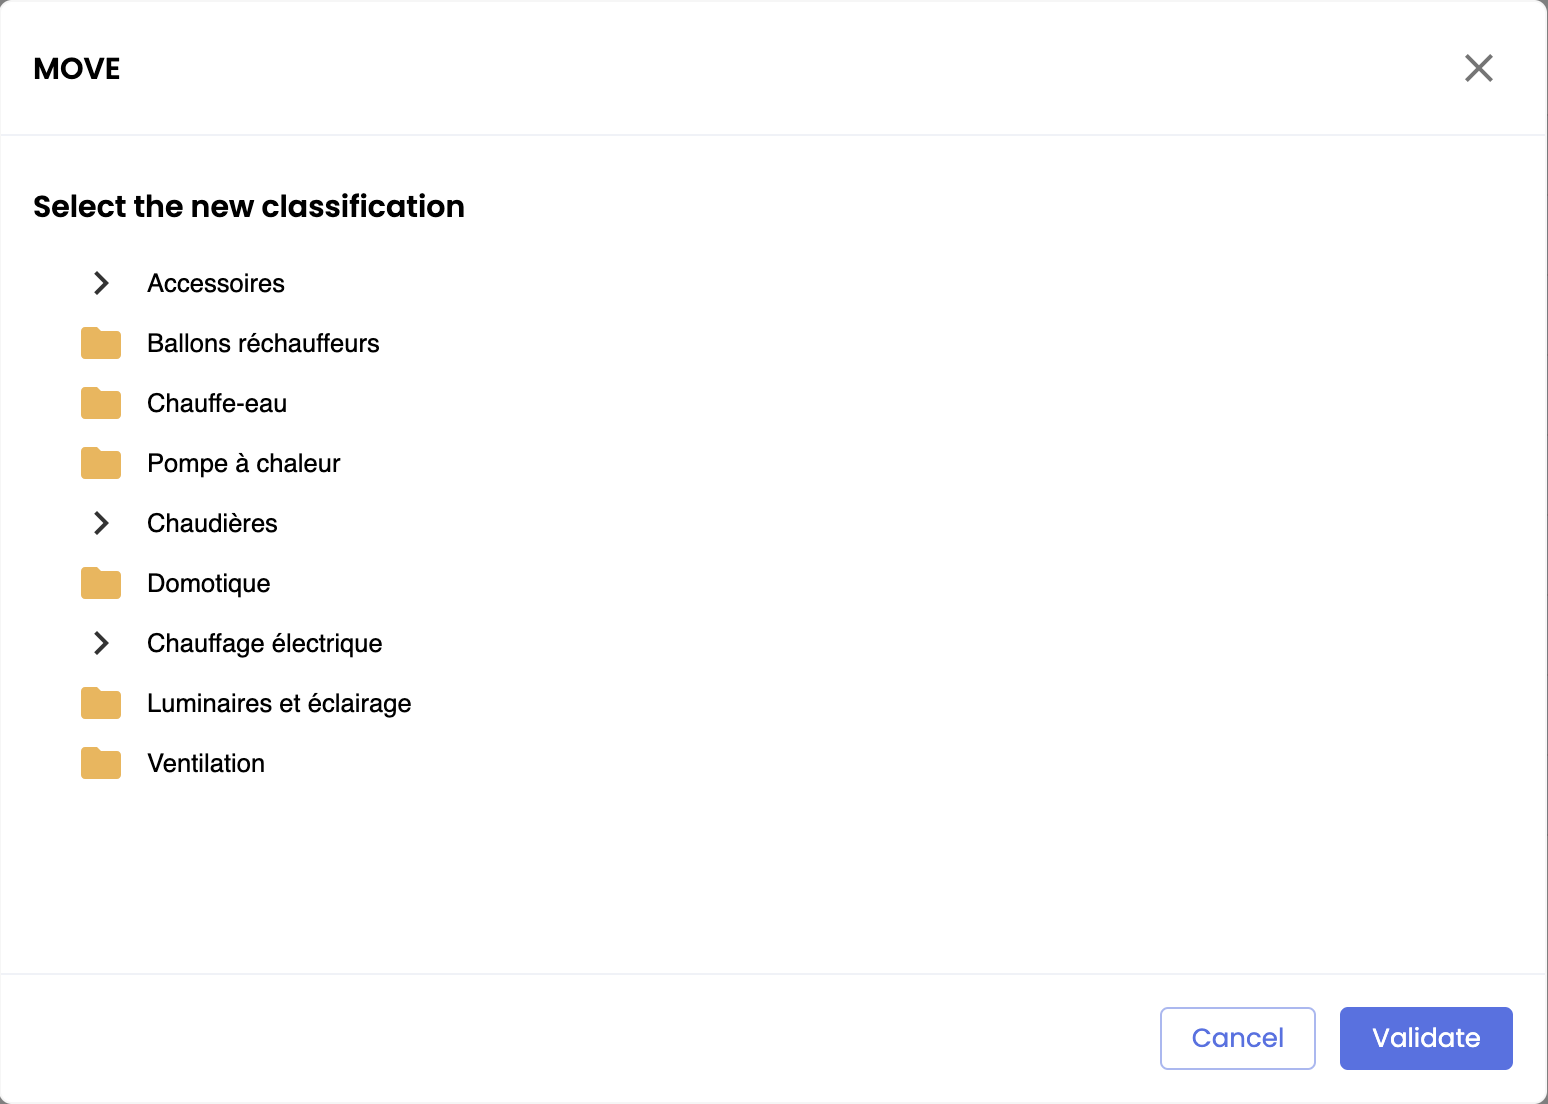
Bulk Move
Bulk Move allows you to change the classification of a selection of items simultaneously on product sheets, media, or variants.
- First, perform a search on a selection of objects.
- Second, select the objects you wish to modify by clicking their checkboxes, or by clicking "select all results".
- Finally, click the Actions button, then choose Move from the dropdown menu.
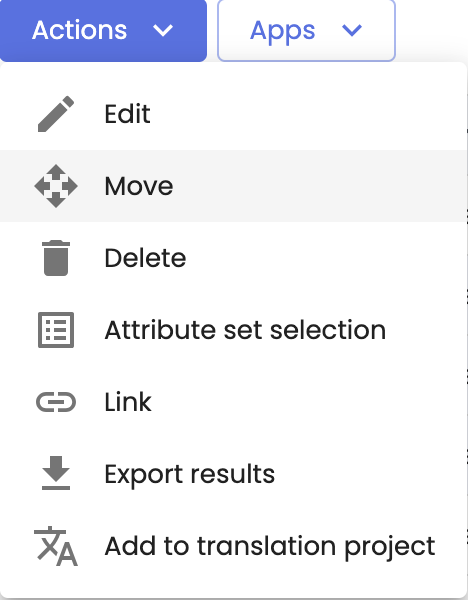
-
A dialog box will prompt you to select the classification where you want to move the objects. Expand the classification tree, select the desired classification node, and click Validate.
Bulk Delete
Bulk Delete allows you to remove a selection of items simultaneously on product sheets, assets, or variants.
- First, perform a search on a selection of objects.
- Second, select the objects you wish to delete by clicking their checkboxes, or by clicking "select all results".
- Finally, click the Actions button, then choose Delete from the dropdown menu.

- A dialog box will ask for confirmation to delete the items.
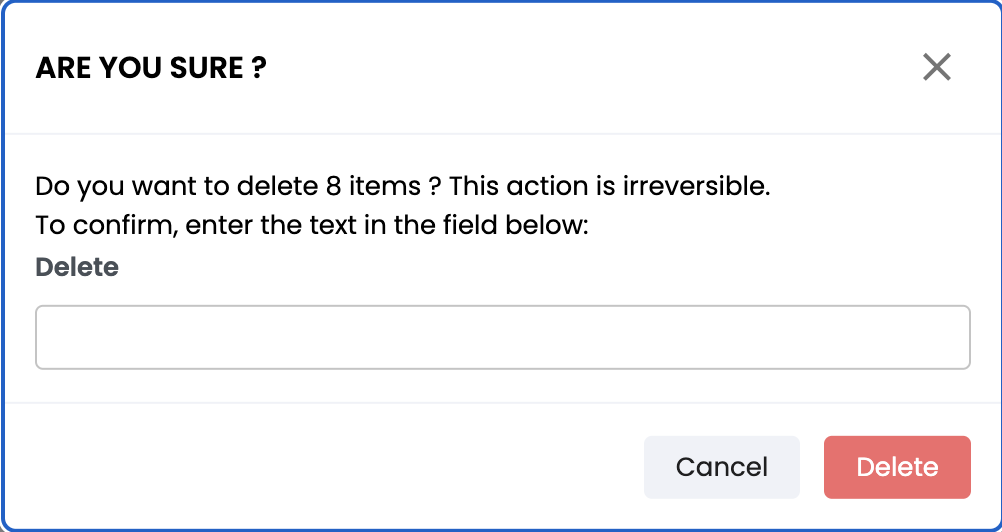
Irreversible ActionThis action is irreversible. Once the bulk deletion is completed, it is not possible to recover the deleted items.
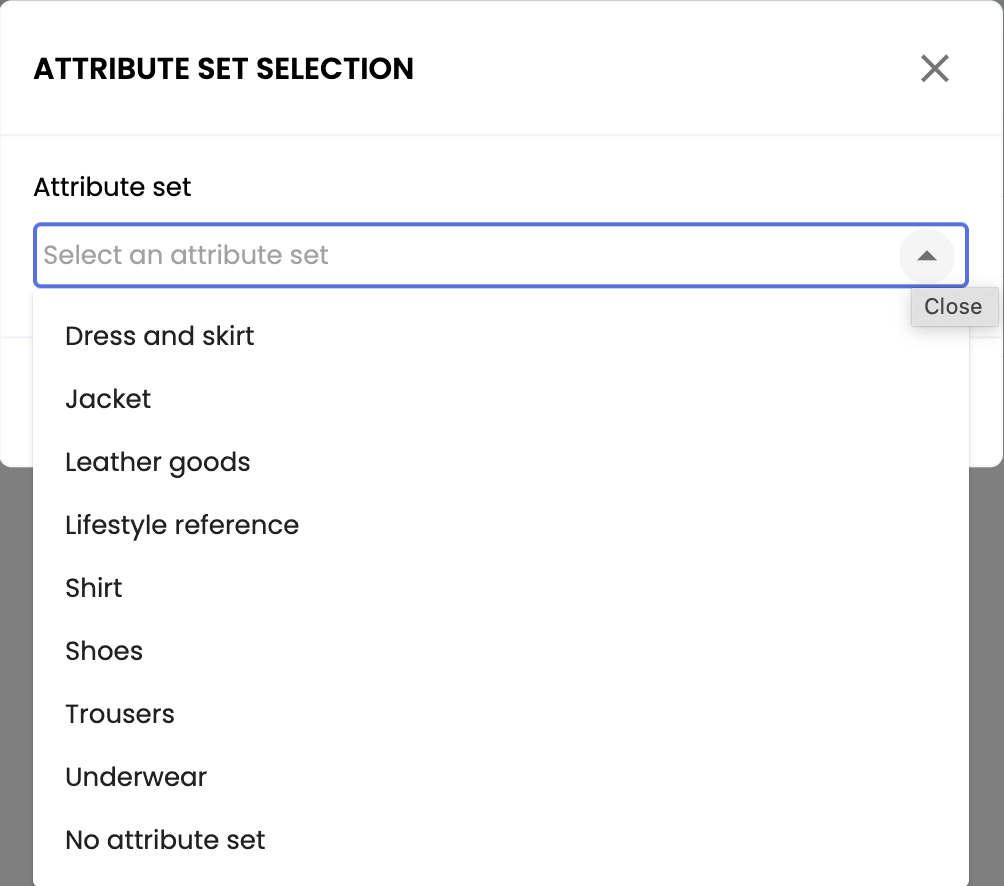
Bulk Attribute Set Selection
The bulk attribute set selection feature allows you to assign an attribute set to multiple product at once.
If a product does not have an assigned attribute set, one will be automatically assigned to it. Conversely, if a product already has an attribute set, it will be updated.
-
First, perform a search to create a selection of objects.
-
Then, select the objects for which you want to assign an attribute set by checking their boxes or clicking "Select all results".
-
Finally, click on the Actions button and, from the dropdown menu, choose Attribute set selection.

-
A dialog box will prompt you to select an attribute set from a list. Open the dropdown menu, choose the desired attribute set, and click Apply.
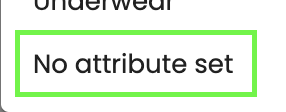
Good to knowYou can remove the assigned attribute set from the product selection by choosing "No attribute set" from the attribute set list.
Bulk Link
The Bulk Link feature allows you to link a selection of products to other products simultaneously by choosing the type and relationship to be applied.
- First, perform a search to create a selection of objects.
- Then, select the items for which you want to link by checking their checkboxes or by clicking Select all results
- Finally, click the Actions button, and in the dropdown menu, choose Link.
- A dialog box will prompt you to select the document-to-document relationship: parent or child. Expand the dropdown menu, select the desired relationship, and click Validate.
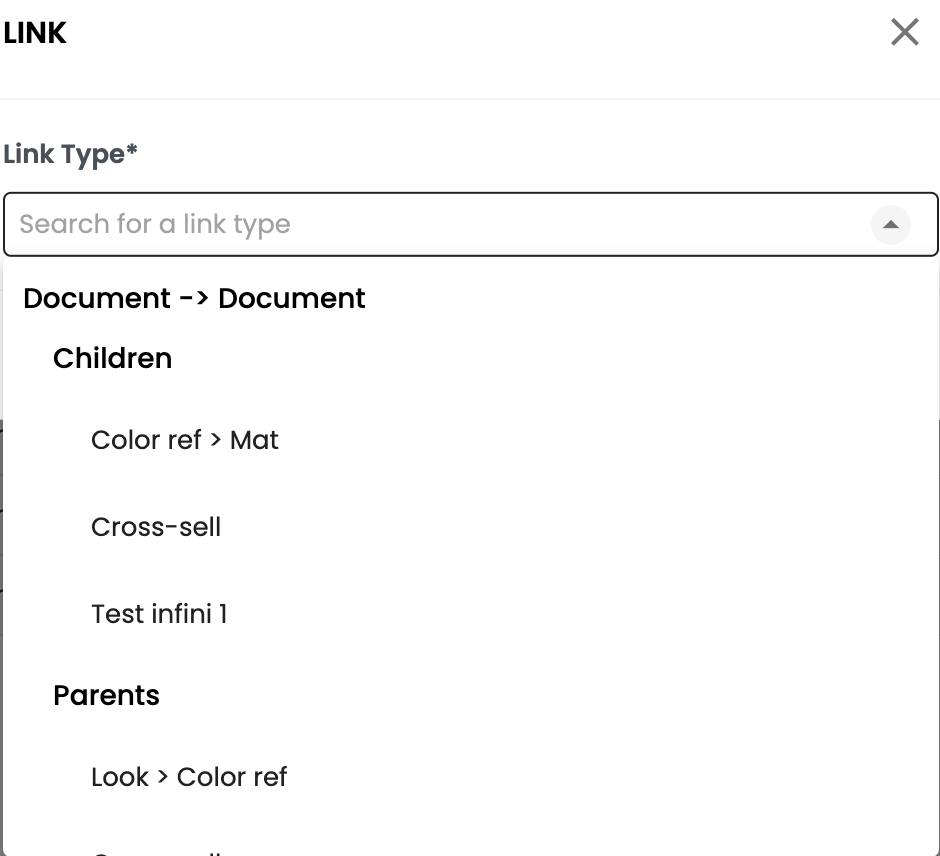
Good to know
- You can only link product sheets to other product sheets in bulk.
- The Bulk Link feature will be enhanced in the future to also allow linking assets to product files, and later variants to products.
Export Results
Selections RequiredThis function is active only when the user has made object selections via checkboxes.
- First, perform a search on a selection of objects.
- Secondly, select the objects you want to export by clicking on their checkboxes.
- Finally, click on the Action button, then choose Export Results from the dropdown menu.
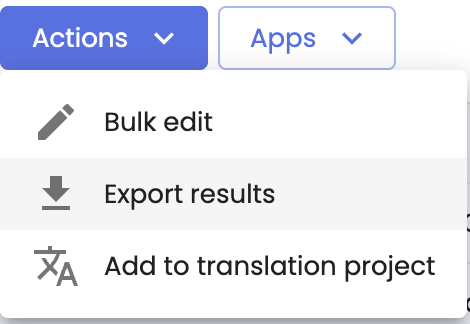
- A dialog box allows you to configure the export of the selected objects. Depending on the configured Object Type, exports offer up to three options for the Export Type. The following sections describe each of the available options.

Translation Export
The Translation output type allows you to export the textual content of the selected documents or variants into a translation file. Once selected, additional options appear to define your export.

Select the following information:
| Information | Description |
|---|---|
| Target Language | Indicates the language into which the content should be translated. |
| Source Language | Indicates the language from which the content should be translated. |
| Content to Export for Translation | Defines the content to export. The following options are available:
|
| File Format | Defines the format of the export file. The following options are available:
|
Once you have configured the dialog box, click the Export button to generate the translation content export or the Cancel button to exit the dialog without exporting.
The generated export file contains a column with textual content in the Source Language and an empty column for translation in the Target Language.
You can download the file from the Translation File Export section of the Translations page in the Data Flow menu > Translations, or directly from your notification center.

Good to KnowOnly attributes for which data is missing are exported in the translation content export file. Attributes for which translation data already exists are not exported.
Limitations on Translation ExportsIt is not possible to export more than 5,000 items using advanced search.
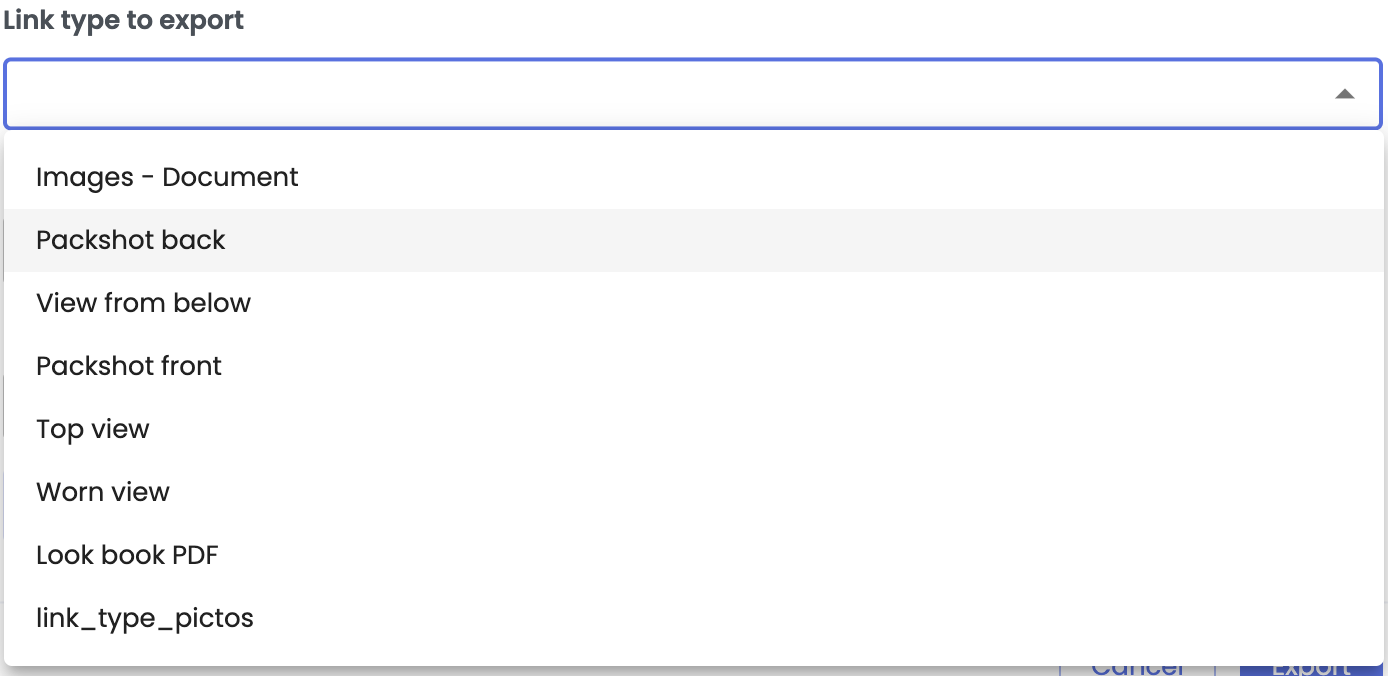
Asset Export
The Asset output type allows you to export the asset related to the directly selected documents or asset.

Once you have selected the Asset output type, additional options appear to define your export:
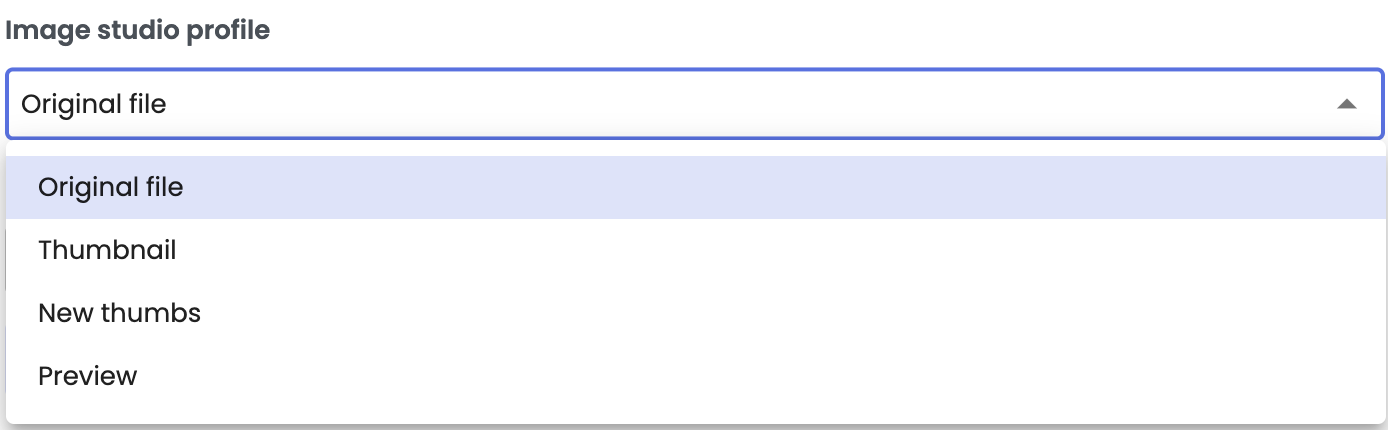
- Link Type – This option is available for Documents and Variants object types. Select one or more asset link types. The link types in the dropdown menu correspond to the asset links of the relevant document type or variant.
- Image Resizer Profile – Select a profile from those available for your asset. By default, Quable PIM includes two standard profiles:
- Original – Asset is uploaded in its original format.
- 600x600 – Asset is uploaded in 600x600 format (standard profile used for thumbnails).
- Export file type – Select a file type:
- Files – A compressed file (.zip) with the exported asset.
- URL – A text file (.txt) with URL links to download the exported asset.
- Files and URL – A compressed file (.zip) with the exported asset and a text file (.txt) with URL links to download the exported asset.
Once these three fields are filled out, click the Export button to generate an asset export or the Cancel button to exit the dialog without exporting.
The platform then sends an email to the address of your account profile containing download links for the asset files. If the total weight exceeds 2 GB, you will also receive a link to a text file (.txt) with the download URLs for the exported asset.
Limitations on asset export
- File size: If the total export size exceeds 1.86 GB, you will automatically receive a link to a text file (.txt) containing URL links to download the exported media.
- Link duration: Download links are valid for 2 days. After 2 days, the download links will be deactivated.
Best PracticeHow to retrieve media from a text file (.txt) with URL links? To facilitate media downloads:
- You can use the Chrome Extension Tab Save
- You can use a download manager such as FreeDownloadManager
CSV Export
The CSV output type allows you to export the textual content of your selected objects (documents, assets, variants, or classifications) into a .csv file. Once selected, additional options appear to define your export.

Provide the following information:
| Information | Description |
|---|---|
| Encoding | Defines how to transform the data for specific use. The following options are available:
|
| Columns | Designate the attributes to export. To select attributes, select individual items from the Available Columns list (on the left) and move them to the Selected Columns list (on the right). You can also search for a specific column header by typing at least three characters of the attribute name in the search bar. |
Once you have made your selections, click the Export button to generate the CSV file export or the Cancel button to exit the dialog without exporting.
You can download the file from the Downloads page in the Data > Content menu or directly from your notification center.

Limitation on CSV exportThis option is limited to 5,000 records. To export more records, use the Export platform.
Translation Project
PrerequisitesThis feature is available when:
- the Quable PIM administrator has integrated the TextMaster connector
and
- documents are selected.
A Translation Project allows you to use the TextMaster connector to send your selected documents for translation directly from Quable PIM.
- First, perform a search on a selection of documents.
- Secondly, select the objects you want to send for translation by clicking on their checkboxes.
- Finally, click on the Action button, then choose Translation Project from the dropdown menu.
This opens a dialog box, and additional options appear to define your translation project.

Select the following information:
| Information | Description |
|---|---|
| Source Language | Defines the language of the data from which the text will be translated. |
| TextMaster Template to Use | Specifies the predefined translation templates to use for translation. Quable PIM automatically detects the target languages according to the selected translation templates. |
| Select Attributes for Translation | Designate the attributes to be translated. To select attributes, select individual items from the Available Columns list (on the left) and move them to the Selected Columns list (on the right). You can also search for a specific column header by typing at least three characters of the attribute name in the search bar. |
The selected documents are added to your TextMaster basket and can be found on the TextMaster Projects page in the Data Flow > Translations menu.
Quable App
PrerequisitesThis feature is available when:
- the Quable PIM administrator has integrated a QuableApp,
and
- the document type defined for the QuableApp is selected.
The Apps button allows you to use an external application integrated with your selected documents.
To use a QuableApp, click on the Apps button and select an application from the dropdown list. A dialog box opens to allow you to configure and interact with the external application.
Follow the instructions or procedures displayed in the window. When you're finished, you can close the window by clicking on the X in the top right corner.
Important NoteThe window opened by the external application, as well as its content and data, are entirely managed by the third-party application itself and not by Quable.
Updated 20 days ago