Attributes
Manage the building blocks of your product information!
The Attributes page allows you to create and manage the structure of your Quable PIM content:
- The attributes that will contain the majority of the data
- The visual organization of these attributes for your users
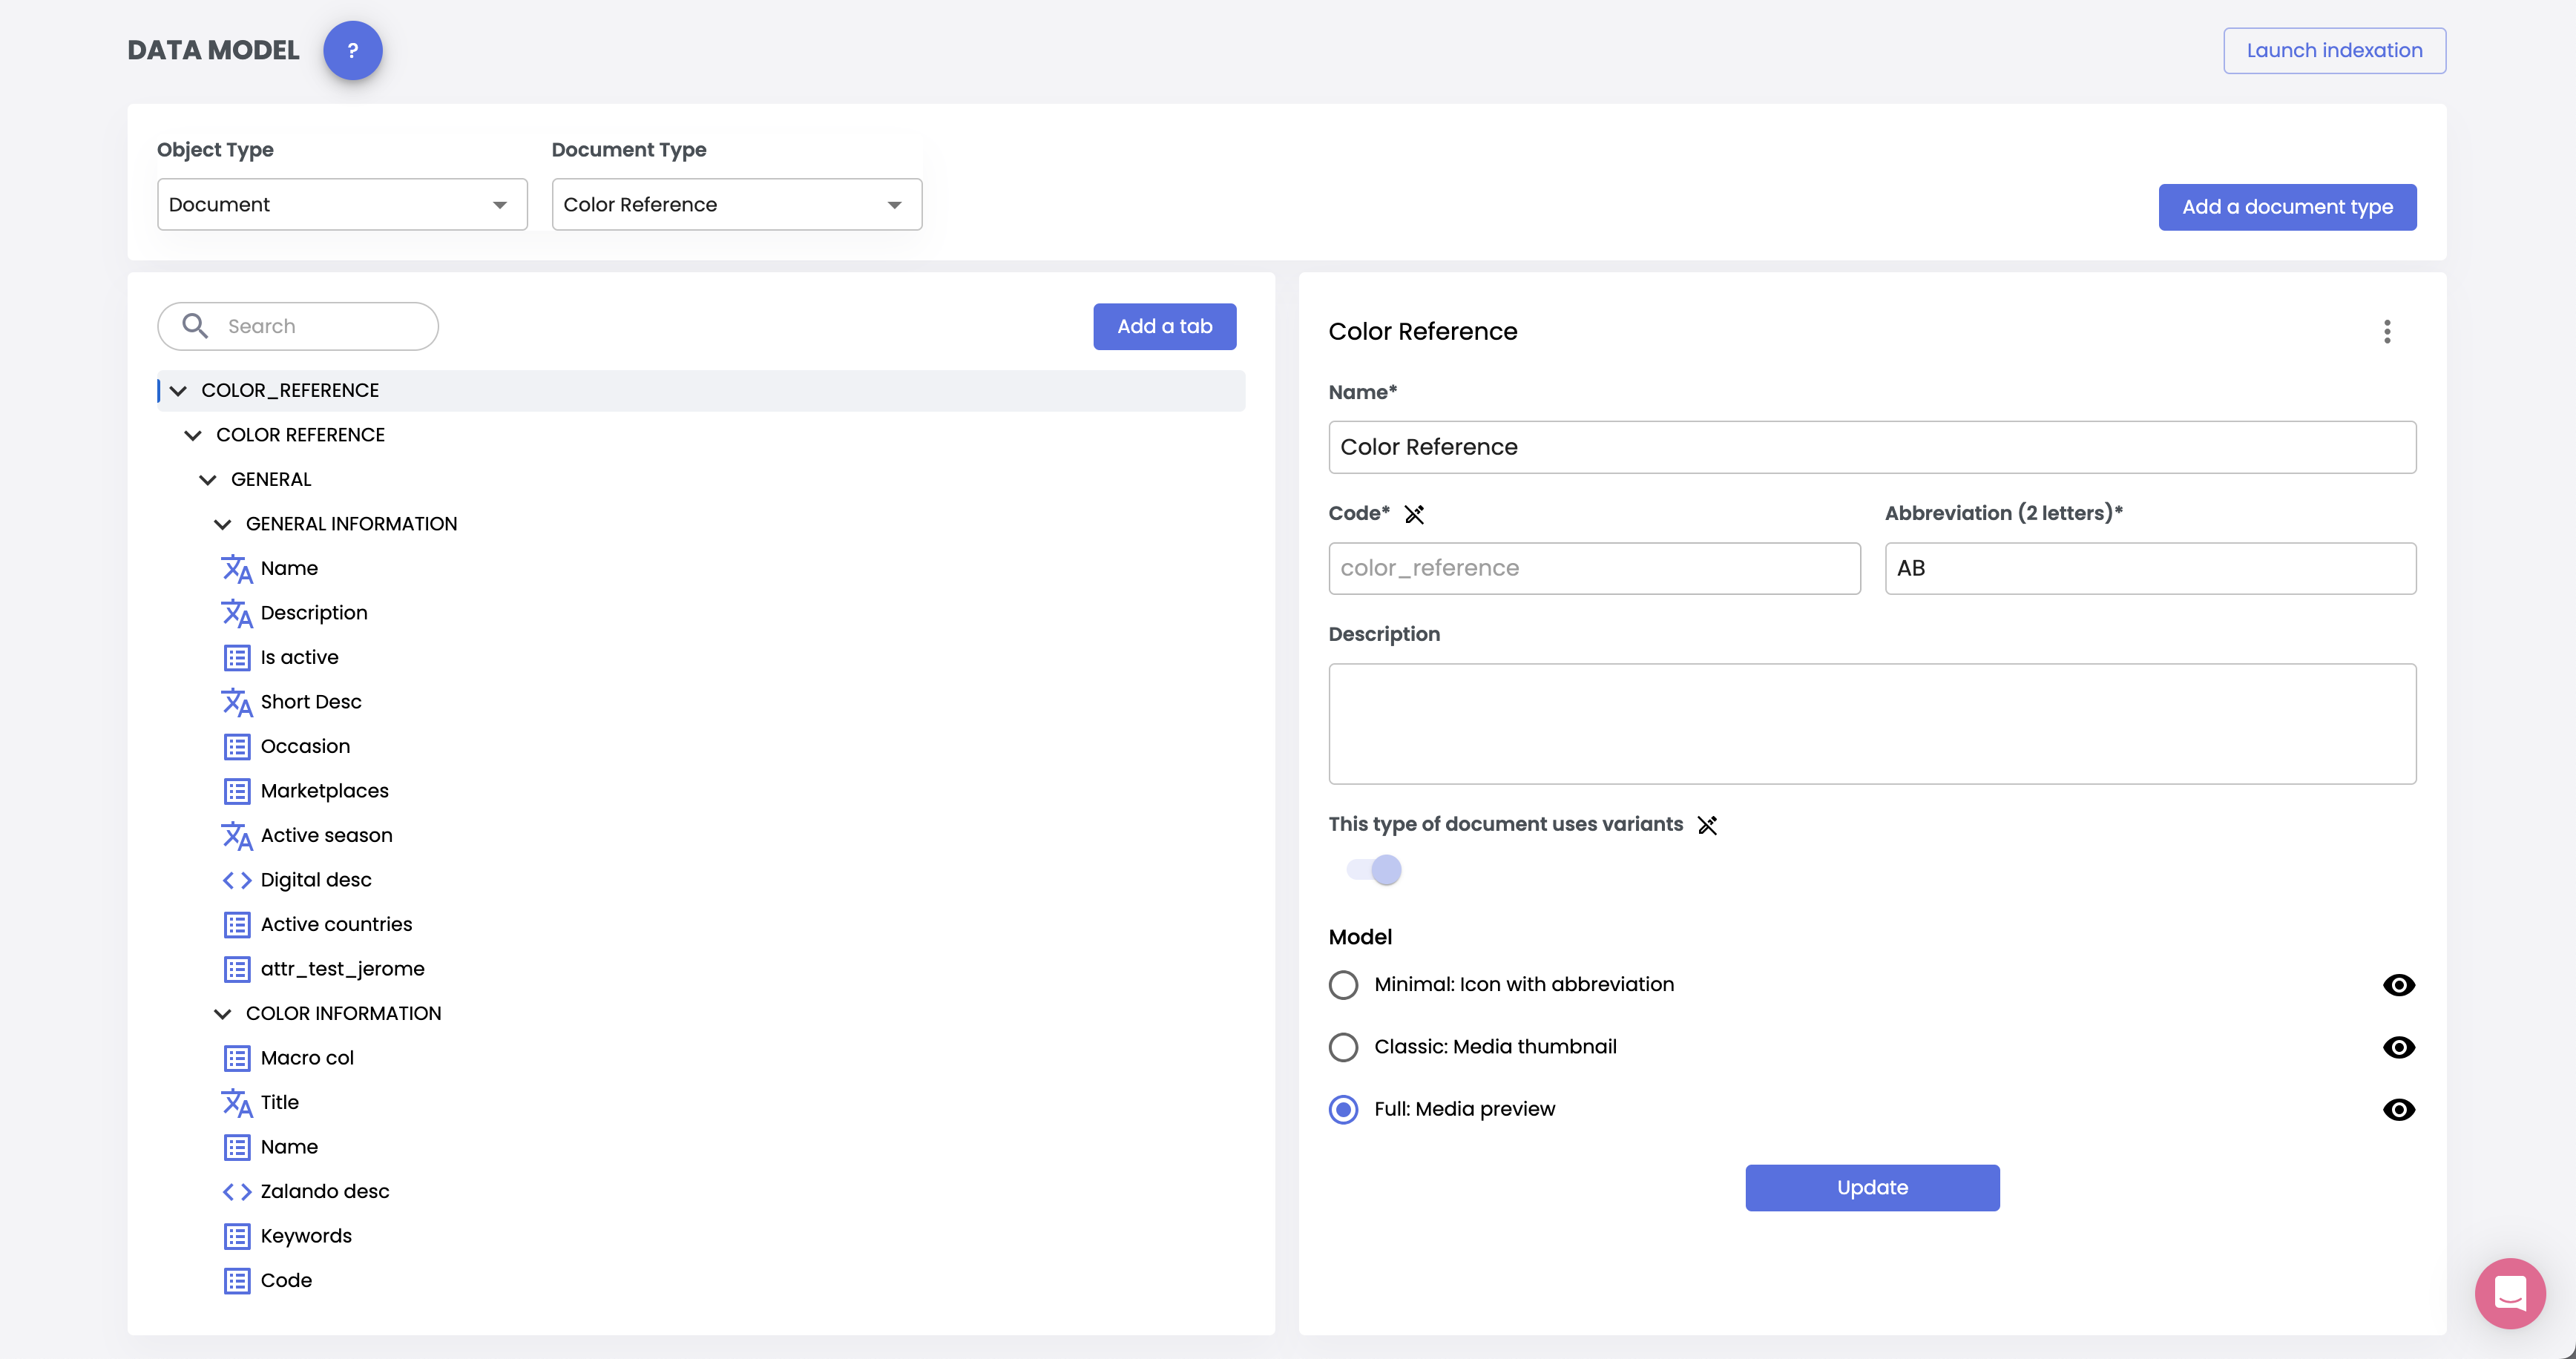
Interface de gestion des attributs
The page is divided into three panels:

The object selection block to modify: Asset, Classification, Document, Variant, or Links
The attribute management block and their display in the PIM
The definition block for your document type or attributes
The information displayed in the panels depends on the Object Type selected in the dropdown list at the top of the page.

When you make a selection of an object and optionally a document type or link type, the left block updates and presents you with the structure of your object and its attributes.
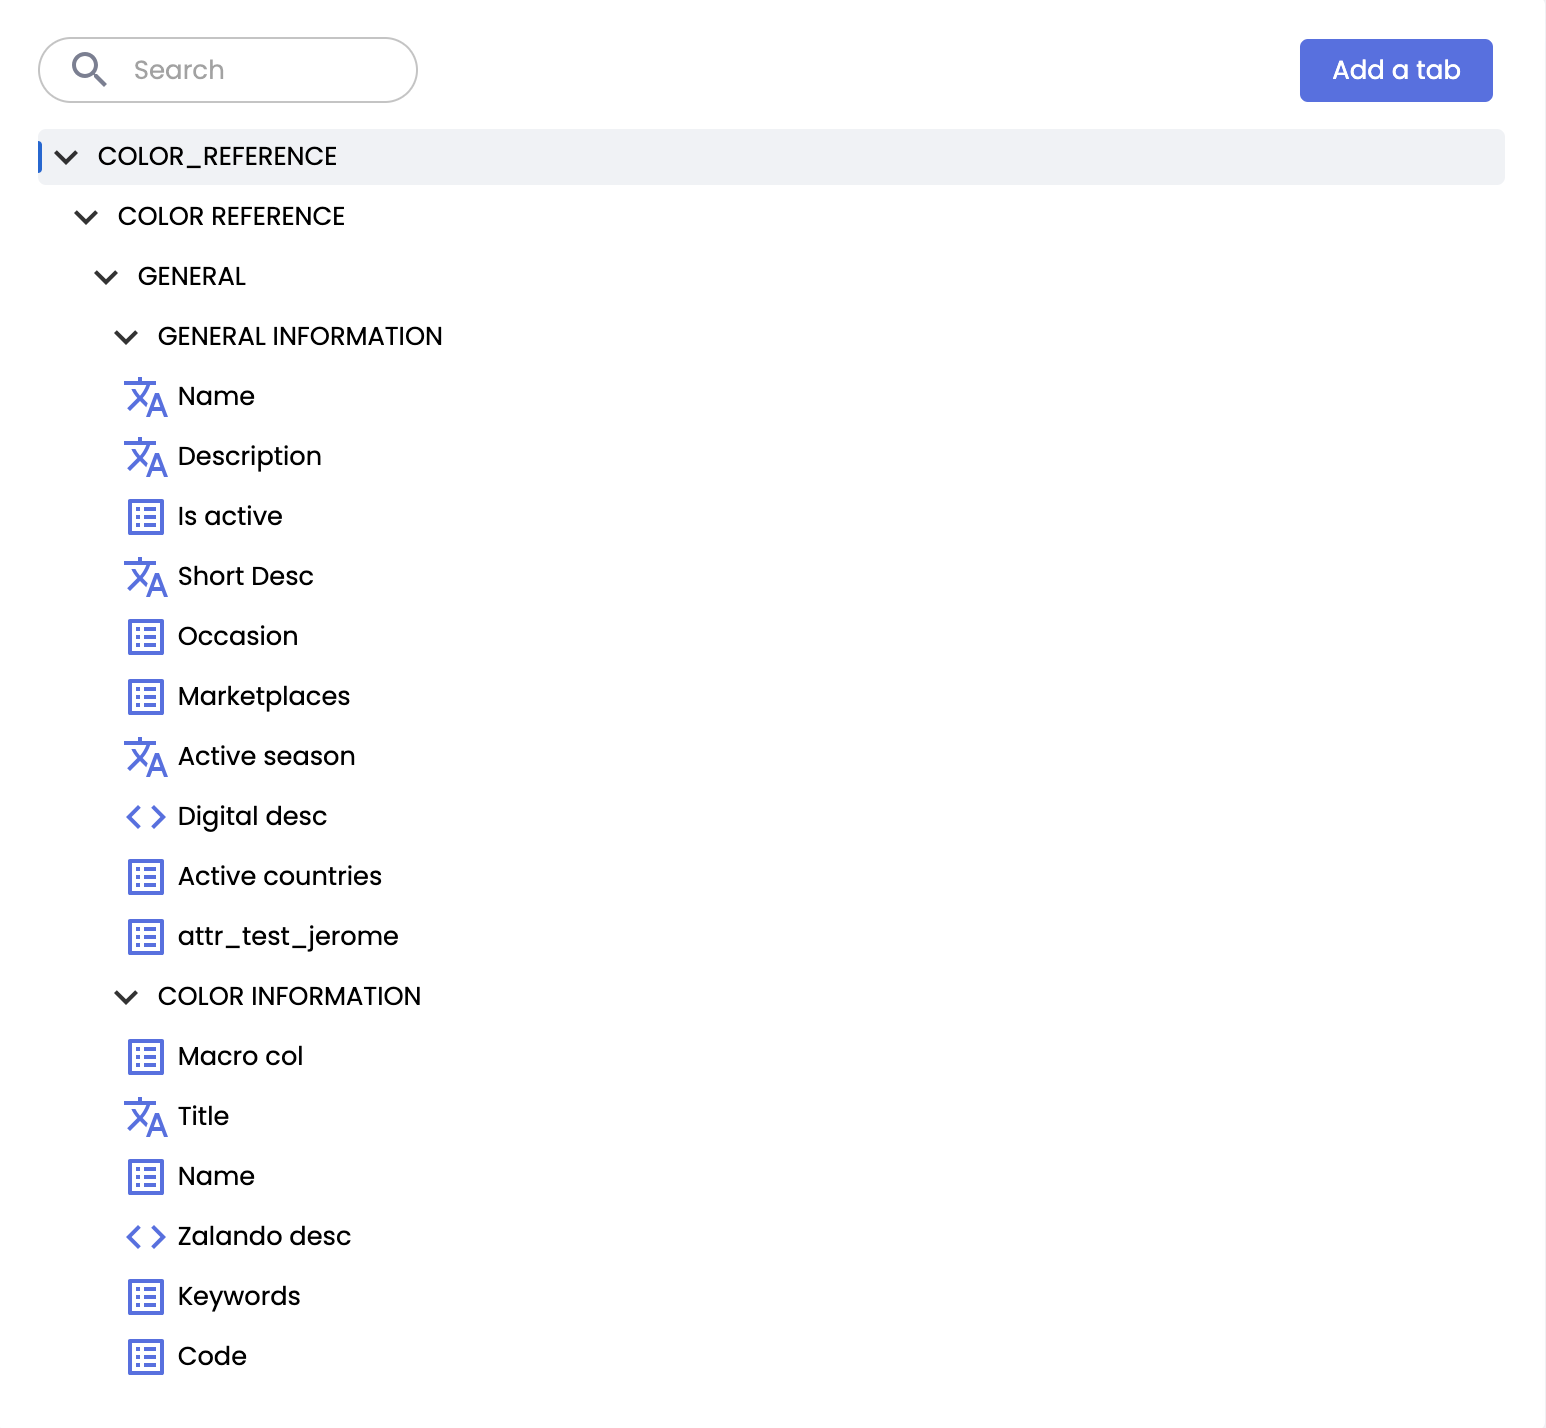
Very useful if you have a lot of attributes!At the top of the attribute listing block, a search space allows you to easily find one of your attributes.
Hold on! Are you talking to me about objects and attributes...Before you can manage your objects and attributes, it is essential to properly understand what they are and how they are used. You will find a detailed description of these two concepts in the following sections.
Introduction to Objects
Objects are the templates for your product information in Quable PIM. They are used as blueprints to organize and define how your product information is displayed.
A simple way to understand these templates is to think of objects as an Excel spreadsheet describing your products, and attributes are the column headers.
Object Type
To build a solid structure, you need a framework. This is where objects come into play. They define how and where information about your products is displayed.
Quable PIM provides five distinct types of objects:
| Object | Description |
|---|---|
| Classification | Defines the layout for the display of your categories and subcategories. |
| Documents | Main object type Defines the layout for the display of your product information. |
| Variants | Defines the attributes displayed for variations of your documents. |
| Assets | Defines the attributes displayed for your digital asset files (photos, videos, music, etc.). |
| Links | Defines the kinds of relationships available for your objects. |
The different object types work together to form the structure of your data model:

Attribute Organization
Each type of object has its own organization.
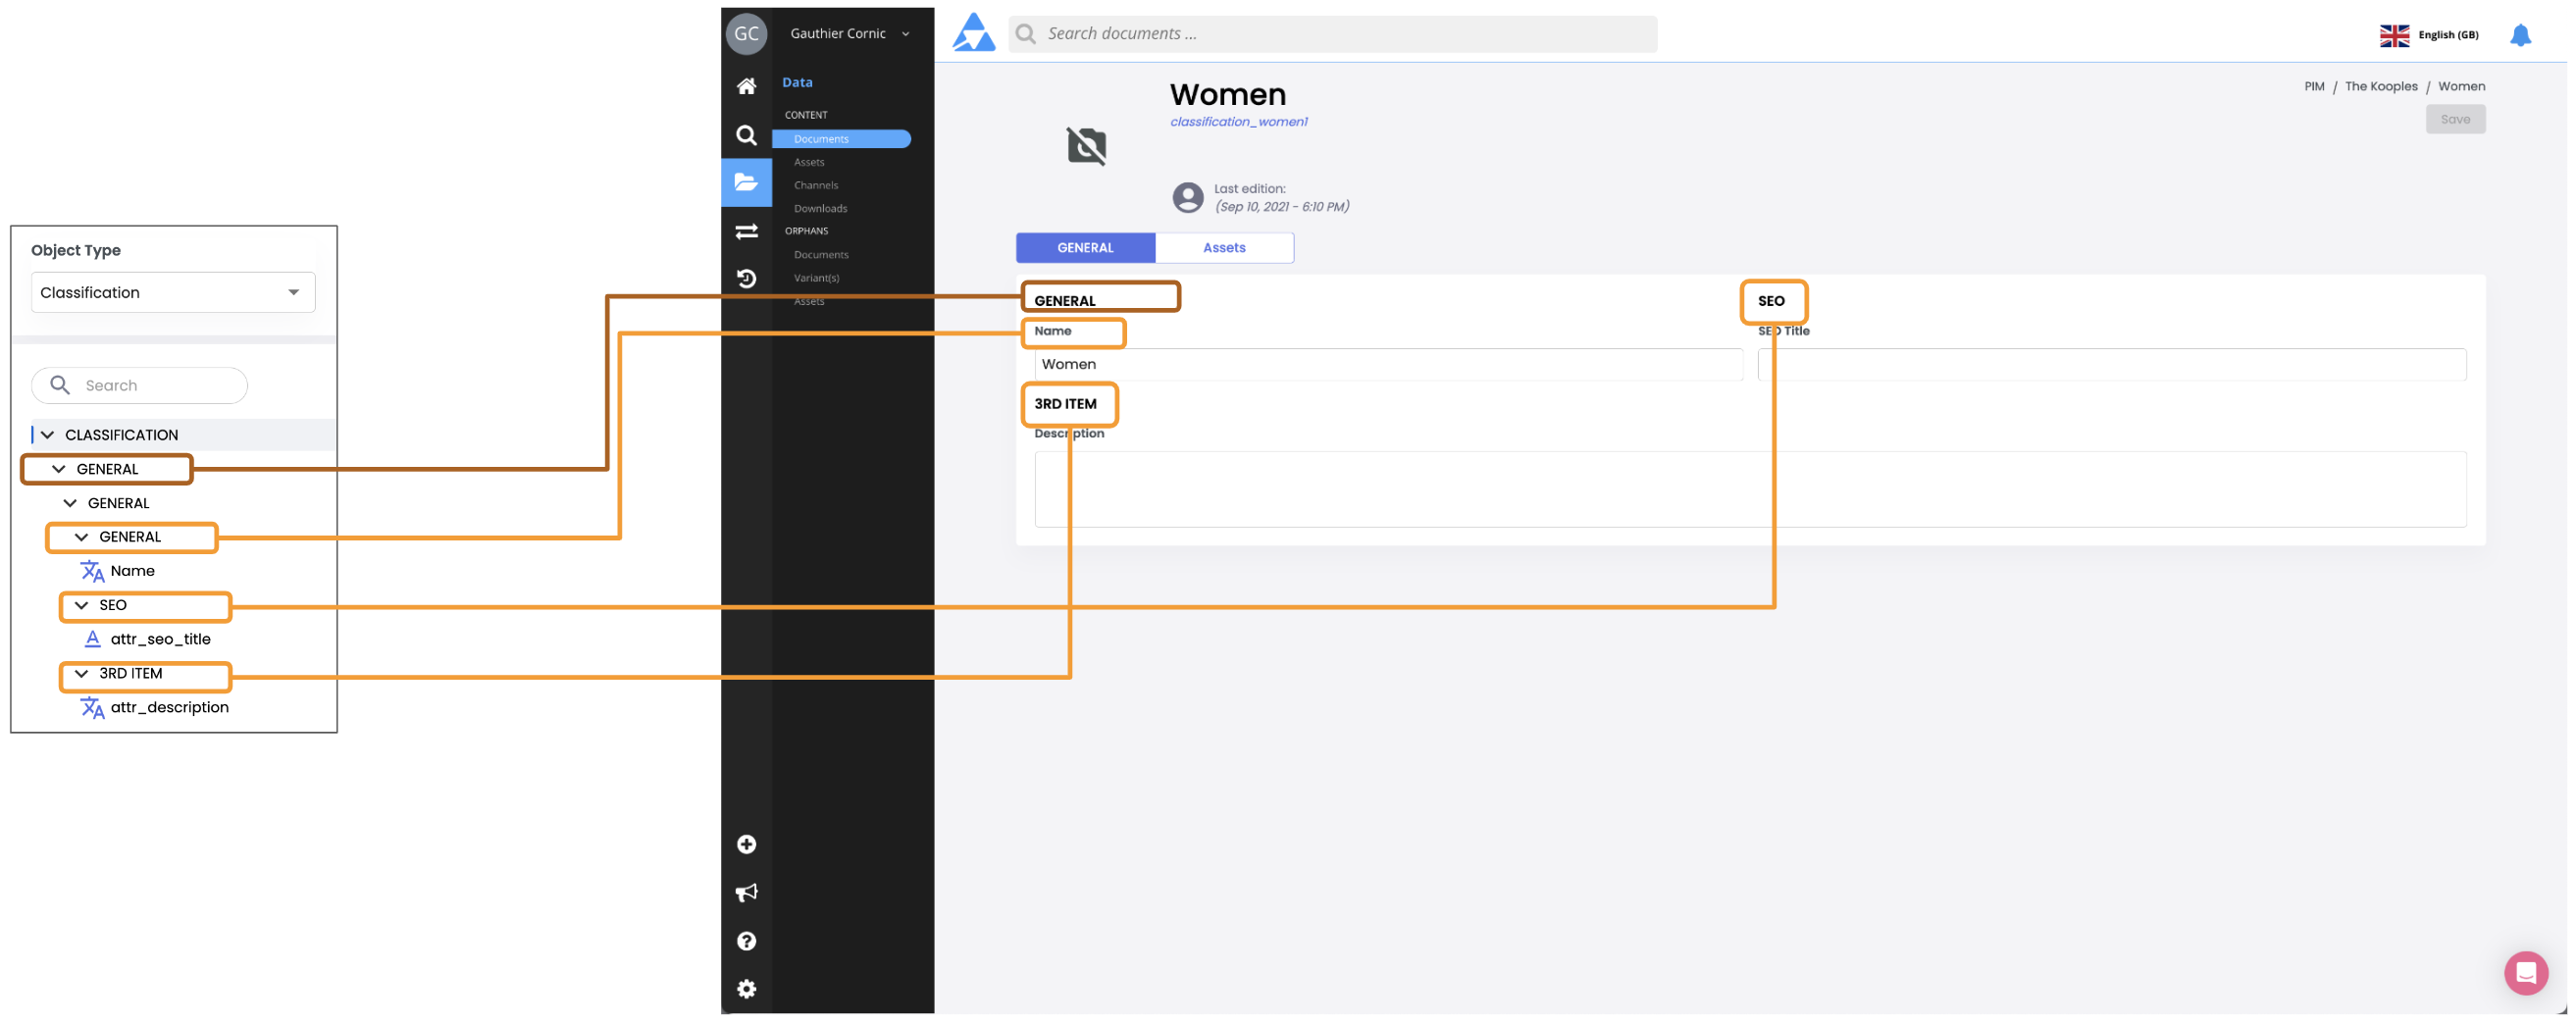
To visualize the hierarchy levels of a type of object:
- Select a type of object from the Object Type dropdown list.
- Click on a level in the tree structure.
The properties of the selected element will be displayed in the right panel

Structure of a document type and selecting an element from the hierarchy.
The displayed hierarchical levels change depending on the organization of your product information. By default, at least four levels are automatically generated when creating your objects in Quable PIM.
The properties for each hierarchy level can be modified to suit your preferences.
Note: Quable PIM does not recommend changing the Code attribute.
The overall process for managing the hierarchy of objects is the same for each object type, but there are some differences. The following sections describe how to manage the hierarchy for each object type.
Presentation of Attributes
As described previously in the Object Overview, objects store information about your products in attributes.

Attributes are the names, descriptions, and any other information contained in your objects that describe your content. You can define different attributes based on the different types of objects.
Attribute Types
Quable PIM provides the following attribute types:
| Type | Description |
|---|---|
| Simple text not localized | A text input field that accepts text that is never translated.
|
| Simple text localized | A text input field that accepts a single line of text. |
| Text area localized | A text input field that accepts multiple lines of text. |
| HTML code | A text input field that accepts HTML content. |
| JSON code | A text input field that accepts JSON content. |
| Integer | A text input field that only accepts numeric content (integer numbers only). |
| Decimal | A text input field that only accepts numeric content (decimal numbers only). |
| Date | A text input field that only accepts date content in the format DD/MM/YYYY. |
| Time | A text input field that only accepts time content in the format HH:MM. |
| Checkbox | A boolean checkbox (Yes / No). |
| Simple select of predefined values | A selection field that accepts only one choice from a predefined list. |
| Select of multiple predefined values | A selection field that accepts multiple choices from a predefined list. |
| Calculated | A text field whose value is automatically generated from a formula based on other attributes |
Adding Attributes
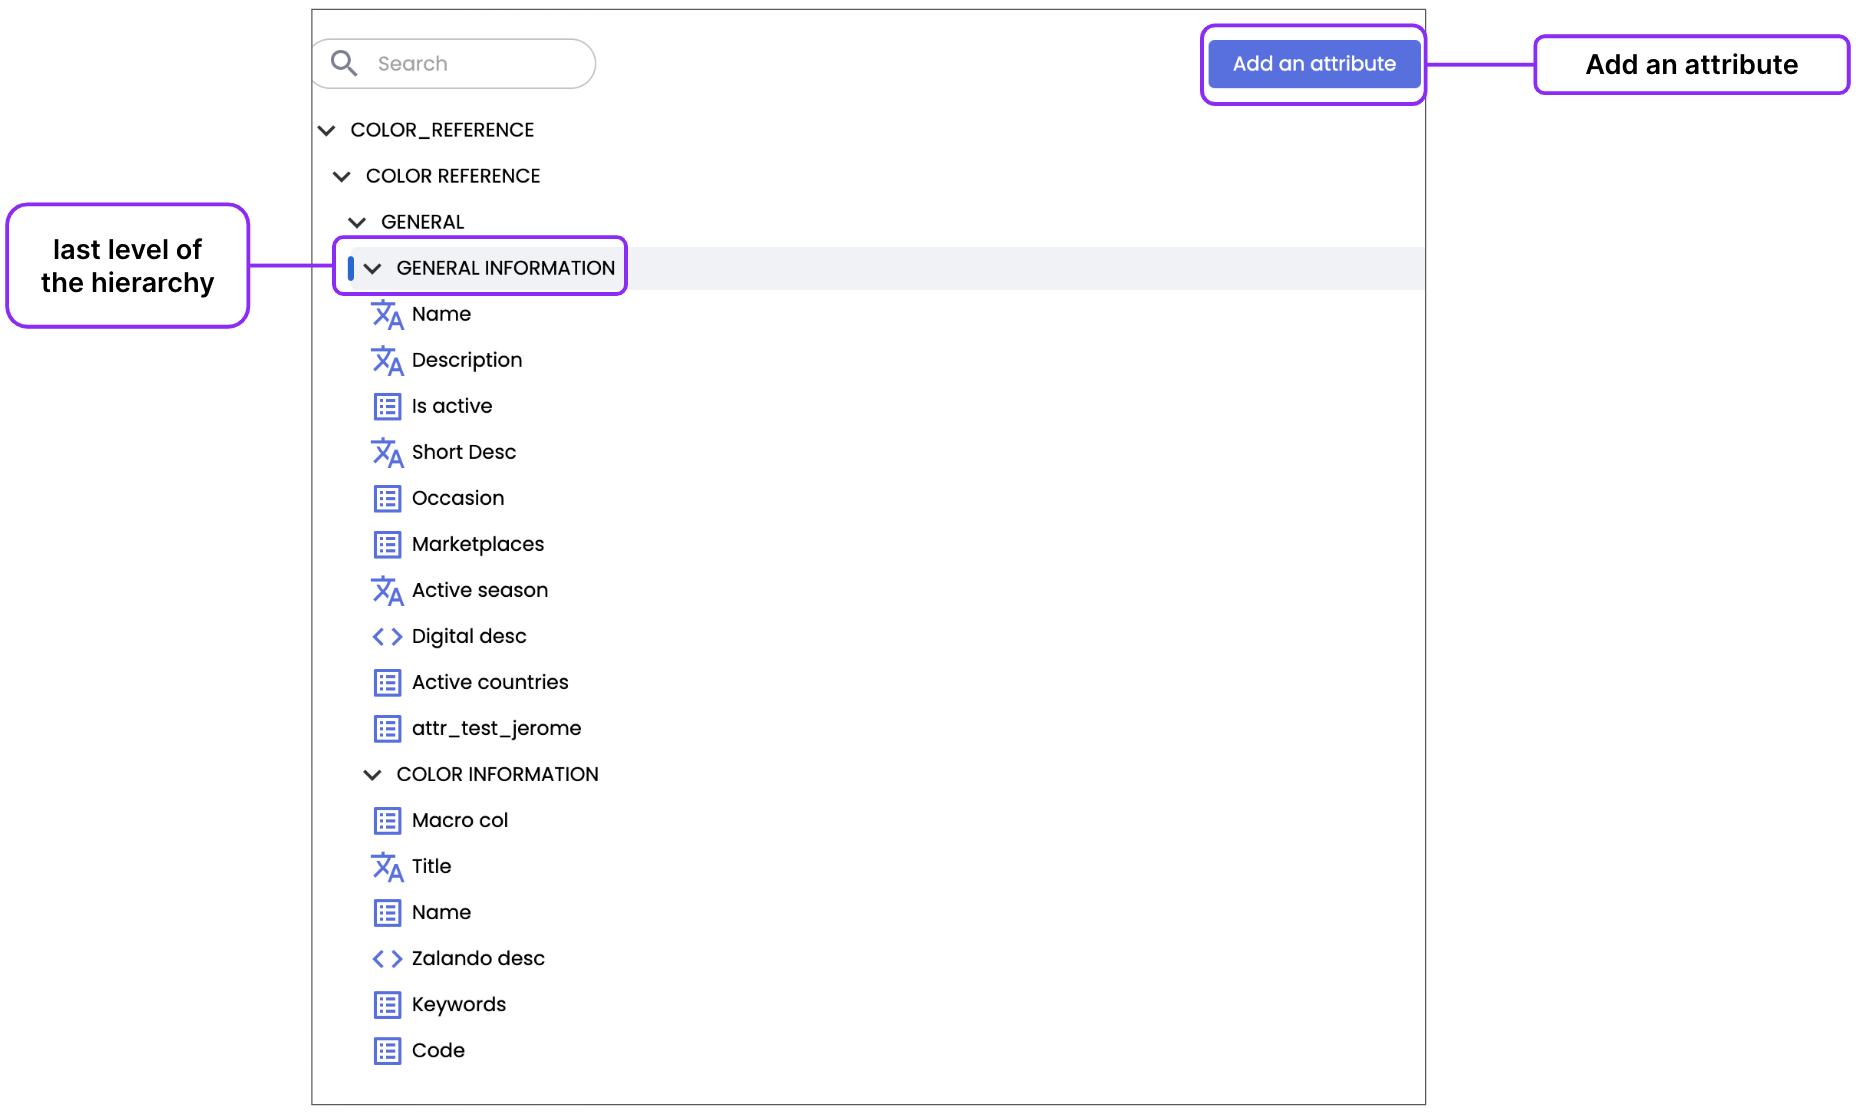
Attributes always constitute the last (lowest) level of a hierarchy.
- To add an attribute, select an object from the Object Type dropdown menu.
- Then click on the last level of the hierarchy where you want to create the new attribute.
- Finally, click the Add an Attribute button in the attribute management block.
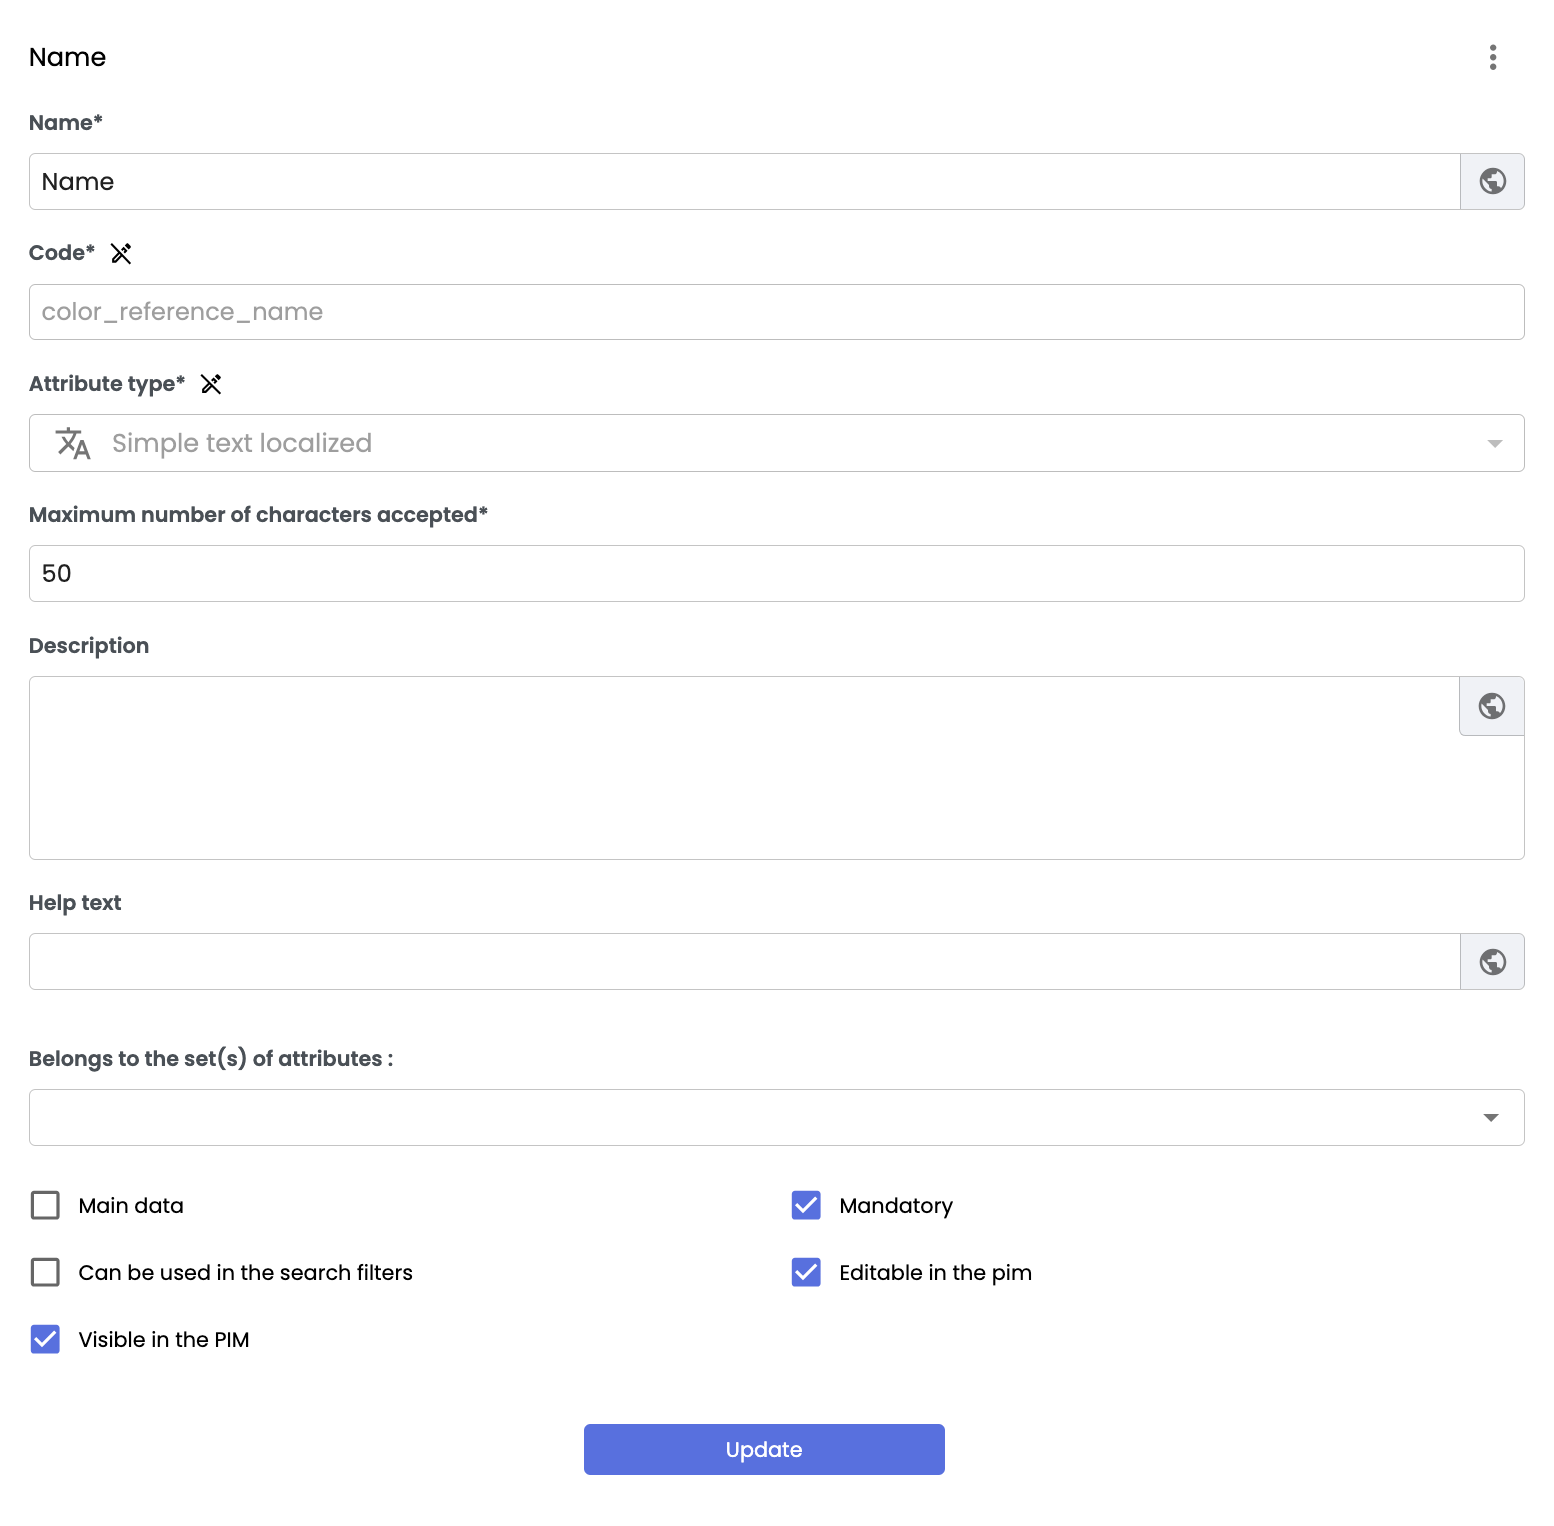
The Add an attribute form allows you to define specific properties and behaviors for each attribute.

The following properties are available:
| Information | Description | Mandatory | ||||||
|---|---|---|---|---|---|---|---|---|
| Name | Enter a name for the attribute | Yes | ||||||
| Code | Click in the entry area to initiate an auto-generated code for the new attribute. This can be changed manually. However, in order to avoid conflicts with system keywords and values, the Code value cannot:
| - active - attribute_code - attribute_set_code - catalog - checksum - classification_code - classification_parent_code - completeness - date_created - date_modified - document_code" - external - asset_classification_code - asset_code - asset_name | - mime_type - original_filename - sequence - source_code - status - target_code - thumbnail_url - tree_left - tree_right - sku_code - url - value_code - value_label - workflow |
|
|
| ||
| - active - attribute_code - attribute_set_code - catalog - checksum - classification_code - classification_parent_code - completeness - date_created - date_modified - document_code" - external - asset_classification_code - asset_code - asset_name | - mime_type - original_filename - sequence - source_code - status - target_code - thumbnail_url - tree_left - tree_right - sku_code - url - value_code - value_label - workflow | |||||||
|
| |||||||
|
| |||||||
| Description | Enter a definition or an explanation of the attribute. | |||||||
| Help Text | Enter additional text to be displayed when the attribute is hovered over in the object. | |||||||
| Type | Select the attribute type from the dropdown list. | Yes | ||||||
| Attribute Sets | If the attribute is assigned to one or more attribute sets, the attribute is only visible on objects with the designated attribute set(s). | |||||||
| Maximum number of characters accepted | Available for the following attribute type
| |||||||
| Main data | Check the box to set the attribute as the "main attribute" and display its value in the page header.
| |||||||
| Mandatory | Select the checkbox to specify that the object cannot be saved until this attribute is completed. If not selected, the attribute is optional and the object can be saved without it. | |||||||
| Filterable (search) | Select the checkbox to specify that the attribute can be used as a filter in an advanced search. If not selected, the attribute is not available as a filter for an advanced search. | |||||||
| Visible (internal) | Check the box to specify that the attribute is visible in the PIM, by default. This behavior can be overridden at the "h-1": "Description",(doc:attribute-access level. | |||||||
| Editable (internal) | Check the box to specify that the attribute is editable in the PIM, by default. This behavior can be overridden at the "h-1": "Description",(doc:attribute-access level. |
Once you have entered the attribute's property values, click the Apply button to save the attribute or the Delete button to cancel the creation of a new attribute.
Good to know - "Belongs to set(s) of attributes" field:
When you select an attribute and check the "Belongs to set(s) of attributes" field, only the first 100 attribute sets are displayed by default in the dropdown list.
To access all your attribute sets, use this field as a search filter to find the desired set. Search results appear as soon as you type the first three characters.

Attribute Localization
You can locate the properties of your attributes in all PIM interface languages. This translation allows you to adapt the labels of attribute properties according to the different PIM interface languages. To localize attributes, click on the globe icon to the right of the input field.
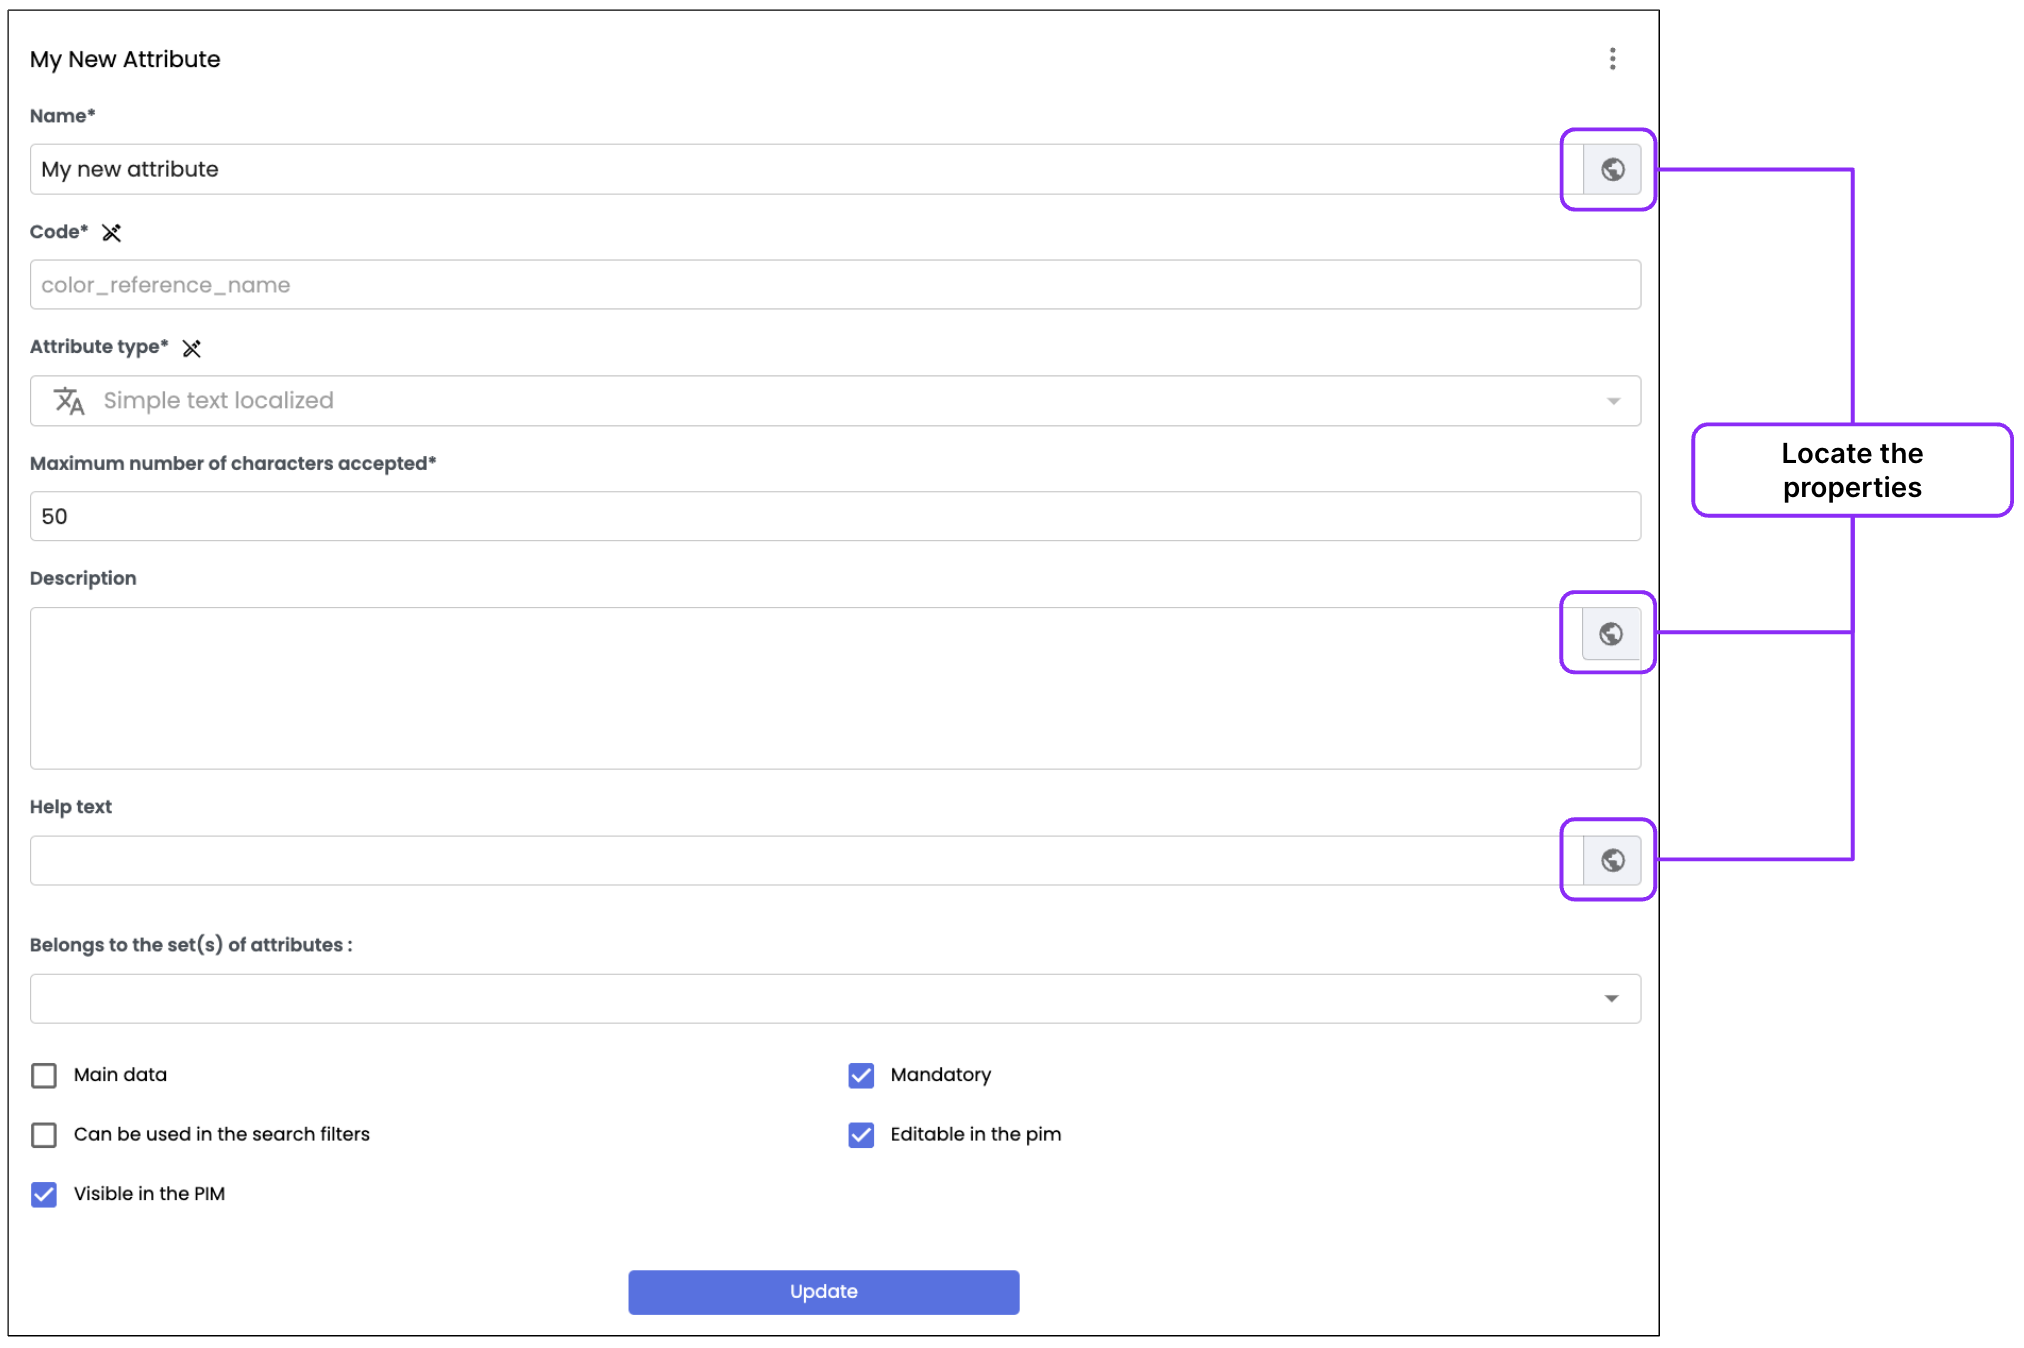
A pop-up appears, allowing you to enter values in all the interface languages of the PIM:
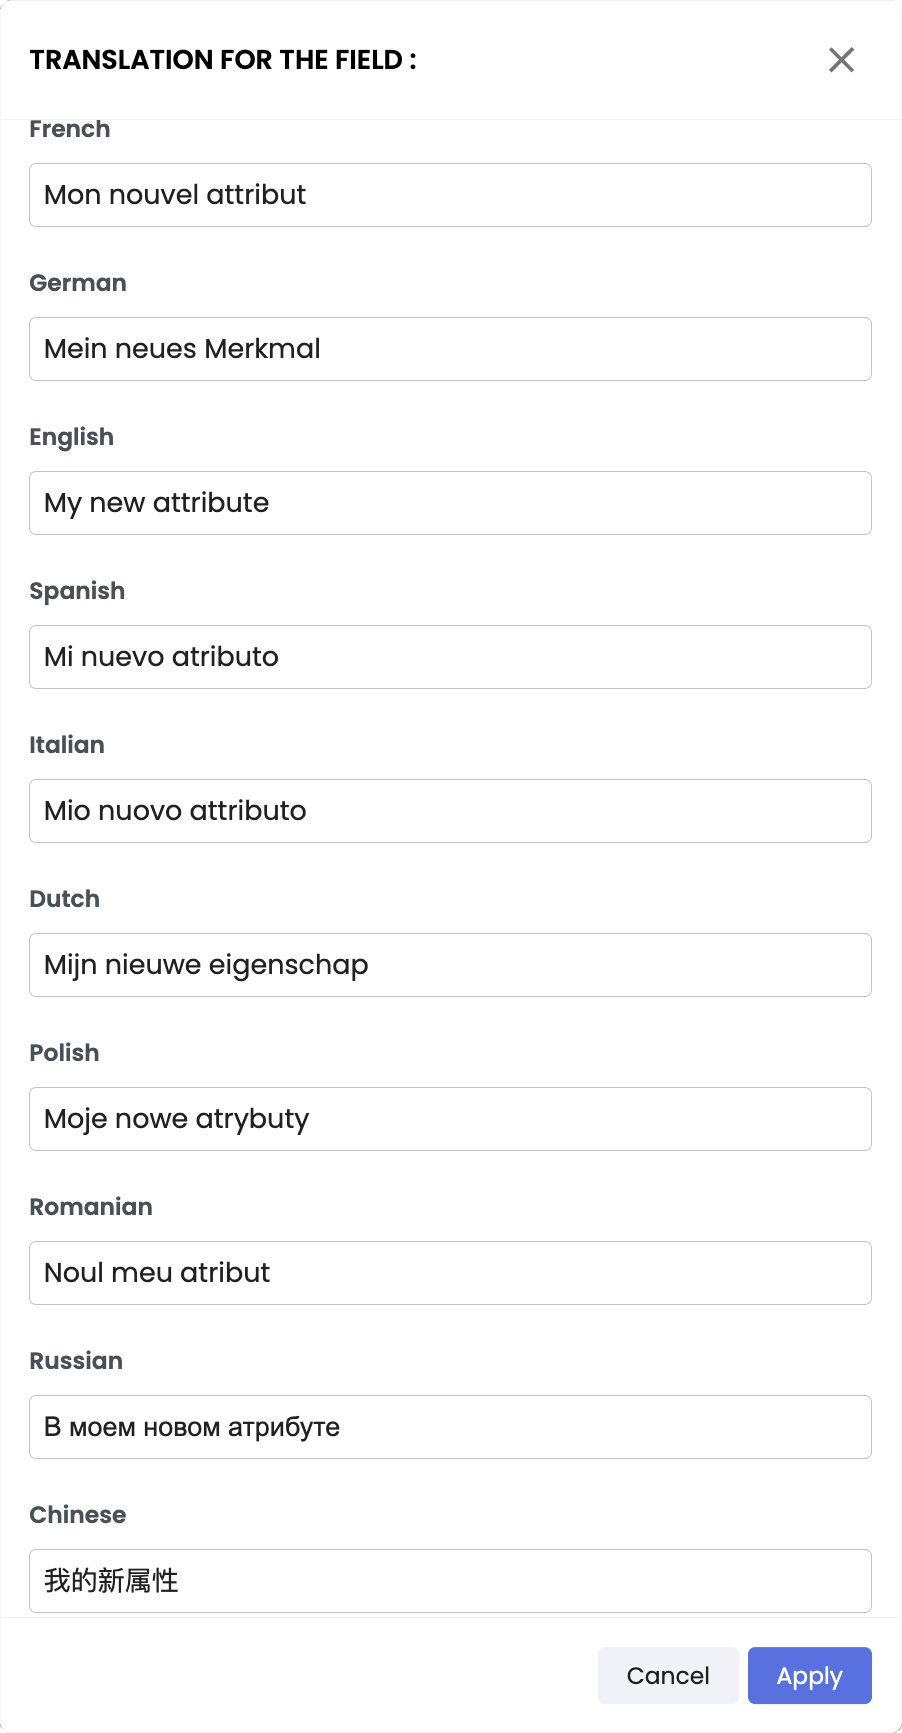
Once you have entered the attribute property translations, click the Apply button to save or the Cancel button to discard the creation.
Editing Attributes
You can modify the attributes of an object at any time. To modify an attribute:
- Select an object from the Object Type dropdown list.
- Then, in the left-hand management block, select the attribute you want to modify.
- In the right-hand block, modify the properties of the attribute.
To manually add a value to a single-choice or multiple-choice attribute:
- Select the attribute to be modified as previously indicated.
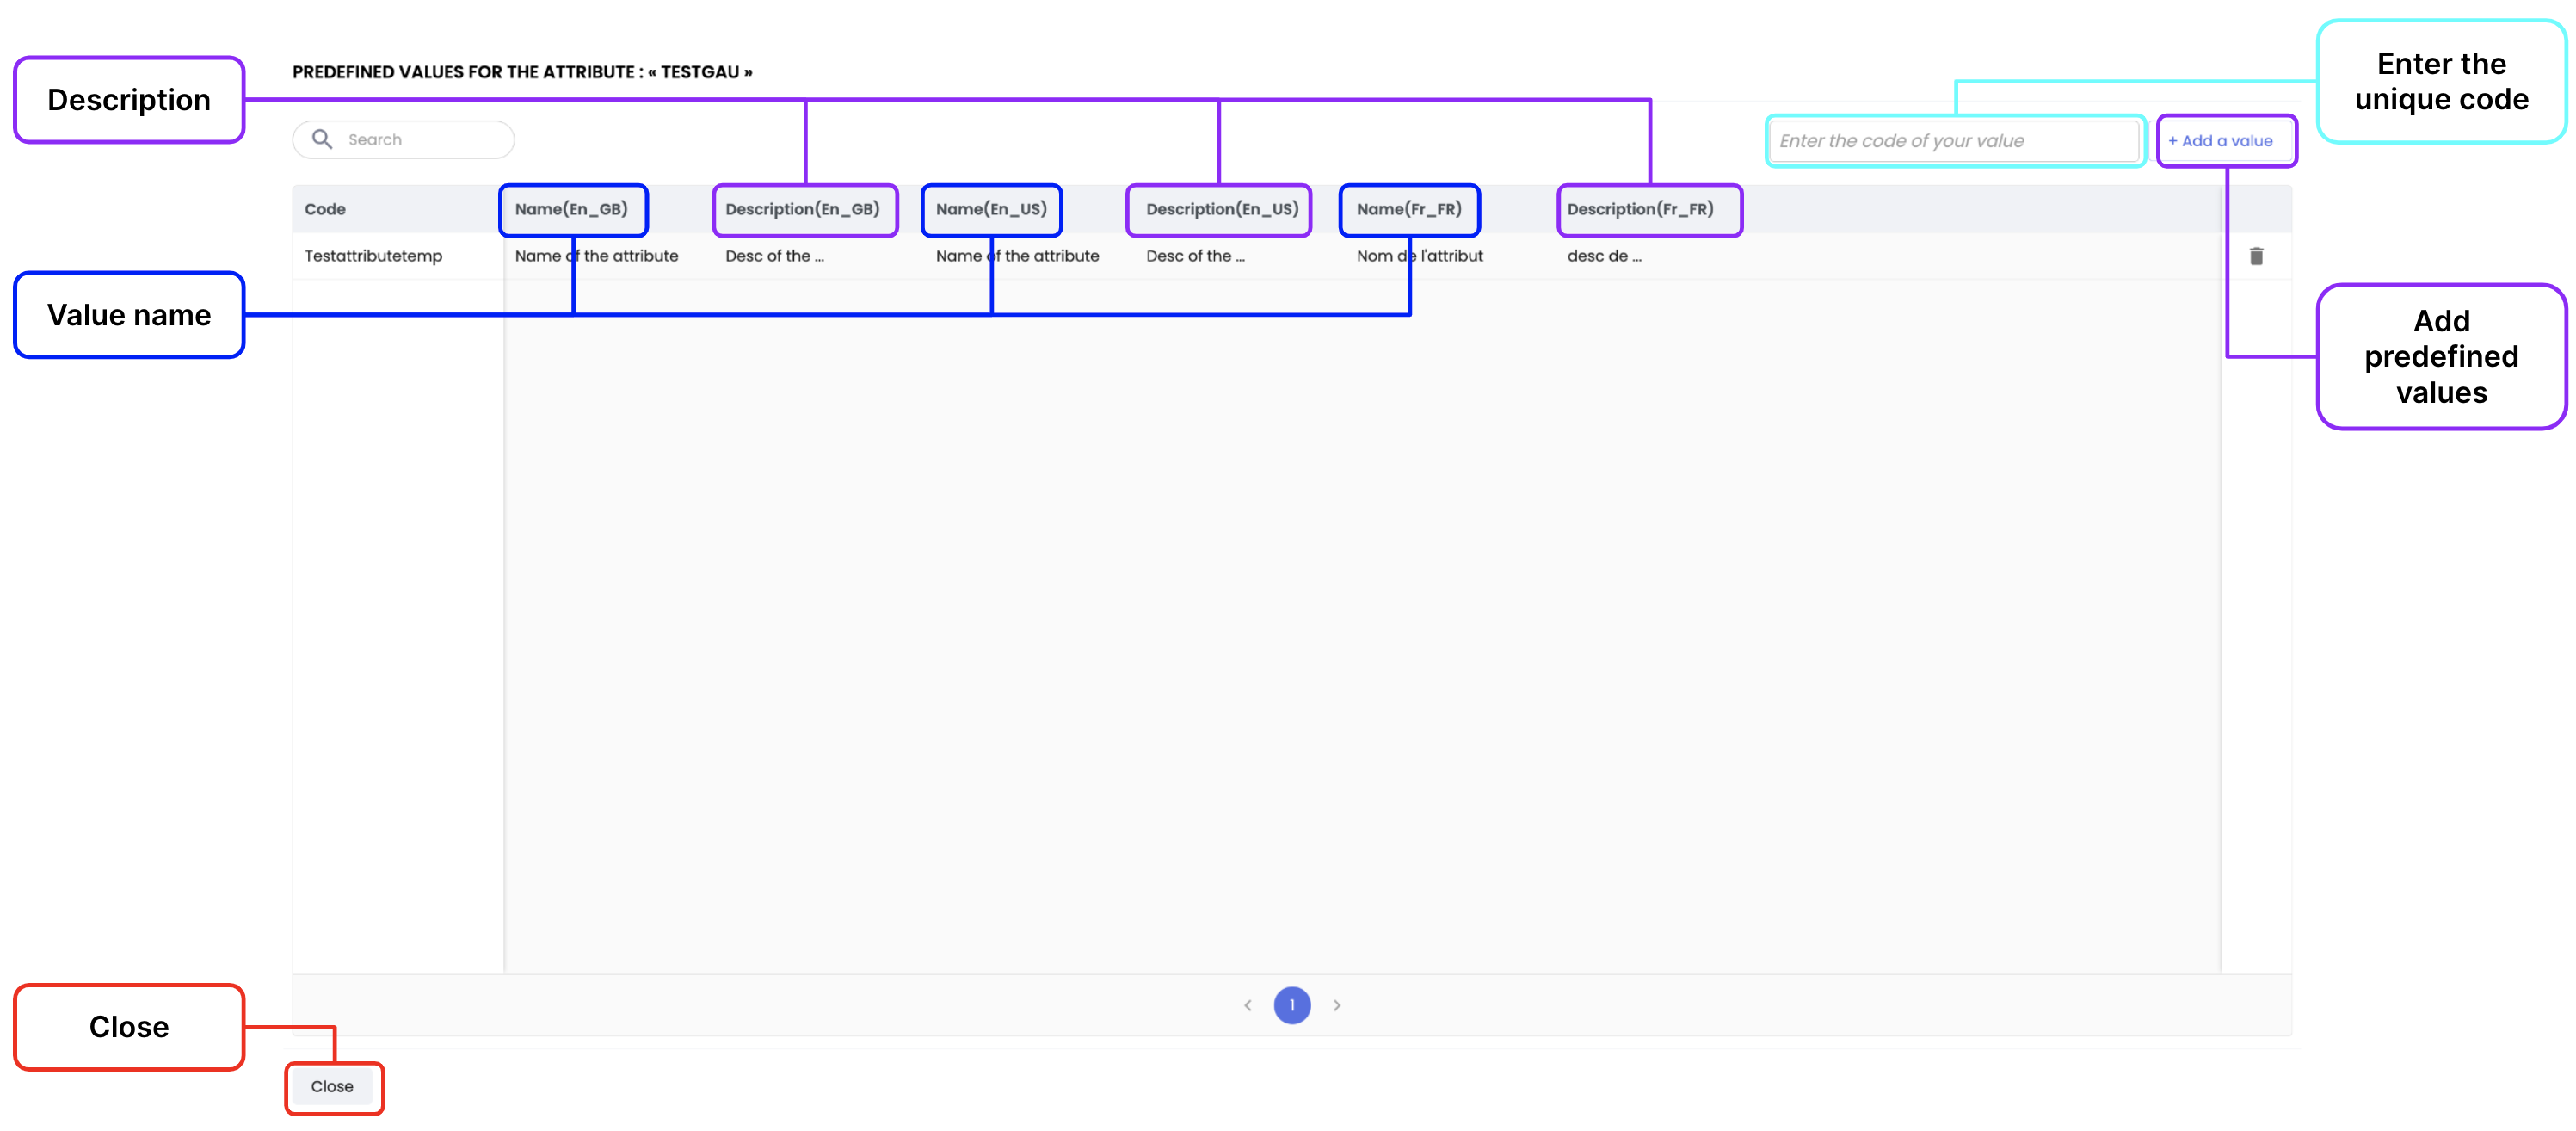
- In the Predefined Values section, click the Manage values for this attribute button, a pop-up will appear. Fill in the fields:
- Enter the unique code for the value (max. 150 car.),
- Click the + Add a value button,
- In the Name field, enter the label for the value that will be visible on the product sheet for each location of your data languages (max. 255 car.),
- In the Description field(s), you can provide a descriptive text (optional) only visible in the back office for each location of your data languages,
- Click Close, the changes will be automatically saved.
- Click on the Launch Indexing button above the attributes section, then click on Continue.
Find out our Quick Look tutorial:
- Quick Look - Manually add a value to a single select or multiple select attribute
- Quick Look - Translate a list of values associated with a single select or multiple select attribute
Moving Attributes
To change the position of an attribute in your data model, select the attribute, hold down the key, and move it to the desired location.
Find out the Quick Look tutorial video:
Deleting Attributes
To delete an attribute, select an object from the Object Type dropdown list.
- Choose the attribute to be deleted in the left-hand management block.
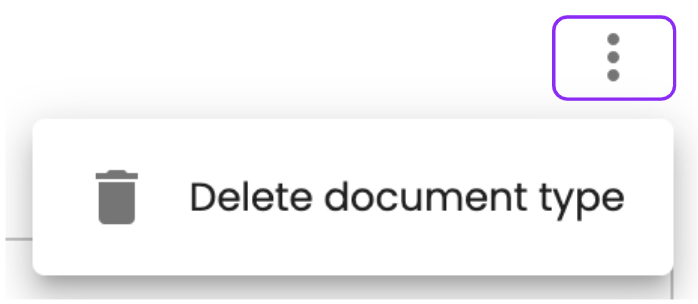
- Click on the three small vertically aligned dots at the top of the attributes section.
- Click on the Delete the Attribute button.
A dialog box will appear to confirm that you want to delete the attribute.

Enter the attribute code and click the Remove button to delete the attribute or click the Cancel button to abort the deletion.
Find out the Quick Look tutorial video:
Classification
To avoid confusion, it's important to understand the difference:
| Classification Object | Classification |
|---|---|
A template that specifies how to display the attributes that describe your classifications. No matter the number of classifications you may have for categorizing your product information, there is only one Classification object. | Classifications are the categories and subcategories used to organize your documents or assets. There are no standard rules for defining classifications for your documents. You are free to decide what works best for your content. Classifications can be defined from categories:
Note: While there is is no limit on the number of classifications you can have to organize your content, Quable PIM strongly recommends having a maximum of three levels of classifications. |
The information in this section describes how to manage the Classification object.
Classification Hierarchy
All classifications belong to a master classification list in Quable PIM.

Because classifications belong to a master classification object, any actions on this object must be performed at the third level (or lower) of the Classification hierarchy (the second level is an internal Quable PIM placeholder).
This does not impact the hierarchy of your product classifications, it only affects the display of classification information.
For example, to create this classification (shown from Advanced Search):
The hierarchy looks like:
Classifications are visible from:
- the Advanced Search page,
- theData menu when creating a new document, or
- the breadcrumbs at the top of documents.
The hierarchy levels for the Classification object type define how your classification information is displayed.

| Hierarchy Level | Description | |
|---|---|---|
| 1 | First level | This level defines the master classification. Its properties are not visible or editable. |
| 2 | Second level | This level defines the first tab when viewing a classification. Its properties are automatically generated by Quable PIM. They contain the Name of the hierarchy level and the Code (with additional information defining its position). To ensure proper functioning of Quable PIM, we strongly advise against modifying these properties. |
| 3 | Third level | This level defines the first section when viewing a classification from the Advanced Search or Data menus. All content for the first tab of a classification is within this level. Its properties are automatically generated by Quable PIM. They contain the Name of the hierarchy level and the Code (with additional information defining its position). |
| 4 | Fourth level | This level defines an attribute group in the first section when viewing a classification from the Advanced Search or Data menus. Its properties are automatically generated by Quable PIM. They contain the Name of the hierarchy level and the Code (with additional information defining its position). |
| 5 | Fifth level | This level contains all of the attributes of the attribute group. The Name and Description attributes are mandatory. The properties for each attribute in this level are displayed in the Right panel. |
Adding Levels
While there is only one Classification object, you can add, edit, and delete the levels (3rd, 4th, or 5th) to customize the display of your classification information. The following sections describe the steps to take.
Second Level - Tabs
By default, classifications are limited to two tabs: Editing and Assets. Any additions at the second hierarchy level are ignored.
Third Level - Sections
To add a new section (third hierarchy level), select Classification from the Object Type dropdown list.
Perform the following actions in order:
- Select the 2nd hierarchical level.
- Click on the Add Section button.
- Enter the property values for the new section:
- Enter a Name (here: My new section).
- Click in the Code field for automatically generated code. Note: This value cannot be modified after the creation of the new section.
- Click on:
- the Add button to save the new section or
- outside the input window to cancel the creation of the new section.
The new section will be displayed in the hierarchy (at the third level of the hierarchy).

The new section will not be visible until it contains at least one attribute group and one attribute with the Visible property enabled.
Fourth Level - Attribute Groups
To add a new attribute group (fourth hierarchy level), select Classification from the Object Type dropdown list.
Perform the following actions in the following order:
- Select the 3rd hierarchical level.
- Click on the Add a section button.
- Enter the property values for the new section:
- Enter a Name (here: My new attribute group).
- Click in Code for automatically generated code. Note: This value cannot be modified after the new section is created.
- Click on:
- the Add button to save the new section or
- outside the input window to abandon creating a new section.
The new section will be displayed in the hierarchy (at the fourth level of the hierarchy).

The new attribute group will not be visible until it contains at least one attribute with the Visible property enabled.
Fifth Level - Attributes
To add attributes to a section, select Classification from the Object Type dropdown list.
Perform the following actions in the following order:
- Select the 4th hierarchical level.
- Click on the Add an attribute button.
- Enter the property values for the new attribute:
- Enter a Name (here: My new attribute).
- Define all the attribute values in the New Attribute form.
- Click:
- on the Add button to save the new attribute, or
- outside the input window to abandon the creation of the attribute.
The new attribute will be displayed in the hierarchy (at the fifth level of the hierarchy).
AttentionDon't confuse classification object properties with attributes!
- Properties describe an object (the classification type)
- Attributes are the information displayed in classifications

Editing Levels
At any time, you can modify the properties that describe a hierarchy level (third level or lower).
To edit a hierarchy level, select Classification from the Object Type dropdown list.
Perform the following actions in the following order:
- Select a hierarchical level to modify (3rd, 4th, or 5th level).
- Modify the properties displayed on the right screen.
- Click the Modify button or
- outside of the right screen to discard the changes.
Deleting Levels
A hierarchy level can only be deleted if:
- no objects are associated with it (documents, variants, assets, links) and
- it has no sections/attribute groups/attributes.
The Remove button is disabled if a hierarchy level is associated with an object or is not empty.
To delete a hierarchy level (3rd, 4th, or 5th), select Classification from the Object Type dropdown list.
Perform the following actions in the following order:
- Select a hierarchical level to modify (3rd, 4th, or 5th level).
- Click on the three dots in the right screen.
- Click on Delete this group.
A dialog box will appear to confirm the deletion:

- Click on the Delete button or
- On the Cancel button or the X close button at the top right of the popup or outside the popup to cancel the deletion.
AttentionThis action is irreversible. Once a hierarchy level has been deleted, it can't be recovered.
Documents
To avoid confusion, it's important to understand the difference:
| Document Object | Document |
|---|---|
A template that specifies how to display the attributes in your documents. Document objects define the tabs, sections, attributes, and attribute groups displayed on your documents. You can specify different hierarchies and attributes to characterize each different type of document object. | Documents display all of the attributes that describe your products ... and more! They can describe a wide range of information such as:
The only limit is your imagination! |
The information in this section describes how to manage the Document object.
Document Hierarchy
Document object hierarchy defines the presentation of your Quable PIM content (product sheets, collections, etc.).
For example, to create this product document:

The hierarchy looks like:

Documents are visible from:
- the Advanced Search page and
- the Data menu.
The hierarchy levels for a Document object define how your information is displayed in tabs, sections, and groups within a document.

| Hierarchy Level | Description | |
|---|---|---|
| 1 | First level | This level defines the object type. In this example, a Product document. Its properties are the information entered on the New Document Type dialog when when creating a new document type. |
| 2 | Second level | This level defines the first tab when viewing a document from the Advanced Search or Data menus. All of the content (sections, groups, etc.) for a tab in a document descends from this level. Its properties are automatically generated by Quable PIM. They contain:
|
| 3 | Third level | This level defines the first section on the first tab when viewing a document from the Advanced Search or Data menus. Its properties are automatically generated by Quable PIM. They contain:
If you have two or more sections, they will be displayed in a gray panel on the left side of the document. |
| 4 | Fourth level | This level defines an attribute group for the first section in a document. Its properties are automatically generated by Quable PIM. They contain:
|
| 5 | Fifth level | This level contains all of the attributes of the attribute group. The properties for each attribute in this level are displayed in the Right panel. |
Adding Documents
To add a new document type, select Document from the Object Type dropdown list.
Perform the following actions in the following order:
- Click on the Add Document Type button in the top right corner.

A New Document Type dialog box will appear:

Set the following properties for the new document type:
| Information | Description |
|---|---|
| Label | Enter a descriptive name for the document type. |
| Code | You can either:
Note: This value cannot be changed after the new document type has been created. |
| Abbreviation | Enter a two-character alphanumeric value to identify the document. This is displayed in the document when the Minimal icon with abbreviation option is selected as the Model. |
| Description | Enter text to describe the purpose of the document type. |
| Uses Variants | Specify if documents of this type will use variants. |
Once you have entered the values for the document properties, click the Add button to save the new document type, or click the Cancel button (or the Xin the upper right corner) to abandon the creation of a new document type.
The new document type will be displayed in the Document Type dropdown menu in the top block.
AttentionDon't confuse document object properties with attributes!
- Properties describe an object (the document type)
- Attributes are the information displayed in documents

Adding Levels
The Document object is the most flexible object type. You can add, edit, and delete any of the hierarchy levels to customize the display of the information in your documents. The following sections describe the steps to take.
Second Level - Tabs
To add a new tab (second hierarchy level), select Document from the Object Type dropdown list.
Perform the following actions in order:
- Select the 1st hierarchical level.
- Click on the Add Tab button.
- Enter the property values for the new tab:
- Enter a Name (here: Prod. Tab 2).
- Click in the Code field for automatically generated code. Note: This value cannot be modified after creating the new section.
- Click on:
- the Add button to save the new tab or
- outside the right screen to cancel the addition.
The new tab will be displayed in the hierarchy (at the second level of the hierarchy).

The new tab will not be visible until it contains at least one section, one group of attributes, and one attribute with the Visible property enabled.
Third Level - Sections
To add a new section, select Document from the Object Type dropdown list.
Perform the following actions in the following order:
- Select the 2nd hierarchical level.
- Click on the Add a section button.
- Enter the property values for the new section:
- Enter a Name (here: Prod. Section 2).
- Click in the Code field for automatically generated code. Note: This value cannot be modified after creating the new section.
- Click on:
- the Add button to save the new section, or
- outside of the right screen to cancel the addition.
The new tab will be displayed in the hierarchy (at the third level of the hierarchy).

The new section will not be visible until it contains at least one attribute group and one attribute with the Visible property enabled.
Fourth Level - Attribute Groups
To add a group of attributes to a section, select Document from the Object Type dropdown list.
Perform the following actions in the following order:
- Select the 3rd hierarchical level.
- Click on the Add a section button.
- Enter the property values for the new section:
- Enter a Name (here: ERP).
- Click in the Code field for automatic code generation. Note: This value cannot be changed after creating the new section.
- Click on:
- the Add button to save the new section or
- outside the right screen to cancel the addition.
The new tab is displayed in the hierarchy (at the fourth level of the hierarchy).

The new attribute group will not be visible until it contains at least one attribute with the Visible property enabled.
Fifth Level - Attributes
To add attributes to an attribute group, select Document from the Object Type dropdown list.
Perform the following actions in order:
- Select the 4th hierarchical level.
- Click on the Add an attribute button:
- Enter a Name.
- Set all the attribute values in the New Attribute form.
- Click either:
- the Add button to save the new attribute section, or
- outside of the input window to abandon adding the attribute.
The new attribute will be displayed in the hierarchy (at the fifth level of the hierarchy).
AttentionDon't confuse document object properties with attributes!
- Properties describe an object (the document type)
- Attributes are the information displayed in documents

Editing Levels
At any time, you can modify the properties that describe a hierarchy level.
To edit a hierarchy level, select Document from the Object Type dropdown list.
Perform the actions in the following order:
- Select a hierarchical level to modify
- Edit the properties displayed on the right screen
- Click the Modify button or
- outside of the right screen to discard the changes.
Deleting Levels
A hierarchy level can only be deleted if:
- no objects are associated with it (documents, variants, assets, links) and
- it has no sections/attribute groups/attributes.
The Remove button is disabled if a classification level is associated with an object or is not empty.
To delete a hierarchy level, select Document from the Object Type dropdown list.
Perform the following actions in order:
- Select a hierarchical level to delete
- Click on the three ellipsis points in the right screen
- Click on Delete this group
A dialog box will appear to confirm the deletion:

- Click the Delete button or
- Click the Cancel button or the X in the top right corner of the popup or outside of the popup to cancel the deletion.
AttentionThis action is irreversible. Once a hierarchy level has been deleted, it can't be recovered.
Deleting Documents
To delete a document type, select Document from the Object Type dropdown list.
Perform the following actions in order:
- Select the document's top-level hierarchy.
- Click on the three dots in the right screen.
- Click on Delete Document Type.
A message will appear to confirm that you want to delete the document.

Click the Delete button to delete the document, or click the Cancel button to abort the deletion.
AttentionThis action is irreversible. Once a document type has been deleted, it can't be recovered.
Variants
To avoid confusion, it's important to understand the difference:
| Variant Object | Variants |
|---|---|
A template that specifies how to display the attributes in your variants. No matter the number of variants you may have for differentiating your product information, there is only one Variant object. | Variants, sometimes referred to as a Stock Keeping Units (SKU), display all of the attributes that describe different versions of a product such as color, size, etc. |
The information in this section describes how to manage the Variant object.
Variant Hierarchy
All variants belong to a master variant list in Quable PIM.

Because variants belong to a master variant object, any actions on this object must be performed at the third level (or lower) of the Variant hierarchy (the second level is an internal Quable PIM placeholder).
This does not impact the hierarchy of your product variations, it only affects the display of variant information.
For example, to create this variant (shown from a product document):

The hierarchy looks like:

Variants are visible from:
- the Advanced Search page,
- the Data menu, and
- related documents.
The hierarchy levels for the Variant object type define how your classification information is displayed.

| Hierarchy Level | Description | |
|---|---|---|
| 1 | First level | This level defines the master variant. Its properties are not visible or editable. |
| 2 | Second level | This level is an internal Quable PIM placeholder. Variant objects don't display tabs. Its properties are automatically generated by Quable PIM. They contain the Name of the hierarchy level and the Code (with additional information defining its position). To ensure proper functioning of Quable PIM, we strongly advise against modifying these properties. |
| 3 | Third level | This level is an internal Quable PIM placeholder. It contains the Its properties are automatically generated by Quable PIM. They contain the Name of the hierarchy level and the Code (with additional information defining its position). |
| 4 | Fourth level | This level defines an attribute group when viewing a variant from a document. Its properties are automatically generated by Quable PIM. They contain the Name of the hierarchy level and the Code (with additional information defining its position). |
| 5 | Fifth level | This level contains all of the attributes of the attribute group. The Name attribute is mandatory. The properties for each attribute in this level are displayed in the Right panel. |
Adding Levels
While there is only one Variant object, you can add, edit, and delete the levels (3rd, 4th, or 5th) to customize the display of your variant information. The following sections describe the steps to take.
Third Level - Sections
To add a section, select Variant from the Object Type dropdown list.
Perform the following actions in order:
- Select the 2nd hierarchical level.
- Click on the Add a Section button.
- Enter the property values for the new section:
- Enter a Name (here: My new section).
- Click in the Code field for automatic code generation. Note: This value cannot be changed after creating the new section.
- Click on:
- the Add button to save the new section or
- outside the input window to cancel adding the new section.
The new section will be displayed in the hierarchy (at the third level of the hierarchy).

The new section will not be visible until it contains at least one attribute group and one attribute with the Visible property enabled.
Fourth Level - Attribute Groups
To add a group of attributes to a section, select Variant from the Object Type dropdown list.
Perform the following actions in the following order:
- Select the 3rd hierarchical level.
- Click on the Add a section button
- Enter the property values for the new section:
- Enter a Name (here: My new attribute group).
- Click in the Code field for automatically generated code. Note: This value cannot be modified after the new section is created.
- Click on:
- the Add button to save the new section, or
- outside the input window to cancel adding the new section.
The new section will be displayed in the hierarchy (at the fourth level of the hierarchy).

The new attribute group will not be visible until it contains at least one attribute with the Visible property enabled.
Fifth Level - Attributes
To add attributes to an attribute group, select Variant from the Object Type dropdown list.
Perform the following actions in the following order:
- Select the 4th hierarchical level.
- Click on the Add an attribute button.
- Enter the property values for the new attribute:
- Enter a Name (here: My new attribute).
- Define all the attribute values in the New Attribute form.
- Click:
- on the Add button to save the new attribute, or
- outside the input window to abandon the attribute creation.
The new attribute will be displayed in the hierarchy (at the fifth level of the hierarchy).
AttentionDon't confuse variant object properties with attributes!
- Properties describe an object (the variant type)
- Attributes are the information displayed in documents

Editing Levels
At any time, you can modify the properties that describe a hierarchy level (fourth or fifth levels).
To edit a hierarchy level, select Variant from the Object Type dropdown list.
Perform the following actions in order:
- Select a hierarchical level to modify (3rd, 4th, ou 5th level).
- Modify the properties displayed on the right screen.
- Click on the Edit button or
- outside the right screen to abandon the modifications.
Deleting Levels
A hierarchy level can only be deleted if:
- no objects are associated with it (documents or links) and
- it has no sections/attributes.
The Remove button is disabled if a classification level is associated with an object or is not empty.
To delete a hierarchy level (3rd, 4th, or 5th), select Variant from the Object Type dropdown list.
Perform the following actions in the following order:
- Select a hierarchical level to modify (3rd, 4th, or 5th level).
- Click on the ellipsis (...) in the right screen.
- Click on Delete this group.
A dialog box will appear to confirm the deletion:

- Click on the Delete button, or
- Click on the Cancel button, or click on the X in the upper right corner of the popup, or outside the popup to cancel the deletion.
AttentionThis action is irreversible. Once a hiearchy level has been deleted, it can't be recovered.
Assets
To avoid confusion, it's important to understand the difference:
| Asset Object | Asset |
|---|---|
A template that specifies how to display the attributes that describe your assets. No matter the number of assets (digital asset files) you may have, there is only one Asset object. | Assets are the digital asset files (e.g., videos, images, audio clips) that enrich your product information. You can use any kind of asset to enrich your Quable PIM content. Maximum size: 400 MB. You can include attributes that are displayed to describe them. |
The information in this section describes how to manage the Asset object.
Asset Hierarchy
All assets belong to a master asset list in Quable PIM.

Because assets belong to a master asset object with default settings and attributes, any actions on this object must be performed at the third level (or lower) of the Asset hierarchy (the second level is an internal Quable PIM placeholder).
This does not impact the hierarchy of your assets, it only affects the display of asset information.
For example, to create this asset (shown from a document):

The hierarchy looks like:

Assets are visible from:
- the Advanced Search page,
- Data menu, and
- related documents.
The hierarchy levels for the Asset object type define how your asset information is displayed.

| Hierarchy Level | Description | |
|---|---|---|
| 1 | First level | This level defines the master asset. Its properties are not visible or editable. |
| 2 | Second level | This level is an internal Quable PIM placeholder. Asset objects don't display tabs. Its properties are automatically generated by Quable PIM. They contain the Name of the hierarchy level and the Code (with additional information defining its position). To ensure proper functioning of Quable PIM, we strongly advise against modifying these properties. |
| 3 | Third level | This level is an internal Quable PIM placeholder. This level defines the first section when viewing an asset. Its properties are automatically generated by Quable PIM. They contain the Name of the hierarchy level and the Code (with additional information defining its position). Note: The section name is not displayed when viewing an asset. |
| 4 | Fourth level | This level defines an attribute group for the first section in an asset. Its properties are automatically generated by Quable PIM. They contain the Name of the hierarchy level and the Code (with additional information defining its position). |
| 5 | Fifth level | This level contains all of the attributes of the attribute group. The properties for each attribute in this level are displayed in the Right panel. |
Adding Levels
While there is only one Asset object, you can add, edit, and delete the fourth and fifth levels to customize the display of your asset information. The following sections describe the steps to take.
Third Level - Sections
To add a new section, select Asset from the Object Type dropdown list.
Perform the following actions in the following order:
- Select the 2nd hierarchical level.
- Click on the Add a Section button.
- Enter the property values for the new section:
- Enter a Name (here: My new section).
- Click in the Code field for automatic code generation. Note: This value cannot be modified after creating the new section.
- Click on:
- the Add button to save the new section, or
- outside the input window to cancel the creation of the new section.
The new section will be displayed in the hierarchy (at the third level of the hierarchy).

The new section will not be visible until it contains at least one attribute group and one attribute with the Visible property enabled.
Fourth Level - Attribute Groups
To add a group of attributes to a section, select Asset from the Object Type dropdown list.
Perform the following actions in the following order:
- Select the 3rd hierarchical level.
- Click on the Add a Section button.
- Enter the property values for the new section:
- Enter a Name (here: My new attribute group).
- Click in the Code field for automatically generated code. Note: This value cannot be changed after creating the new section.
- Click on:
- the Add button to save the new section or
- outside the right screen to cancel the addition.
The new tab is displayed in the hierarchy (at the fourth level of the hierarchy).

The new attribute group will not be visible until it contains at least one attribute with the Visible property enabled.
Fifth Level - Attributes
To add attributes to an attribute group, select Asset from the Object Type dropdown list.
Perform the following actions in the following order:
- Select the 4th hierarchical level.
- Click on the Add an attribute button.
- Enter the property values for the new attribute:
- Enter a Name (here: My new attribute).
- Set all the attribute values in the New Attribute form.
- Click:
- on the Add button to save the new attribute or
- outside the input window to cancel the creation of the attribute.
The new attribute will be displayed in the hierarchy (at the fifth level of the hierarchy).

AttentionDon't confuse asset object properties with attributes!
- Properties describe an object (the asset type)
- Attributes are the information displayed in asset
Editing Levels
At any time, you can modify the properties that describe a hierarchy level (3rd, 4th, or 5th).
To edit an asset type, select Asset from the Object Type dropdown list.
Perform the following actions in the following order:
- Select a hierarchical level to modify (3rd, 4th, or 5th level)
- Modify the properties displayed on the right screen
- Click the Modify button or
- outside the right screen to discard the changes
Deleting levels
A hierarchy level can only be deleted if:
- no objects are associated with it (documents, variants, assets, links) and
- it has no sections/attribute groups/attributes.
The Remove button is disabled if a hierarchy level is associated with an object or is not empty.
To delete a hierarchy level (3rd, 4th, or 5th), select Asset from the Object Type dropdown list.
Perform the following actions in the following order:
- Select a hierarchical level to modify (3rd, 4th, or 5th level).
- Click on the three dots in the right screen.
- Click on Delete this group.
A dialog box will appear to confirm the deletion:

- Click on the Delete button or
- Click on the Cancel button or on the X in the top right corner of the popup or outside the popup to cancel the deletion.
AttentionThis action is irreversible. Once a hierarchy level has been deleted, it can't be recovered.
Links
To avoid confusion, it's important to understand the difference:
| Link Object | Link |
|---|---|
A template that specifies characteristics for links. You can specify different properties for each different type of link object. For links between documents, you can also specify attributes. | Links are relationships between object types, such as related variants, related assets, cross-selling, collections, etc. |
AttentionA link must be created on the Link Types page before you can manage the link object.
Link Hierarchy
Link object hierarchy defines the structure for links between your different Quable PIM objects.
For example, to create these related documents:

The link hierarchy looks like:

The hierarchy levels for a Link object define the structure of a relationship between objects.

| Hierarchy Level | Description | |
|---|---|---|
| 1 | First level | This level defines the link object. Its properties are automatically generated by Quable PIM. They contain:
|
| 2 | Second level | This level provides Quable PIM the first piece of technical information about the link between the objects. Its properties are automatically generated by Quable PIM. They contain:
|
| 3 | Third level | This level provides Quable PIM the second piece of technical information about the link between objects. Its properties are automatically generated by Quable PIM. They contain:
|
| 4 | Fourth level | This level provides Quable PIM the third piece of technical information about the link between objects. Its properties are automatically generated by Quable PIM. They contain:
|
| 5 | (optionally) Fifth level | This level contains all of the attributes of the link. The properties for each attribute in this level are displayed in the Right panel. Note: This is available only for links between document objects. |
Managing Attributes
While Link objects have several hierarchy levels, Quable PIM recommends that you only add, edit, or delete attributes (fifth hierarchy level). The following section describes the steps to take.
Add Attributes
To add attributes to a link, select Link from the Object Type dropdown list.
Perform the following actions in the following order:
- Select the 4th hierarchical level.
- Click on the Add an attribute button.
- Enter the property values for the new attribute:
- Enter a Name (here: My new attribute).
- Set all the attribute values in the New Attribute form.
- Click:
- on the Add button to save the new attribute or
- outside the input window to abandon the creation of the attribute.
The new attribute will be displayed in the hierarchy (at the fifth level of the hierarchy).

AttentionDon't confuse link type properties with attributes!
- Properties describe an object (the link type)
- Attributes describe information for your object relationships
Edit Attributes
To edit a link attribute, select Link from the Object Type dropdown list.
- Select the attribute to modify in the hierarchy.
- In the right-hand block, modify the properties of the attribute.
- Click:
- on the Modify button to save the new attribute, or
- outside the input window to cancel the creation of the attribute.
Delete Attributes
To delete a linking attribute, select Link from the Object Type dropdown list.
Perform the following actions in the following order:
- Select the attribute to delete in the hierarchy.
- Click on the 3 vertically aligned dots at the top of the attribute block.
- Click the Delete Attribute button.
- A dialog box will appear to confirm if you want to delete the attribute.
- Enter the attribute code and click the Delete button to delete the attribute or click the Cancel button to cancel the deletion.
Indexing
Indexation ensures that your Quable PIM product information is up to date. Any time you add, delete, or modify an object or attribute a message is displayed in red next to the Indexation button to remind you that an index is needed.
AttentionNo other actions can be performed while an index is ongoing. If you have multiple actions to perform on the Object and Attributes page, it's best to complete them all before indexing.
To start an index, click on the Launch indexation button at the top of the Right Panel

The following dialog box will appear:

Click on the Continue button to index your Quable PIM content or on the Cancel button to abandon the indexing.
Updated 6 months ago